How to Install and Configure Zabbix on RHEL/CentOS 7
To Configure and Install Zabbix on RHEL/CentOS 7
Zabbix is an open source monitoring tool to monitor the servers and network components that are connected to a network. It allows to check the services like SMTP, IMAP, HTTP & FTP. Installation and configuration of Zabbix is explained.
Features
- Web based administration interface.
- Monitor CPU utilization.
- Agentless monitoring.
- Monitor network device using snmp agents.
- Hardware monitoring.
- Monitor Vmware hypervisor and virtual machines.
Enable epel and the necessary repos as shown below.
[root@linuxhelp ~]# yum install epel-release -y
Loaded plugins: fastestmirror, langpacks
Loading mirror speeds from cached hostfile
 * base: centos.mirror.net.in
 * extras: centos.mirror.net.in
 * updates: centos.mirror.net.in
Resolving Dependencies
-->  Running transaction check
--->  Package epel-release.noarch 0:7-6 will be installed
-->  Finished Dependency Resolution
.
.
.
Transaction test succeeded
Running transaction
  Installing : epel-release-7-6.noarch                                                                                                  1/1
  Verifying  : epel-release-7-6.noarch                                                                                                  1/1

Installed:
  epel-release.noarch 0:7-6

Complete!
[root@linuxhelp ~]# rpm -ivh http://repo.zabbix.com/zabbix/3.0/rhel/7/x86_64/zabbix-release-3.0-1.el7.noarch.rpm
Retrieving http://repo.zabbix.com/zabbix/3.0/rhel/7/x86_64/zabbix-release-3.0-1.el7.noarch.rpm
warning: /var/tmp/rpm-tmp.Y8r8ia: Header V4 DSA/SHA1 Signature, key ID 79ea5ed4: NOKEY
Preparing...                          ################################# [100%]
Updating / installing...
   1:zabbix-release-3.0-1.el7         ################################# [100%]
Then setup Mariadb and Apache web server.
[root@linuxhelp ~]# yum install mariadb-server httpd -y
Loaded plugins: fastestmirror, langpacks
Loading mirror speeds from cached hostfile
 * base: centos.webwerks.com
 * epel: epel.mirror.net.in
 * extras: centos.mirror.net.in
 * updates: centos.mirror.net.in
zabbix                                                                                                                                53/53
zabbix-non-supported                                                                                                                    4/4
Resolving Dependencies
-->  Running transaction check
--->  Package httpd.x86_64 0:2.4.6-40.el7.centos.1 will be installed
-->  Processing Dependency: httpd-tools = 2.4.6-40.el7.centos.1 for package: httpd-2.4.6-40.el7.centos.1.x86_64
.
.
.
IO-Compress.noarch 0:2.061-2.el7     perl-Net-Daemon.noarch 0:0.48-5.el7
  perl-PlRPC.noarch 0:0.2020-14.el7

Dependency Updated:
  mariadb-libs.x86_64 1:5.5.47-1.el7_2

Complete!
Utilize the following command to install Zabbix server.
[root@linuxhelp ~]# yum install zabbix-server-mysql zabbix-web-mysql mysql php -y
Loaded plugins: fastestmirror, langpacks
Loading mirror speeds from cached hostfile
 * base: centos.mirror.net.in
 * epel: epel.mirror.net.in
 * extras: centos.mirror.net.in
 * updates: centos.mirror.net.in
Package 1:mariadb-5.5.47-1.el7_2.x86_64 already installed and latest version
Resolving Dependencies
-->  Running transaction check
--->  Package php.x86_64 0:5.4.16-36.1.el7_2.1 will be installed
.
.
.
mysql.x86_64 0:5.4.16-36.1.el7_2.1
  php-pdo.x86_64 0:5.4.16-36.1.el7_2.1        php-xml.x86_64 0:5.4.16-36.1.el7_2.1            t1lib.x86_64 0:5.1.2-14.el7
  unixODBC.x86_64 0:2.3.1-11.el7              zabbix-web.noarch 0:3.0.3-1.el7

Complete!
After installing the packages, start and enable the Mariadb services using the following command.
[root@linuxhelp ~]# systemctl start mariadb
[root@linuxhelp ~]# systemctl enable mariadb
ln -s ' /usr/lib/systemd/system/mariadb.service'  ' /etc/systemd/system/multi-user.target.wants/mariadb.service'
Setup root password for Mariadb.
[root@linuxhelp ~]# mysql_secure_installation
/usr/bin/mysql_secure_installation: line 379: find_mysql_client: command not found

NOTE: RUNNING ALL PARTS OF THIS SCRIPT IS RECOMMENDED FOR ALL MariaDB
      SERVERS IN PRODUCTION USE!  PLEASE READ EACH STEP CAREFULLY!

In order to log into MariaDB to secure it, we' ll need the current
password for the root user.  If you' ve just installed MariaDB, and
you haven' t set the root password yet, the password will be blank,
so you should just press enter here.

Enter current password for root (enter for none):
OK, successfully used password, moving on...

Setting the root password ensures that nobody can log into the MariaDB
root user without the proper authorisation.

Set root password? [Y/n] y
New password:
Re-enter new password:
Password updated successfully!
Reloading privilege tables..
 ... Success!

By default, a MariaDB installation has an anonymous user, allowing anyone
to log into MariaDB without having to have a user account created for
them.  This is intended only for testing, and to make the installation
go a bit smoother.  You should remove them before moving into a
production environment.

Remove anonymous users? [Y/n] y
 ... Success!

Normally, root should only be allowed to connect from ' localhost' .  This
ensures that someone cannot guess at the root password from the network.

Disallow root login remotely? [Y/n] y
 ... Success!

By default, MariaDB comes with a database named ' test'  that anyone can
access.  This is also intended only for testing, and should be removed
before moving into a production environment.

Remove test database and access to it? [Y/n] y
 - Dropping test database...
 ... Success!
 - Removing privileges on test database...
 ... Success!

Reloading the privilege tables will ensure that all changes made so far
will take effect immediately.

Reload privilege tables now? [Y/n] y
 ... Success!

Cleaning up...

All done!  If you' ve completed all of the above steps, your MariaDB
installation should now be secure.

Thanks for using MariaDB!
Login to mariadb and run the following commands to create database.
[root@linuxhelp ~]# mysql -u root -p
Enter password:
Welcome to the MariaDB monitor.  Commands end with   or g.
Your MariaDB connection id is 10
Server version: 5.5.47-MariaDB MariaDB Server

Copyright (c) 2000, 2015, Oracle, MariaDB Corporation Ab and others.

Type ' help '  or ' h'  for help. Type ' c'  to clear the current input statement.

MariaDB [(none)]>  create database zabbix
Query OK, 1 row affected (0.00 sec)

MariaDB [(none)]>  grant all privileges on zabbix.* to zabbix@localhost identified by ' linux'
Query OK, 0 rows affected (0.00 sec)

MariaDB [(none)]>  flush privileges
Query OK, 0 rows affected (0.00 sec)

MariaDB [(none)]>  exit
Bye
Move the following directory to import the database schema.
[root@linuxhelp ~]# cd /usr/share/doc/zabbix-server-mysql-3.0.3/
[root@linuxhelp zabbix-server-mysql-3.0.3]# ls
AUTHORS  ChangeLog  COPYING  create.sql.gz  NEWS  README
Run the following command to extract “ create.sql.gz” file.
[root@linuxhelp zabbix-server-mysql-3.0.3]# gunzip create.sql.gz
[root@linuxhelp zabbix-server-mysql-3.0.3]# ls
AUTHORS  ChangeLog  COPYING  create.sql  NEWS  README
Now import create.sql file into the Mariadb database.
[root@linuxhelp zabbix-server-mysql-3.0.3]# mysql -u root -p zabbix <  create.sql
Enter password:
Edit the zabbix configuration file to specify the database name and user.
[root@linuxhelp ~]# vim /etc/zabbix/zabbix_server.conf
DBHost=localhost
DBName=zabbix
DBUser=zabbix
DBPassword=linux
Configure the php setting by editing the php.ini file as follows.
[root@linuxhelp ~]# vim /etc/php.ini
Add the following entry as per your system requirement.
max_execution_time = 1200
max_input_time = 1200
memory_limit = 512M
post_max_size = 64M
upload_max_filesize = 32M
date.timezone = Asia/Kolkata
Allow some ports in the firewall as follows.
[root@linuxhelp ~]# firewall-cmd --permanent --add-port=10050/tcp
success
[root@linuxhelp ~]# firewall-cmd --permanent --add-port=10051/tcp
success
[root@linuxhelp ~]# firewall-cmd --permanent --add-port=80/tcp
success
[root@linuxhelp ~]# firewall-cmd --reload
success
Run the following command to set selinux rule.
[root@linuxhelp ~]# setsebool -P httpd_can_connect_zabbix=1
Now start and enable the Zabbix and httpd services.
[root@linuxhelp ~]# systemctl start zabbix-server
[root@linuxhelp ~]# systemctl enable zabbix-server
ln -s ' /usr/lib/systemd/system/zabbix-server.service'  ' /etc/systemd/system/multi-user.target.wants/zabbix-server.service'
[root@linuxhelp ~]# systemctl start httpd
[root@linuxhelp ~]# systemctl enable httpd
ln -s ' /usr/lib/systemd/system/httpd.service'  ' /etc/systemd/system/multi-user.target.wants/httpd.service'
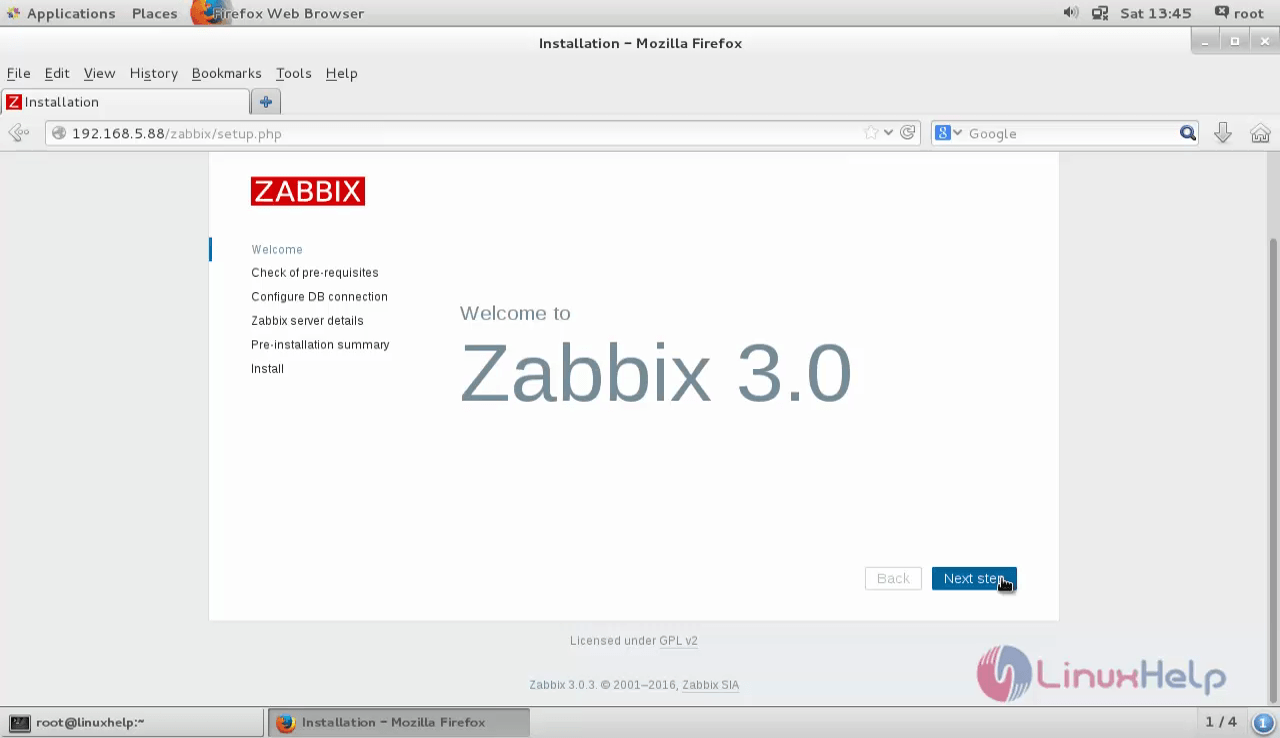
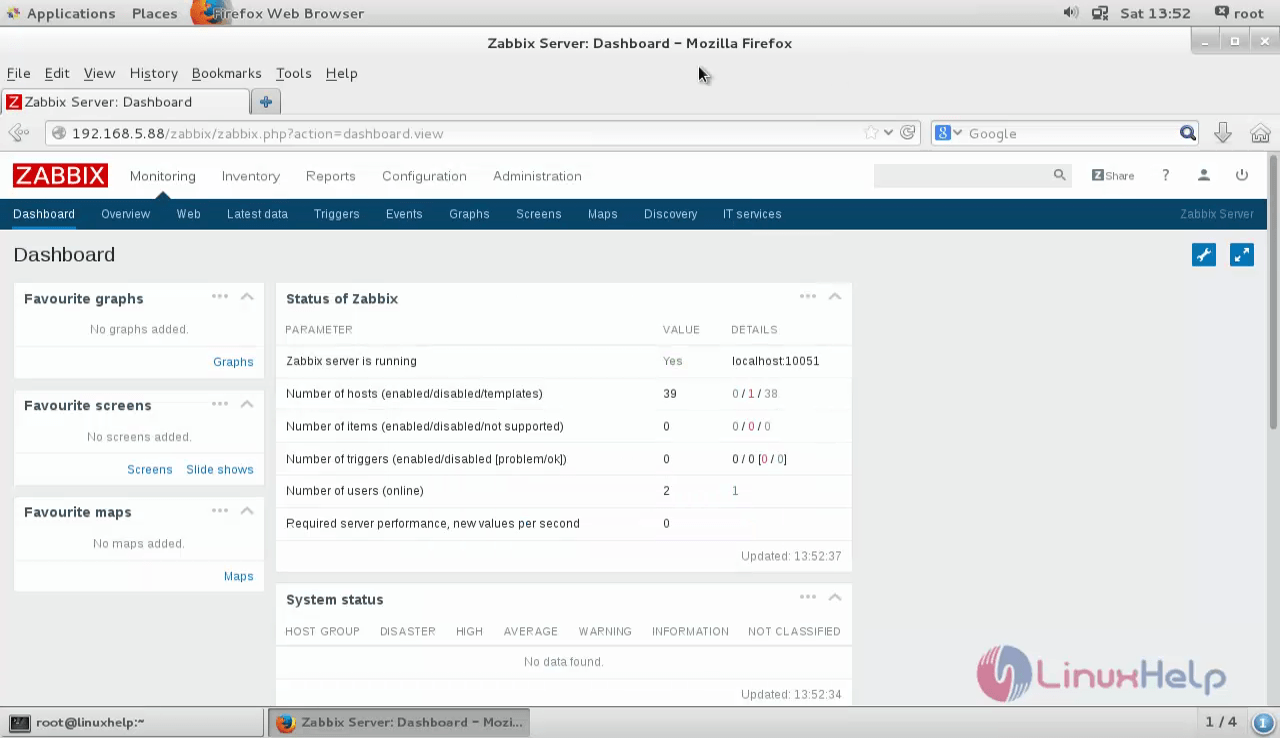
Open your browser and type http://localhost/zabbix or http://< IP_address> /zabbix
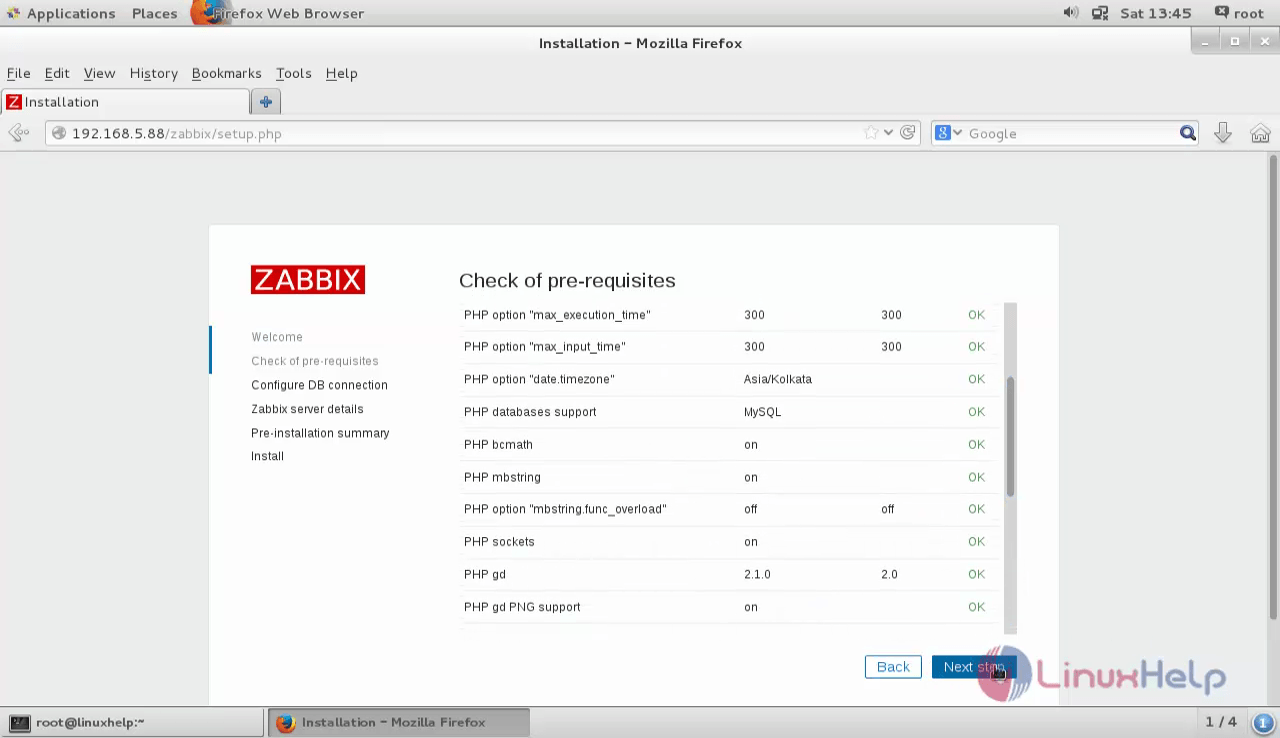
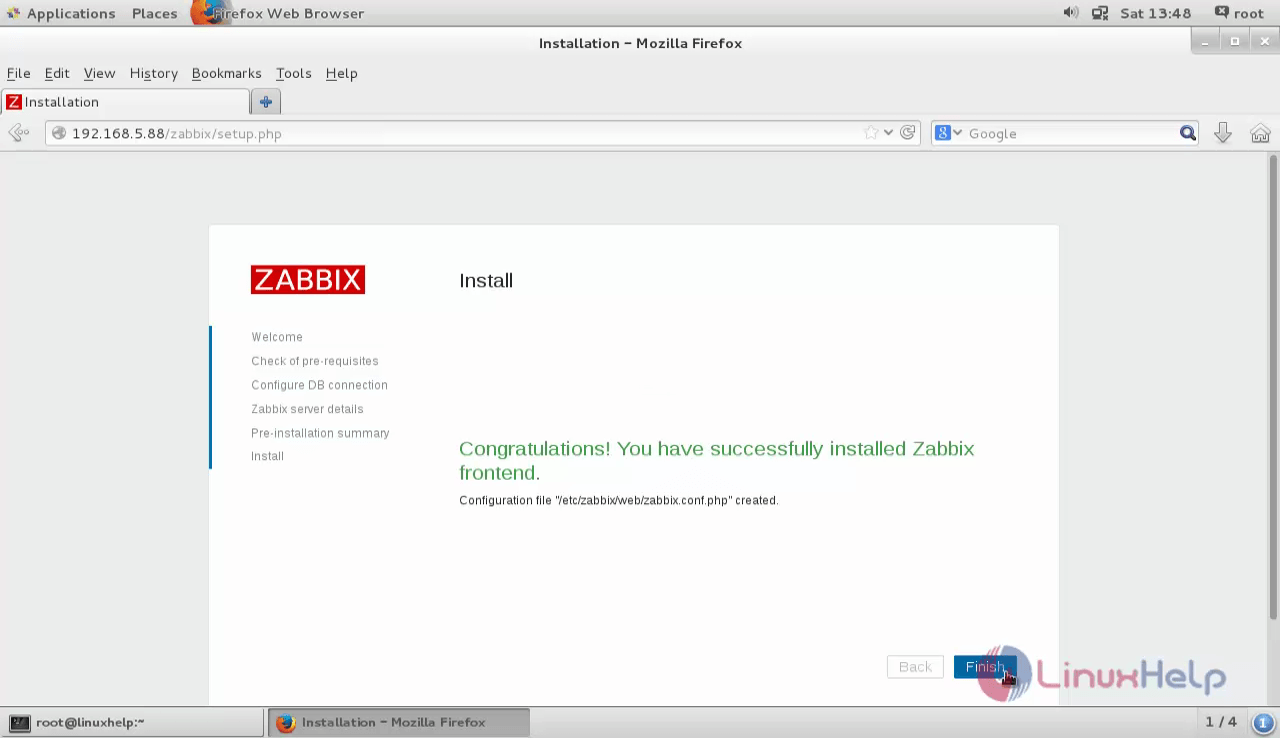
The welcome screen appears as follows. Click “ Next Step” to continue.
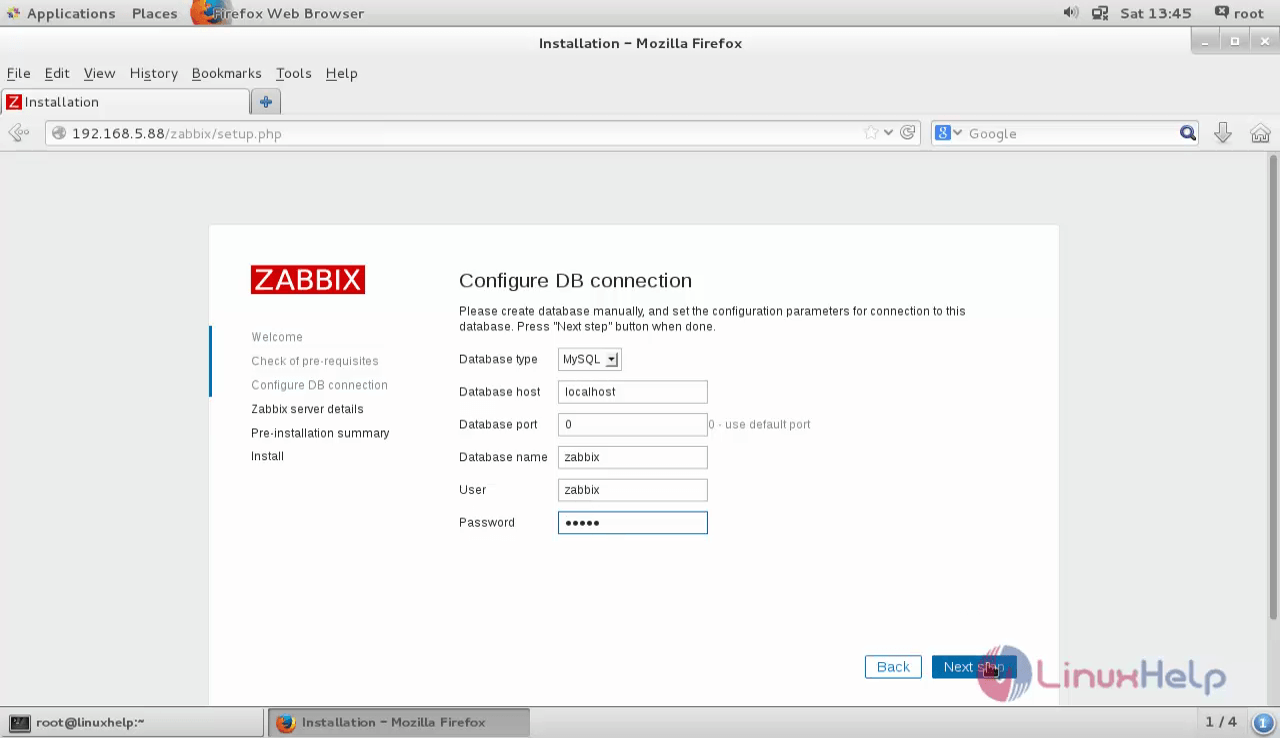
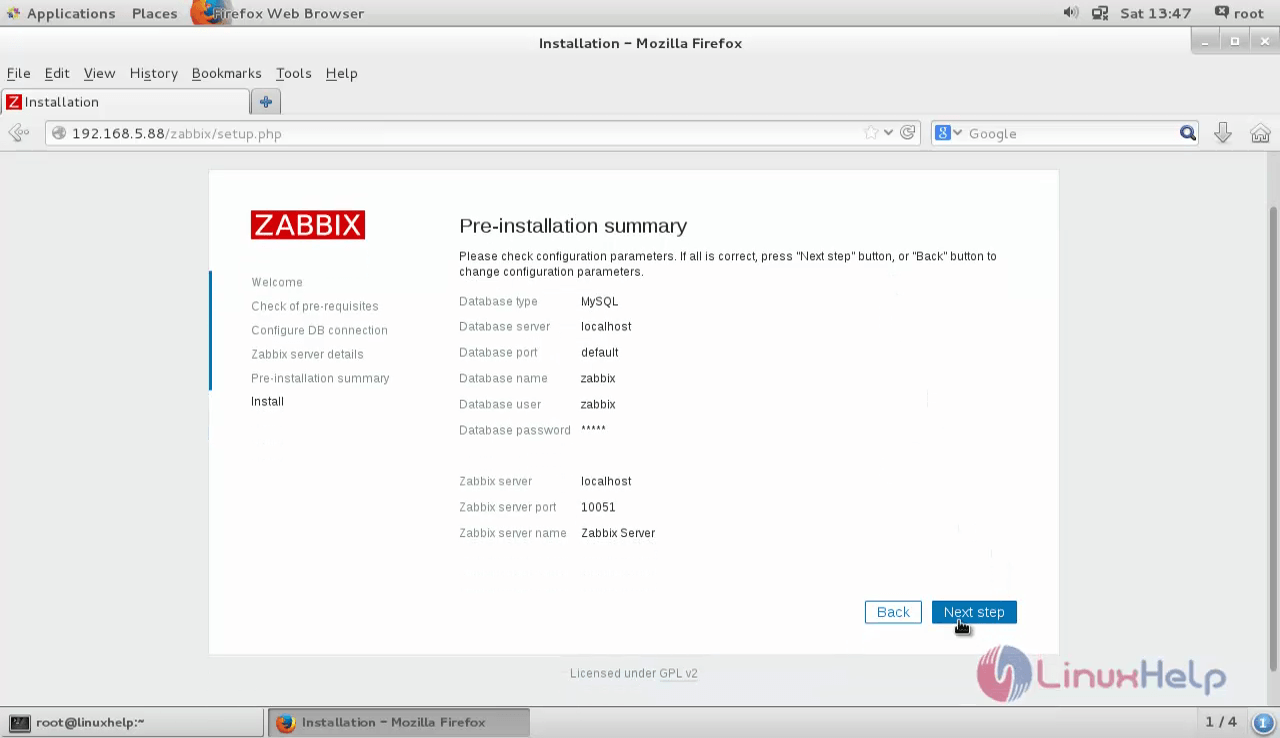
Configure MariaDB Connection with database and click " NextStep" .
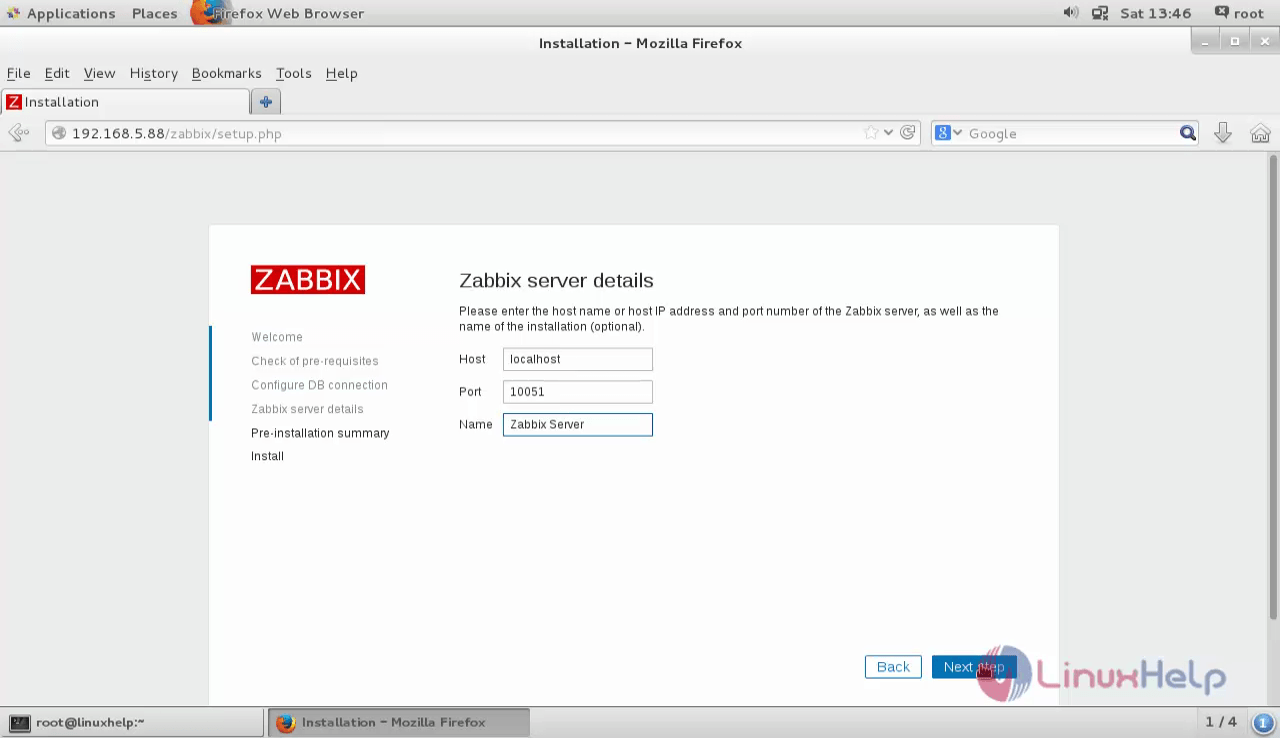
Enter the details for zabbix server.
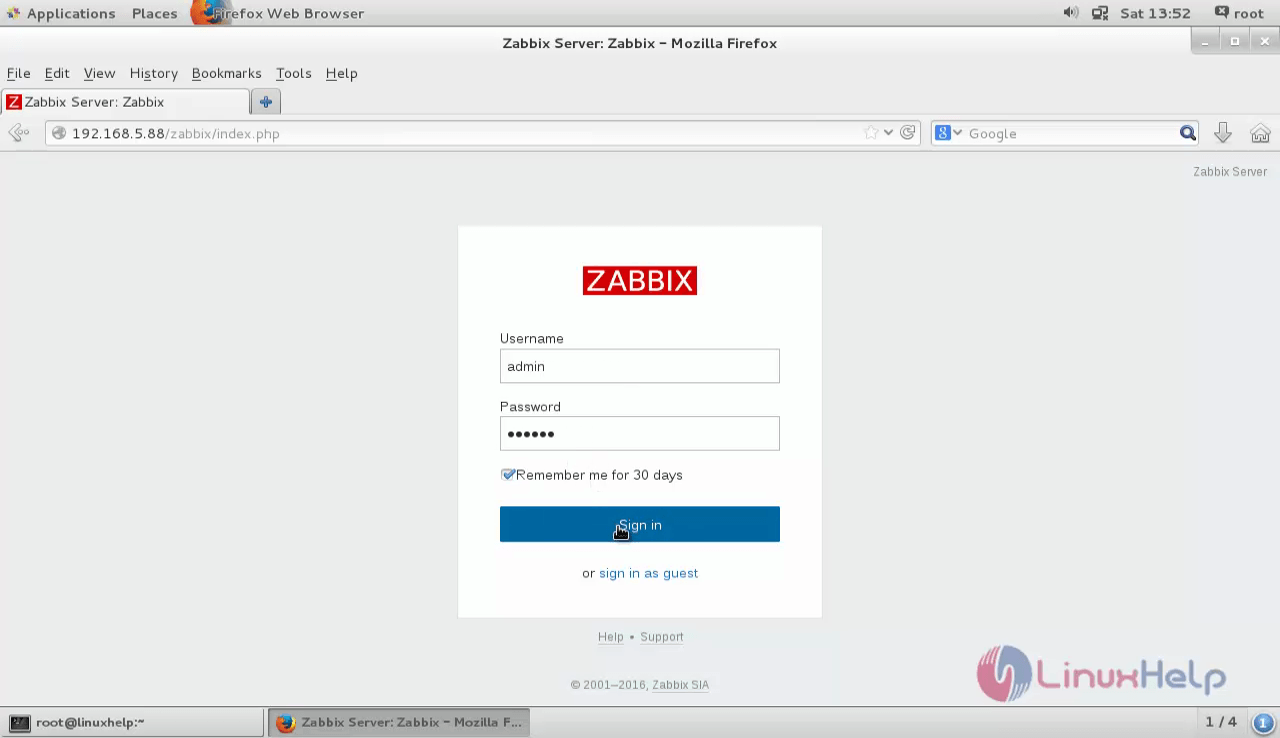
Login using the default credentials
Username=admin Password=zabbix
Comments ( 3 )