How to setup cache only DNS server using Bind in CentOS 7
Using Bind for Setting Up Caching-Only DNS Server in CentOS 7
There are many types of DNS servers like master, slave, forwarding and cache, among them Caching-Only DNS is one, that is easier to setup. DNS employs UDP protocol that will reduce the query time since UDP protocol does not have an acknowledgement. The caching-only DNS server is also called as a resolver, it queries DNS records and collects all DNS information from other servers and stores each query request in its cache.
My Testing Environment
IP Address : 192.168.5.221
Host-name : dns.linuxhelp.com
OS : Centos 7
Ports Used : 53
Config File : /etc/named.conf
Installation of Caching-Only DNS
The Caching-Only DNS, can be installed with the package bind. We use the following command to search for the package name.
[root@dns Desktop]# yum search bind*
Loaded plugins: fastestmirror, langpacks
Loading mirror speeds from cached hostfile
 * base: centos.excellmedia.net
 * extras: centos.excellmedia.net
 * updates: centos.excellmedia.net
=================================== N/S matched: bind ===================================
PackageKit-device-rebind.x86_64 : Device rebind functionality for PackageKit
bind.x86_64 : The Berkeley Internet Name Domain (BIND) DNS (Domain Name System) server
bind-chroot.x86_64 : A chroot runtime environment for the ISC BIND DNS server, named(8)
.
.
.
telepathy-glib.x86_64 : GLib bindings for Telepathy
telepathy-glib.i686 : GLib bindings for Telepathy
telepathy-glib-vala.x86_64 : Vala bindings for telepathy-glib
texlive-fontwrap.noarch : Bind fonts to specific unicode blocks
vala-tools.x86_64 : Tools for creating projects and bindings for vala
  Name and summary matches only, use " search all"  for everything.
We need to choose the bind and bind-utils packages, from the above displayed list of packages by using yum command.
[root@dns Desktop]# yum install bind*
Loaded plugins: fastestmirror, langpacks
Loading mirror speeds from cached hostfile
 * base: centos.excellmedia.net
 * extras: centos.excellmedia.net
 * updates: centos.excellmedia.net
Package 32:bind-devel-9.9.4-29.el7_2.3.x86_64 already installed and latest version
Package 32:bind-libs-9.9.4-29.el7_2.3.x86_64 already installed and latest version
Package 32:bind-license-9.9.4-29.el7_2.3.noarch already installed and latest version
Package 32:bind-pkcs11-libs-9.9.4-29.el7_2.3.x86_64 already installed and latest version
.
.
.
  Verifying  : 32:bind-sdb-9.9.4-29.el7_2.3.x86_64                                   1/6
  Verifying  : bind-dyndb-ldap-8.0-1.el7.x86_64                                      2/6
  Verifying  : 32:bind-chroot-9.9.4-29.el7_2.3.x86_64                                3/6
  Verifying  : 32:bind-sdb-chroot-9.9.4-29.el7_2.3.x86_64                            4/6
  Verifying  : 32:bind-9.9.4-29.el7_2.3.x86_64                                       5/6
  Verifying  : 32:bind-pkcs11-9.9.4-29.el7_2.3.x86_64                                6/6

Installed:
  bind.x86_64 32:9.9.4-29.el7_2.3         bind-chroot.x86_64 32:9.9.4-29.el7_2.3
  bind-dyndb-ldap.x86_64 0:8.0-1.el7      bind-pkcs11.x86_64 32:9.9.4-29.el7_2.3
  bind-sdb.x86_64 32:9.9.4-29.el7_2.3     bind-sdb-chroot.x86_64 32:9.9.4-29.el7_2.3

Complete!
Configuring Caching-Only DNS
After the DNS packages are installed we need to configure DNS to do that open and edit named.conf file using the vim editor.
[root@dns Desktop]# vi /etc/named.conf
Following are the mandatory changes, that we need to perform for a caching-only DNS server. By default the localhost will be available and we need to add any to accept the query from any range of network.
listen-on port 53 { 127.0.0.1  any  }
allow-query     { localhost  any  }
allow-query-cache       { localhost  any  }
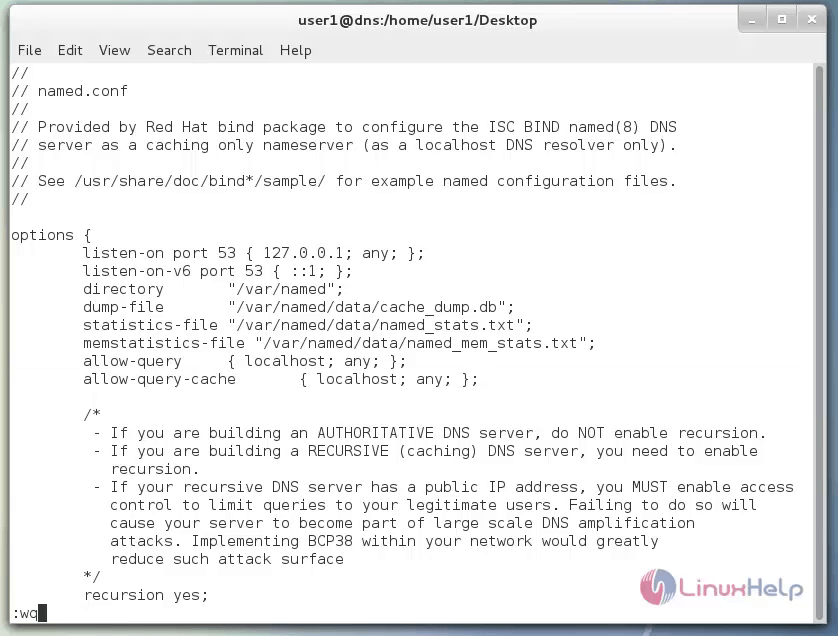
listen-on port 53: This means that Cache server want to use the port 53 for query.
allow-query:This Specifies which ip address may query the server.
allow-query-cache: This will add the query request to the bind.
recursion: This will query the answer and returns to us, during query it may send query to other DNS server over the internet and get back the query.
After completing, we need to confirm whether the named.conf files ownership was not modified from root:named, since the DNS runs under a system user named
[root@dns Desktop]# ls -l /etc/named.conf
-rw-r-----. 1 root named 1608 Apr 26 09:09 /etc/named.conf
[root@dns Desktop]# ls -l /etc/named.rfc1912.zones
-rw-r-----. 1 root named 931 Jun 21  2007 /etc/named.rfc1912.zones
Next we need to verify the selinux context, every named config files is required to be in system_u:object_r:named_conf_t:s0
[root@dns Desktop]# ls -lZ /etc/named.conf
-rw-r-----. root named system_u:object_r:named_conf_t:s0 /etc/named.conf
[root@dns Desktop]# ls -lZ /etc/named.rfc1912.zones
-rw-r-----. root named system_u:object_r:named_conf_t:s0 /etc/named.rfc1912.zones
Now you need to test the DNS configuration for syntax error.
[root@dns Desktop]# named-checkconf /etc/named.conf
Restart the service to take effect for above changes and then allow the service to run persistent while rebooting the server.
[root@dns Desktop]# systemctl enable named.service
[root@dns Desktop]# systemctl restart named.service
Once the above step completes, open the port 53 on the firewall to allow the access.
[root@dns Desktop]# iptables -I INPUT -p udp --dport 53 -j ACCEPT
Chroot Caching-Only DNS
If you like to run the DNS caching-server under chroot environment, it is necessary to install the chroot package only.
[root@dns Desktop]# yum install bind-chroot -y
Loaded plugins: fastestmirror, langpacks
base                                                              | 3.6 kB  00:00:00
extras                                                            | 3.4 kB  00:00:00
linuxhelp                                                         | 2.9 kB  00:00:00
updates                                                           | 3.4 kB  00:00:00
Loading mirror speeds from cached hostfile
 * base: centos.webwerks.com
 * extras: centos.webwerks.com
 * updates: centos.webwerks.com
.
.
.
Installed:
bind-chroot-9.9.4-29.el7_2.3.x86_64 installed
Complete!
Once chroot package installation is complete, you can restart the named service to bring new changes into effect.
[root@dns Desktop]# systemctl restart named.service
Restarting the named service, creates a hard-link from the /etc/named config files to /var/named/chroot/etc/ directory automatically.
[root@dns Desktop]# cat /var/named/chroot/etc/named.conf
Some time the hard link will never be generated automatically that time you must create that hard link.
Setting Up DNS Client Side
Append the DNS caching servers IP 192.168.5.221 as resolver to the client systems.
In Linux environment it will be under /etc/resolv.conf or you can edit manually under /etc/sysconfig/network-scripts/ifcfg-eth0 file in RPM based systems.
[root@linuxhelp Desktop]# vi /etc/sysconfig/network-scripts/ifcfg-eno16777736
TYPE=Ethernet
BOOTPROTO=none
DEFROUTE=yes
IPV4_FAILURE_FATAL=no
IPV6INIT=no
IPV6_AUTOCONF=yes
IPV6_DEFROUTE=yes
IPV6_PEERDNS=yes
IPV6_PEERROUTES=yes
IPV6_FAILURE_FATAL=no
NAME=eno16777736
UUID=ed83592b-49f0-4bed-b548-f8b824f92c0b
ONBOOT=no
HWADDR=00:0C:29:D6:7E:93
IPADDR0=192.168.5.225
PREFIX0=24
GATEWAY0=192.168.5.1
DNS1=192.168.5.221
~
" /etc/sysconfig/network-scripts/ifcfg-eno16777736"  18L, 338C
Finally verify the cache server using some tools, here we use dig & nslookup commands in Linux systems and in windows you can use the nslookup command.
Now we query google.co.in for first time, so it will cache its query.
[root@linuxhelp Desktop]# dig google.co.in
  < < > >  DiG 9.9.4-RedHat-9.9.4-14.el7 < < > >  google.co.in
   global options: +cmd
   Got answer:
   -> > HEADER< < - opcode: QUERY, status: NOERROR, id: 63485
   flags: qr rd ra  QUERY: 1, ANSWER: 1, AUTHORITY: 3, ADDITIONAL: 4

   OPT PSEUDOSECTION:
  EDNS: version: 0, flags:  udp: 4096
   QUESTION SECTION:
 google.co.in.            IN    A

   ANSWER SECTION:
google.co.in.        295    IN    A    216.58.197.67

   AUTHORITY SECTION:
google.co.in.        86393    IN    NS    ns1.google.com.
google.co.in.        86393    IN    NS    ns3.google.com.
google.co.in.        86393    IN    NS    ns2.google.com.

   ADDITIONAL SECTION:
ns3.google.com.        172793    IN    A    216.239.36.10
ns2.google.com.        172793    IN    A    216.239.34.10
ns1.google.com.        172793    IN    A    216.239.32.10

   Query time: 303 msec
   SERVER: 192.168.5.221#53(192.168.5.221)
   WHEN: Tue Apr 26 14:52:39 IST 2016
   MSG SIZE  rcvd: 169
For more info about dig command: https://www.linuxhelp.com/dig-command-query-dns/
Use nslookup command in order to confirm the same.
[root@linuxhelp Desktop]# nslookup google.co.in
Server:        192.168.5.221
Address:    192.168.5.221#53

Non-authoritative answer:
Name:    google.co.in
Address: 216.58.197.67
For more info about nslookup command: https://www.linuxhelp.com/troubleshoot-dns-using-nslookup/
Comments ( 0 )
No comments available