How to install Xrdp Server (Remote Desktop) on Oracle Linux 8.5
- 00:34 cat /etc/os-release
- 00:48 dnf groupinstall "server with GUI"
- 01:30 dnf install epel-release
- 01:55 dnf install xrdp
- 02:11 systemctl enable xrdp
- 02:19 systemctl start xrdp
- 02:28 systemctl status xrdp
- 02:40 systemctl stop firewalld
- 02:46 systemctl disable firewalld
- 02:55 systemctl status firewalld
- 03:06 ip a
To Install Xrdp Server (Remote Desktop) On Oracle Linux 8.5
Introduction:
Xrdp is a free and open-source implementation of microsoftremote desktop protocol server that enables operating systems other than microsoft windows such as linux operating systems to provide a fully functional rdp-compatible remote desktop experience.
Installation Steps:
Step 1: Check the installed version of OS by using the below command
[root@linuxhelp ~]# cat /etc/os-release
NAME="Oracle Linux"
VERSION="8.5
Step 2: Install Server with GUI by using the below command
[root@linuxhelp ~]# dnf groupinstall "server with GUI"
=====================================================================================
 Package                         Arch   Version                                 Repo       Size
=====================================================================================
Upgrading:
 NetworkManager                  x86_64 1:1.36.0-7.el8_6                        baseos    2.3 M
 NetworkManager-adsl             x86_64 1:1.36.0-7.el8_6                        baseos    148 k
 NetworkManager-bluetooth        x86_64 1:1.36.0-7.el8_6                        baseos    174 k
 NetworkManager-config-server    noarch 1:1.36.0-7.el8_6                        baseos    135 k

 NetworkManager-libnm            x86_64 1:1.36.0-7.el8_6                        baseos    1.8 M
 NetworkManager-team             x86_64 1:1.36.0-7.el8_6                        baseos    152 k
 NetworkManager-tui              x86_64 1:1.36.0-7.el8_6                        baseos    345 k
 NetworkManager-wifi             x86_64 1:1.36.0-7.el8_6                        baseos    193 k
 NetworkManager-wwan             x86_64 1:1.36.0-7.el8_6                        baseos    180 k
glibc-common                    x86_64 2.28-189.5.el8_6                        baseos    1.3 M
 glibc-gconv-extra               x86_64 2.28-189.5.el8_6                        baseos    1.5 M
 glibc-langpack-en               x86_64 2.28-189.5.el8_6                        baseos    833 k
 gnome-control-center            x86_64 3.28.2-33.el8_6.1                       appstream 4.8 M
 gnome-control-center-filesystem noarch 3.28.2-33.el8_6.1                       appstream  12 k
 gnome-initial-setup             x86_64 3.28.0-10.el8_6.1                       appstream 773 k
 kernel-tools                    x86_64 4.18.0-372.13.1.el8_6                   baseos    8.2 M
 kernel-tools-libs               x86_64 4.18.0-372.13.1.el8_6                   baseos    8.0 M

Upgraded:
  NetworkManager-1:1.36.0-7.el8_6.x86_64
  NetworkManager-adsl-1:1.36.0-7.el8_6.x86_64
  NetworkManager-bluetooth-1:1.36.0-7.el8_6.x86_64
  NetworkManager-config-server-1:1.36.0-7.el8_6.noarch
  NetworkManager-libnm-1:1.36.0-7.el8_6.x86_64
  NetworkManager-team-1:1.36.0-7.el8_6.x86_64
  NetworkManager-tui-1:1.36.0-7.el8_6.x86_64

  NetworkManager-wifi-1:1.36.0-7.el8_6.x86_64
  containernetworking-plugins-1:1.0.1-2.module+el8.6.0+971+69b94baf.x86_64
  cups-1:2.2.6-45.el8_6.2.x86_64
  cups-client-1:2.2.6-45.el8_6.2.x86_64
  cups-filesystem-1:2.2.6-45.el8_6.2.noarch
  cups-ipptool-1:2.2.6-45.el8_6.2.x86_64
  cups-libs-1:2.2.6-45.el8_6.2.x86_64
  curl-7.61.1-22.el8_6.3.x86_64
  glibc-all-langpacks-2.28-189.5.el8_6.x86_64
  glibc-common-2.28-189.5.el8_6.x86_64
  glibc-gconv-extra-2.28-189.5.el8_6.x86_64
  glibc-langpack-en-2.28-189.5.el8_6.x86_64
  gnome-control-center-3.28.2-33.el8_6.1.x86_64
  gnome-control-center-filesystem-3.28.2-33.el8_6.1.noarch
  gnome-initial-setup-3.28.0-10.el8_6.1.x86_64
Step 3: Now Install EPEL repository by using the below command
[root@linuxhelp ~]# dnf install epel-release
Last metadata expiration check: 0:03:29 ago on Wed 13 Jul 2022 06:20:52 PM EDT.
Dependencies resolved.
================================================================================================
 Package                   Architecture        Version                Repository           Size


Installing:
 epel-release              noarch              8-13.el8               extras               23 k

Transaction Summary
================================================================================================
Install  1 Package

Total download size: 23 k
Installed size: 35 k
Is this ok [y/N]: y
Downloading Packages:
epel-release-8-13.el8.noarch.rpm                                 31 kB/s |  23 kB     00:00
------------------------------------------------------------------------------------------------
Total                                                            15 kB/s |  23 kB     00:01
Running transaction check
Transaction check succeeded.
Running transaction test
Transaction test succeeded.
Running transaction
  Preparing        :                                                                        1/1
  Installing       : epel-release-8-13.el8.noarch                                           1/1
  Running scriptlet: epel-release-8-13.el8.noarch                                           1/1
  Verifying        : epel-release-8-13.el8.noarch                                           1/1


Installed:
  epel-release-8-13.el8.noarch

Complete!
Step 4: Install the Xrdp package by using the below command
[root@linuxhelp ~]# dnf install xrdp
Extra Packages for Enterprise Linux 8 - x86_64                  7.3 MB/s |  12 MB     00:01
Extra Packages for Enterprise Linux Modular 8 - x86_64          713 kB/s | 1.0 MB     00:01
Last metadata expiration check: 0:00:01 ago on Wed 13 Jul 2022 06:25:12 PM EDT.
Dependencies resolved.
================================================================================================
 Package                  Architecture       Version                     Repository        Size
================================================================================================
Installing:
 xrdp                     x86_64             1:0.9.19-1.el8              epel             470 k
Installing dependencies:
 imlib2                   x86_64             1.4.9-8.el8                 epel             222 k
Installing weak dependencies:
 xrdp-selinux             x86_64             1:0.9.19-1.el8              epel              24 k

Transaction Summary

================================================================================================
Install  3 Packages

Total download size: 716 k
Installed size: 2.8 M
Is this ok [y/N]: y
Downloading Packages:
(1/3): xrdp-selinux-0.9.19-1.el8.x86_64.rpm                     161 kB/s |  24 kB     00:00
(2/3): imlib2-1.4.9-8.el8.x86_64.rpm                            625 kB/s | 222 kB     00:00
(3/3): xrdp-0.9.19-1.el8.x86_64.rpm                             1.2 MB/s | 470 kB     00:00
------------------------------------------------------------------------------------------------
Total                                                           608 kB/s | 716 kB     00:01
Extra Packages for Enterprise Linux 8 - x86_64                  1.6 MB/s | 1.6 kB     00:00
Importing GPG key 0x2F86D6A1:
 Userid     : "Fedora EPEL (8) <epel@fedoraproject.org>"
 Fingerprint: 94E2 79EB 8D8F 25B2 1810 ADF1 21EA 45AB 2F86 D6A1
 From       : /etc/pki/rpm-gpg/RPM-GPG-KEY-EPEL-8
Is this ok [y/N]: y
Key imported successfully
Running transaction check
Transaction check succeeded.
Running transaction test
Transaction test succeeded.
Step 5: Enable, Start and Check the Status of Xrdp service by using the below command.
[root@linuxhelp ~]# systemctl enable xrdp
Created symlink /etc/systemd/system/multi-user.target.wants/xrdp.service → /usr/lib/systemd/system/xrdp.service.

[root@linuxhelp ~]# systemctl start xrdp

[root@ linuxhelp]# systemctl status xrdp
● xrdp.service - xrdp daemon
   Loaded: loaded (/usr/lib/systemd/system/xrdp.service; enabled; vendor preset: disabled)
   Active: active (running) since Thu 2022-07-21 14:08:04 IST; 5s ago
Step 6: Stop, Disable and check the status of firewall by using the below command
[root@linuxhelp ~]# systemctl stop firewalld

[root@linuxhelp ~]# systemctl disable firewalld

[root@linuxhelp ~]# systemctl status firewalld
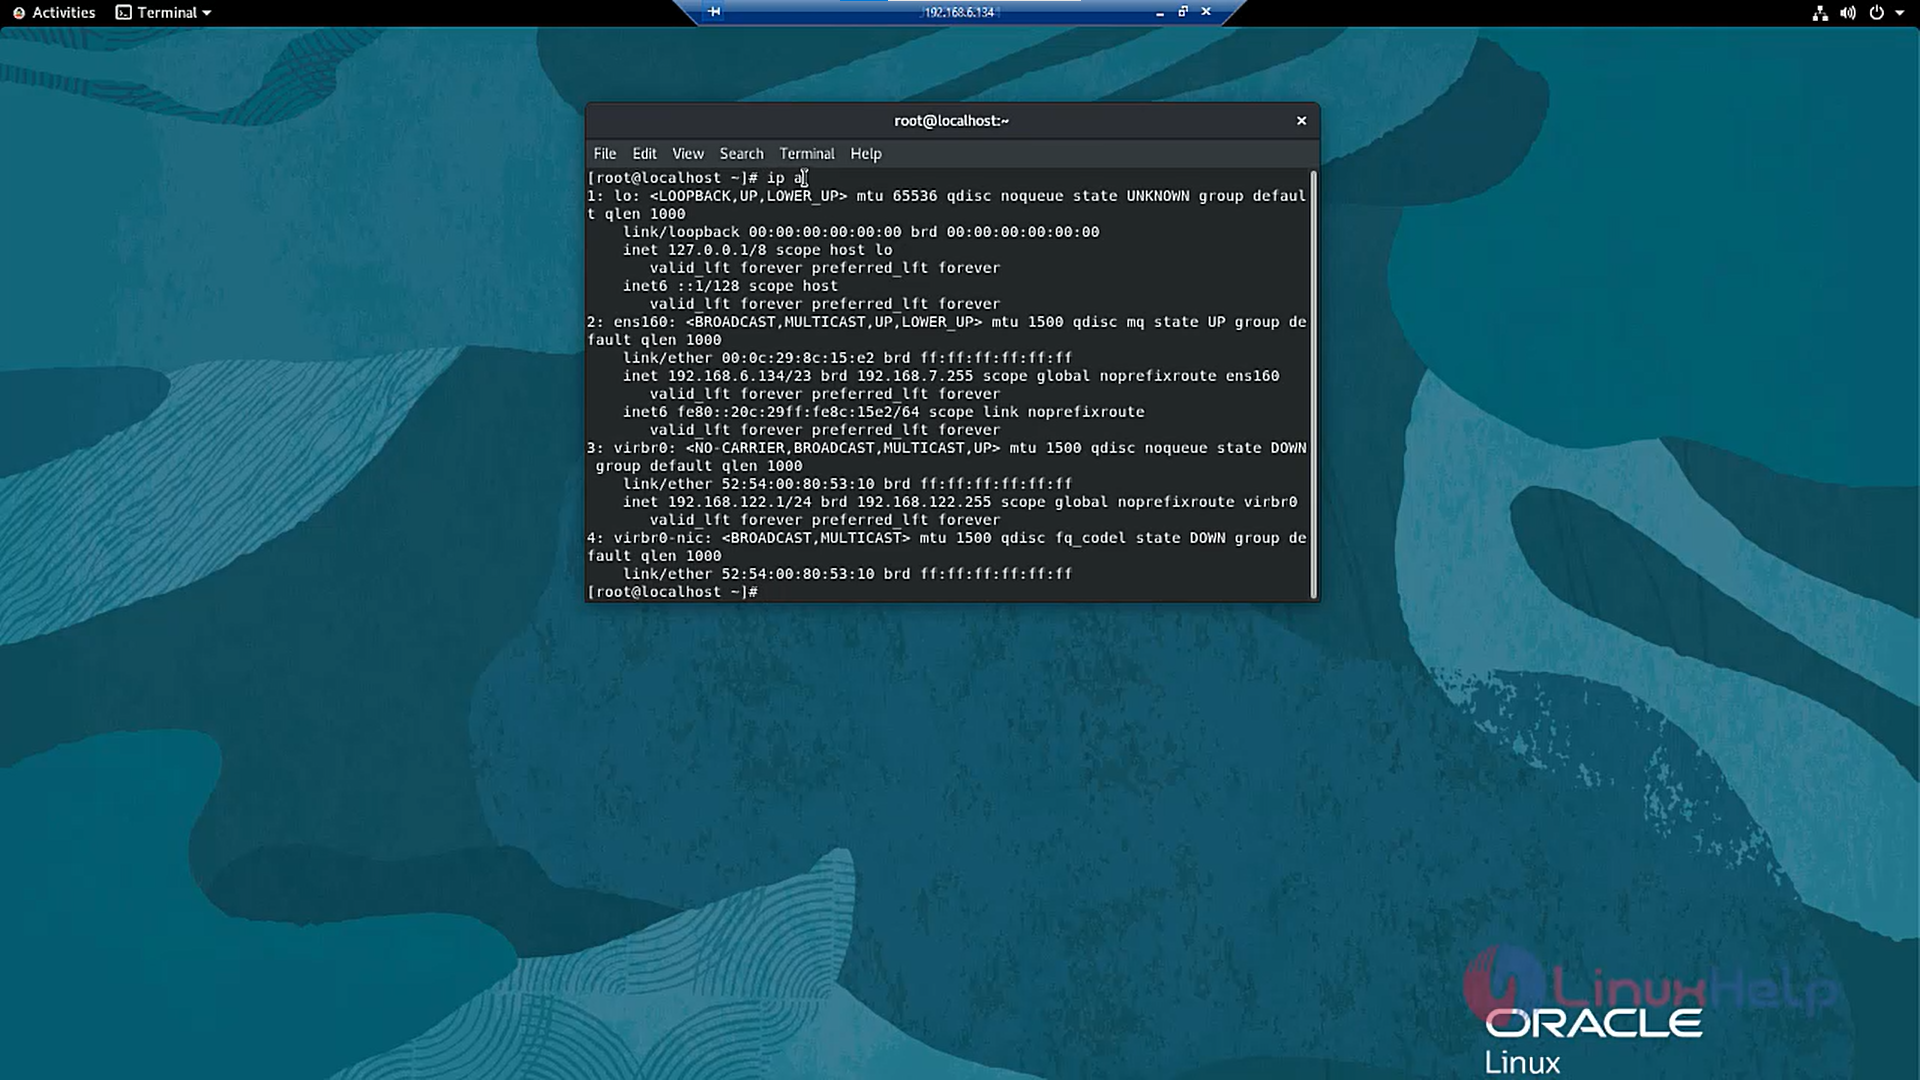
Step 7: Check the IP Address of the system by using the below command
[root@linuxhelp ~]# ip a
1: lo: <LOOPBACK,UP,LOWER_UP> mtu 65536 qdisc noqueue state UNKNOWN group default qlen 1000
    link/loopback 00:00:00:00:00:00 brd 00:00:00:00:00:00

    inet 127.0.0.1/8 scope host lo
       valid_lft forever preferred_lft forever
    inet6 ::1/128 scope host
       valid_lft forever preferred_lft forever
2: ens160: <BROADCAST,MULTICAST,UP,LOWER_UP> mtu 1500 qdisc mq state UP group default qlen 1000
    link/ether 00:0c:29:8c:15:e2 brd ff:ff:ff:ff:ff:ff
    inet **192.168.6.134/23** brd 192.168.7.255 scope global noprefixroute ens160
       valid_lft forever preferred_lft forever
    inet6 fe80::20c:29ff:fe8c:15e2/64 scope link noprefixroute
       valid_lft forever preferred_lft forever
3: virbr0: <NO-CARRIER,BROADCAST,MULTICAST,UP> mtu 1500 qdisc noqueue state DOWN group default qlen 1000
    link/ether 52:54:00:80:53:10 brd ff:ff:ff:ff:ff:ff
    inet 192.168.122.1/24 brd 192.168.122.255 scope global noprefixroute virbr0
       valid_lft forever preferred_lft forever
4: virbr0-nic: <BROADCAST,MULTICAST> mtu 1500 qdisc fq_codel state DOWN group default qlen 1000
    link/ether 52:54:00:80:53:10 brd ff:ff:ff:ff:ff:ff
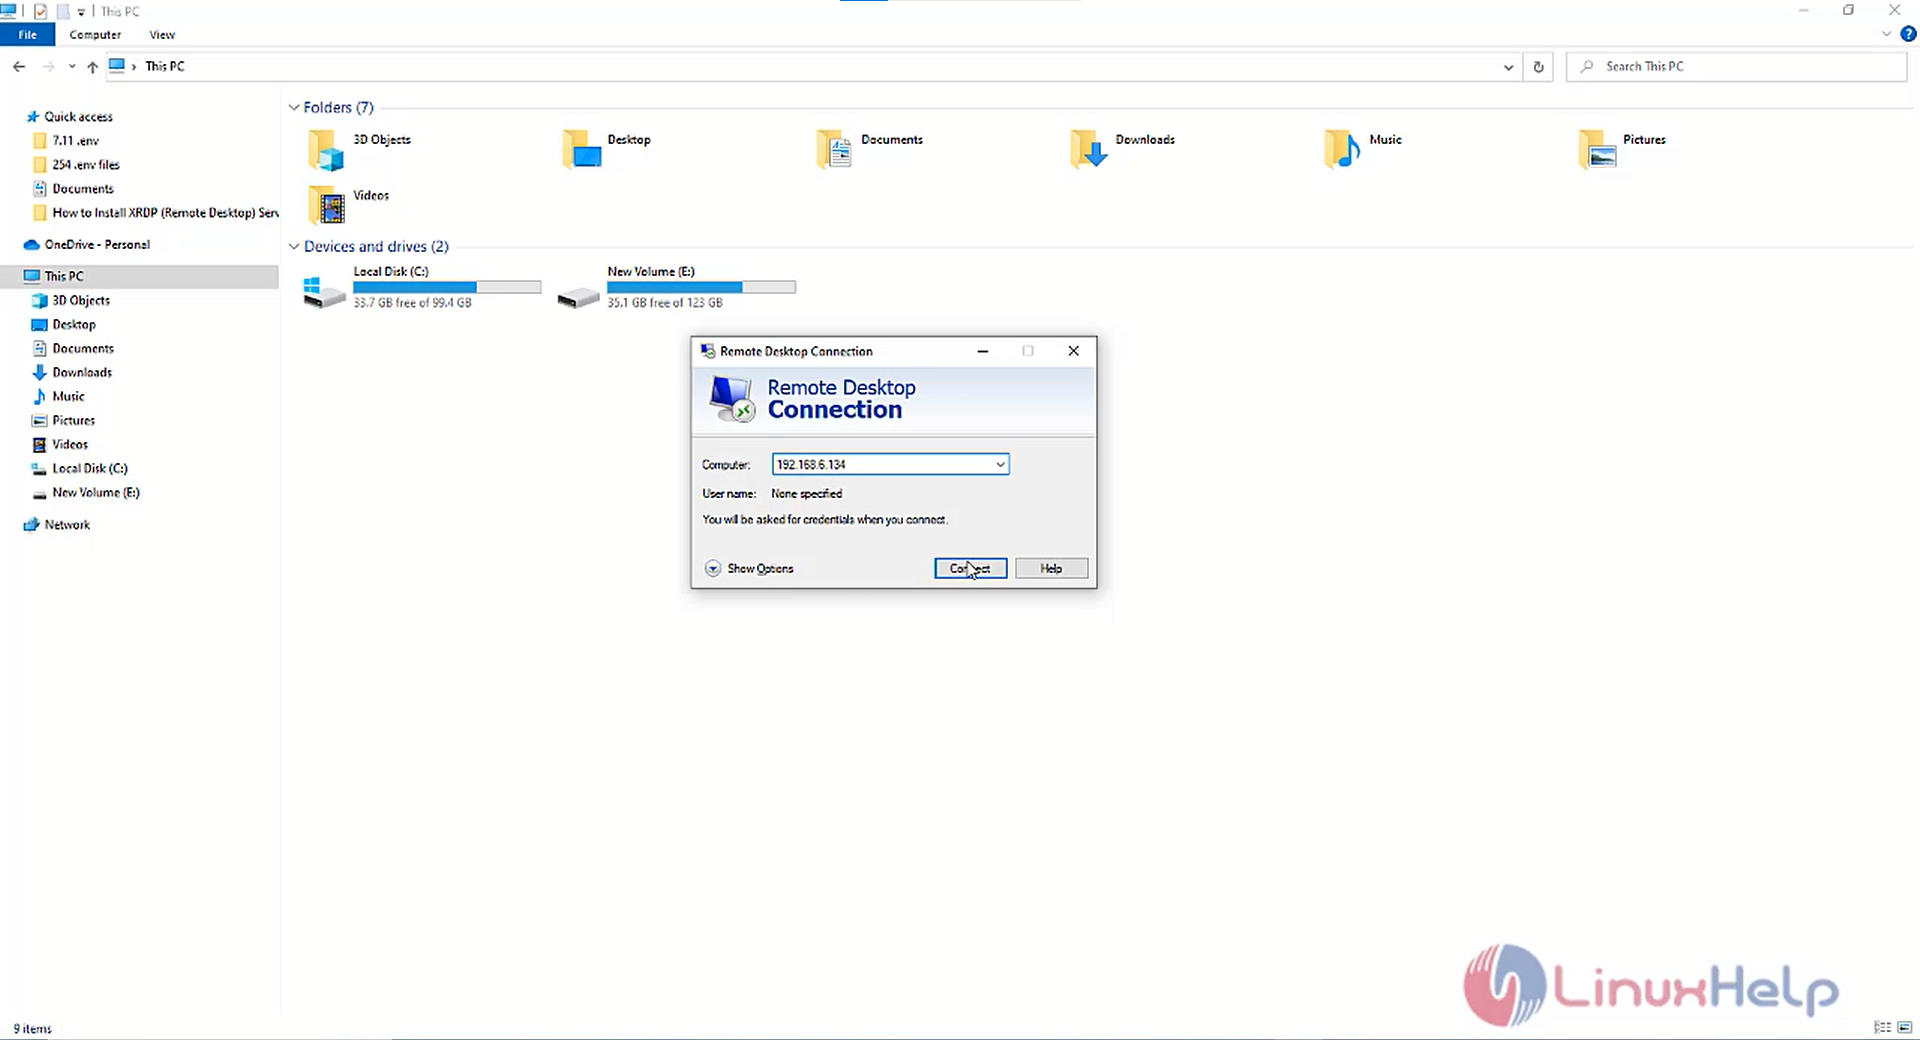
Step 8: Go to Windows Machine and Open Remote Desktop connection application and Enter the IP address as shown in the below image.
Step 9: On the login screen, Enter the Username and Password as shown in the below image.

Snap 10: The Oracle Linux is connected
Conclusion:
We have reached the end of this article. In this guide, we have walked you through the steps required to install Xrdp Server (Remote Desktop) on Oracle linux 8.5. Your feedback is much welcome.
Comments ( 0 )
No comments available