How to install Ntopng on Rocky Linux 9.3
- 00:42 cat /etc/os-release
- 01:06 dnf install https://dl.fedoraproject.org/pub/epel/epel-release-latest-9.noarch.rpm
- 01:25 /usr/bin/crb enable
- 01:32 dnf install https://dl.fedoraproject.org/pub/epel/epel-next-release-latest-9.noarch.rpm
- 01:55 dnf install http://rpms.remirepo.net/enterprise/remi-release-9.rpm
- 02:26 curl https://packages.ntop.org/centos/ntop.repo > /etc/yum.repos.d/ntop.repo
- 02:38 dnf install pfring-dkms n2disk nprobe ntopng cento
- 03:55 systemctl start ntopng
- 04:09 systemctl enable ntopng
- 04:24 systemctl status ntopng
- 04:51 firewall-cmd --permanent --add-port=3000/tcp
- 05:15 firewall-cmd --reload
- 05:33 http://your-server-ip-address:3000
To Install Ntopng On Rocky Linux 9.3
Introduction:
Ntopng is a high-performance web-based network traffic monitoring application. It is a passive network monitoring tool that supports statistical evaluation of traffic data on the connected networks, it does not actively intervene in the network traffic. Ntopng also provides an intuitive, encrypted web user interface for exploring real-time and historical traffic information.
Installation Steps:
Step 1: Check the OS version by using the below Command.
[root@linuxhelp ~]# cat /etc/os-release
NAME="Rocky Linux"
VERSION="9.3 (Blue Onyx)"
ID="rocky"
ID_LIKE="rhel centos fedora"
VERSION_ID="9.3"
PLATFORM_ID="platform:el9"
PRETTY_NAME="Rocky Linux 9.3 (Blue Onyx)"
ANSI_COLOR="0;32"
LOGO="fedora-logo-icon"
CPE_NAME="cpe:/o:rocky:rocky:9::baseos"
HOME_URL="https://rockylinux.org/"
BUG_REPORT_URL="https://bugs.rockylinux.org/"
SUPPORT_END="2032-05-31"
ROCKY_SUPPORT_PRODUCT="Rocky-Linux-9"
ROCKY_SUPPORT_PRODUCT_VERSION="9.3"
REDHAT_SUPPORT_PRODUCT="Rocky Linux"
REDHAT_SUPPORT_PRODUCT_VERSION="9.3"
Step 2: Enable the EPEL and REMI Repository by using the below command
[root@linuxhelp ~]# dnf install https://dl.fedoraproject.org/pub/epel/epel-release-latest-9.noarch.rpm
 [root@linuxhelp ~]# /usr/bin/crb enable
Enabling CRB repo
CRB repo is enabled and named: crb
 [root@linuxhelp ~]# dnf install https://dl.fedoraproject.org/pub/epel/epel-next-release-latest-9.noarch.rpm
 [root@linuxhelp ~]# dnf install http://rpms.remirepo.net/enterprise/remi-release-9.rpm
Step 3: Add the Ntopng repository by using the below command.
 [root@linuxhelp ~]# curl https://packages.ntop.org/centos/ntop.repo > /etc/yum.repos.d/ntop.repo
  % Total    % Received % Xferd  Average Speed   Time    Time     Time  Current
                                 Dload  Upload   Total   Spent    Left  Speed
100   340  100   340    0     0    568      0 --:--:-- --:--:-- --:--:--   567
Step 4: After the repository has been added, Install Ntopng by using the below command.
[root@linuxhelp ~]# dnf install pfring-dkms n2disk nprobe ntopng cento
ntop packages                                                                                                                                       14 kB/s |  24 kB     00:01
ntop packages                                                                                                                                      4.5 kB/s | 6.6 kB     00:01
Remi's Modular repository for Enterprise Linux 9 - x86_64                                                                                          341 kB/s | 673 kB     00:01
Safe Remi's RPM repository for Enterprise Linux 9 - x86_64                                                                                         502 kB/s | 995 kB     00:01
Dependencies resolved.
===================================================================================================================================================================================
 Package                                            Architecture                   Version                                               Repository                           Size
===================================================================================================================================================================================
Installing:
 cento                                              x86_64                         1.21.240511-901                                       ntop                                1.3 M
 n2disk                                             x86_64                         3.7.240511-5503                                       ntop                                1.3 M
 nprobe                                             x86_64                         10.5.240511-8305                                      ntop                                3.7 M
 ntopng                                             x86_64                         6.1.240511-23442                                      ntop                                9.1 M
 pfring-dkms                                        noarch                         8.7.0.9100-dkms                                       ntop-noarch                          75 k
Installed:
  nodejs-1:16.20.2-4.el9_3.x86_64                              nodejs-docs-1:16.20.2-4.el9_3.noarch                  nodejs-full-i18n-1:16.20.2-4.el9_3.x86_64
  nodejs-libs-1:16.20.2-4.el9_3.x86_64                         npm-1:8.19.4-1.16.20.2.4.el9_3.x86_64                 nprobe-10.5.240511-8305.x86_64
  ntop-license-1.0-488.x86_64                                  ntopng-6.1.240511-23442.x86_64                        ntopng-data-6.1.240511-23442.noarch
  numactl-2.0.16-3.el9.x86_64                                  openpgm-5.2.122-28.el9.x86_64                         openssl-devel-1:3.0.7-27.el9.x86_64
  pfring-8.7.0-9100.x86_64                                     pfring-dkms-8.7.0.9100-dkms.noarch                    radcli-1.3.0-4.el9.x86_64
  redis-6.2.7-1.el9.x86_64                                     rrdtool-1.7.2-21.el9.x86_64                           tcp_wrappers-libs-7.6-97.el9.x86_64
  zeromq-4.3.4-2.el9.x86_64                                    zlib-devel-1.2.11-40.el9.x86_64
Removed:
  kernel-5.14.0-362.8.1.el9_3.x86_64    kernel-core-5.14.0-362.8.1.el9_3.x86_64    kernel-modules-5.14.0-362.8.1.el9_3.x86_64    kernel-modules-core-5.14.0-362.8.1.el9_3.x86_64
Complete!
Step 5: After the installation is complete, Enable (to start automatically upon system boot) and start Ntopng by using the below command.
 [root@linuxhelp ~]# systemctl start ntopng
[root@linuxhelp ~]# systemctl enable ntopng
Created symlink /etc/systemd/system/multi-user.target.wants/ntopng.service → /usr/lib/systemd/system/ntopng.service.
Step 6: Verify the status of Ntopng by using the below command.
[root@linuxhelp ~]# systemctl status ntopng
● ntopng.service - ntopng high-speed web-based traffic monitoring and analysis tool
     Loaded: loaded (/usr/lib/systemd/system/ntopng.service; enabled; preset: disabled)
     Active: active (running) since Sun 2024-05-12 02:56:26 IST; 13s ago
   Main PID: 139144 (ntopng)
      Tasks: 14 (limit: 22833)
     Memory: 85.1M
        CPU: 3.341s
     CGroup: /system.slice/ntopng.service
             └─139144 /usr/bin/ntopng /run/ntopng.conf

May 12 02:56:29 linuxhelp ntopng[139144]: 12/May/2024 02:56:29 [Ntop.cpp:1014] Adding fe80::20c:29ff:fe58:7aef/128 as IPv6 interface address for ens160
May 12 02:56:29 linuxhelp ntopng[139144]: 12/May/2024 02:56:29 [Ntop.cpp:1026] Adding fe80::20c:29ff:fe58:7aef/64 as IPv6 local network for ens160
May 12 02:56:30 linuxhelp ntopng[139144]: 12/May/2024 02:56:30 [PeriodicActivities.cpp:122] Started periodic activities loop...
May 12 02:56:31 linuxhelp ntopng[139144]: 12/May/2024 02:56:31 [startup.lua:36] Processing startup.lua: please hold on...
May 12 02:56:35 linuxhelp ntopng[139144]: 12/May/2024 02:56:35 [startup.lua:122] [lists_utils.lua:847] Refreshing category lists...
May 12 02:56:36 linuxhelp ntopng[139144]: 12/May/2024 02:56:36 [startup.lua:122] [lists_utils.lua:444] Updating list 'Abuse.ch URLhaus' [https://urlhaus.abuse.ch/downloads/hostfi>
May 12 02:56:37 linuxhelp ntopng[139144]: 12/May/2024 02:56:37 [startup.lua:122] [lists_utils.lua:444] Updating list 'Emerging Threats' [https://rules.emergingthreats.net/fwrules>
May 12 02:56:38 linuxhelp ntopng[139144]: 12/May/2024 02:56:38 [startup.lua:122] [lists_utils.lua:444] Updating list 'IPsum Threat Intelligence Feed' [https://raw.githubuserconte>
May 12 02:56:38 linuxhelp ntopng[139144]: 12/May/2024 02:56:38 [startup.lua:122] [lists_utils.lua:444] Updating list 'NoCoin Filter List' [https://raw.githubusercontent.com/hoshs>
May 12 02:56:38 linuxhelp ntopng[139144]: 12/May/2024 02:56:38 [startup.lua:122] [lists_utils.lua:444] Updating list 'SSLBL Botnet C2 IP Blacklist' [https://sslbl.abuse.ch/blackl>
lines 1-20/20 (END)
Step 7: Ntopng listens on port 3000 by default, now allow it through the firewall.
[root@linuxhelp ~]# firewall-cmd --permanent --add-port=3000/tcp
Success
Step 8: Reload the firewall by using the below command.
[root@linuxhelp ~]# firewall-cmd –reload
Step 9: Once the installation has completed, you can access the Ntopng application by visiting the following URL http://your-server-ip-address:3030. You will see the following page.
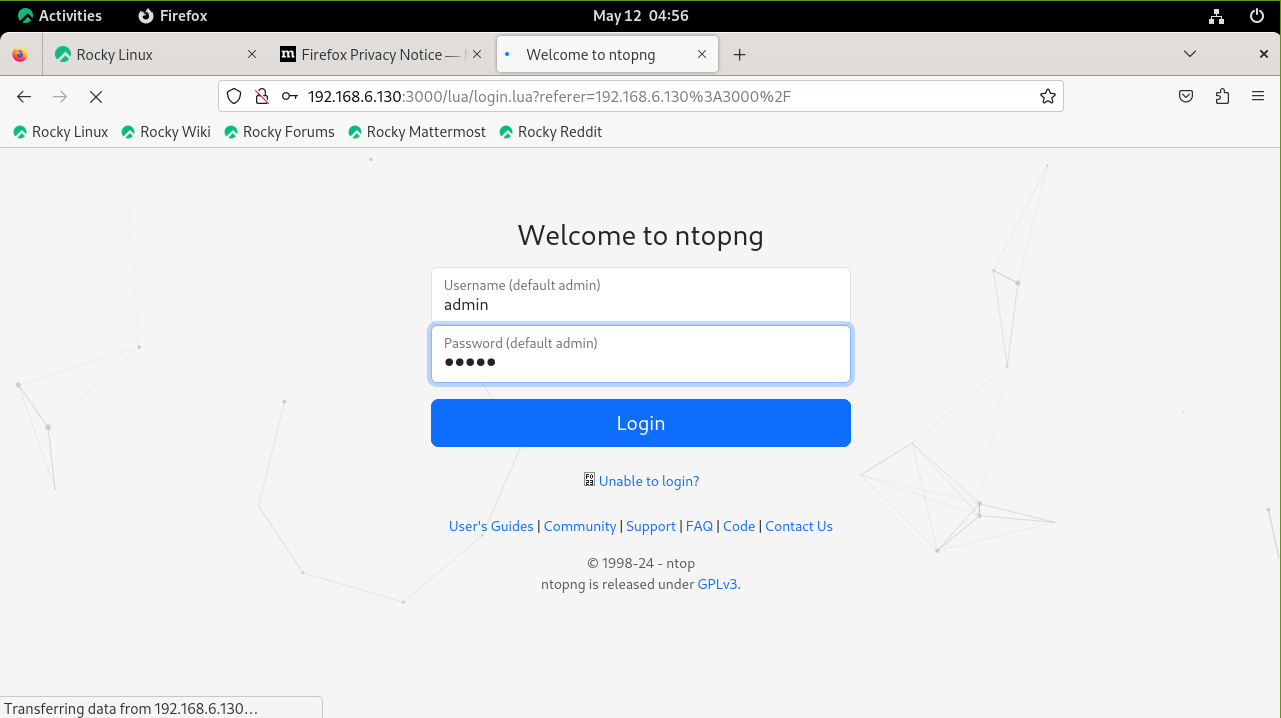 Login using the default credentials: admin:admin
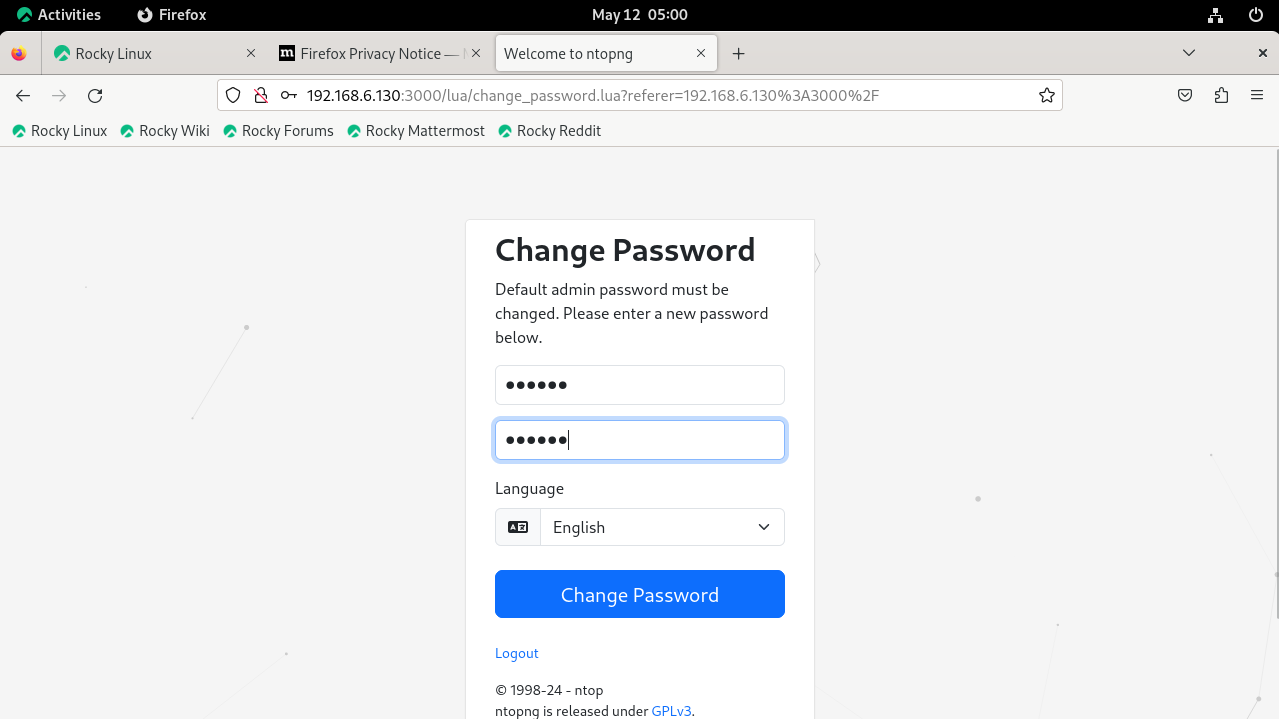
Step 10: Reset the password
You will see the following Ntopng Dashboard page

Conclusion:
We have reached the end of this article. In this guide, we have walked you through the steps required to install Ntopng on Rocky Linux 9.3. Your feedback is much welcome.


Comments ( 0 )
No comments available