How to install FTP Server and Permission-Based Configuration on Debian 11
- 00:40 cat /etc/os-release
- 00:50 apt install Vsftpd
- 01:04 systemctl Start Ftp
- 01:30 mkdir /home/share
- 01:43 adduser --home /home/share u1
- 02:00 adduser --home /home/share u2
- 02:05 adduser --home /home/share u3
- 02:10 passwd u1
- 02:27 passwd u2
- 02:40 passwd u3
- 02:55 cd/ home/share/
- 03:10 mkdir s1 s2 s3
- 03:23 touch s1/f1
- 03:33 touch s2/f2
- 03:40 touch s3/f3
- 03:52 groupadd g1
- 03:58 groupadd g2
- 04:10 usermod -a -G g1 u1
- 04:19 usermod -a -G g1 u3
- 04:33 usermod -a -G g2 u2
- 04:43 usermod -a -G g2 u3
- 05:00 chown -R u2:g1 s1/
- 05:06 chown -R u1:g2 s2/
- 05:18 chown -R u2:u3 s3/
- 05:30 chmod -R 470 s1
- 05:39 chmod -R 470 s2
- 05:52 chmod -R 470 s3
- 06:10 Systemctl restart vsftpd
To Install FTP Server And Permission Based Configuration On Debian 11.3
Introduction
FTP, short for File Transfer Protocol, is a popular protocol for transferring files to and from an FTP server. We can save important user file in file server. We can provide individual username and passwd. We can access those files from different application VSFTPD (Very Secure FTP Daemon) is a fast, secure and stable FTP server that uses encryption to secure data exchanged with the server.
Installation Procedure:
Step 1: Check the OS version by using the below command
[root@linuxhelp ~]# cat /etc/os-release
PRETTY_NAME="Debian GNU/Linux 11 (bullseye)"
NAME="Debian GNU/Linux"
VERSION_ID="11"
VERSION="11 (bullseye)"
VERSION_CODENAME=bullseye
Step 2: Install the FTP server by using the below command
[root@linuxhelp: ~]# apt install Vsftpd
Reading package lists... Done
Building dependency tree... Done
Reading state information... Done
The following package was automatically installed and is no longer required:
  libonig5
Use 'apt autoremove' to remove it.
The following additional packages will be installed:
 attr ibverbs-providers libcephfs2 libgfapi0 libgfrpc0 libgfxdr0 libglusterfs0
 libibverbs1 librados2 librdmacm1 liburing1 python3-dnspython python3-gpg
tdb-tools

Done
Setting up libgfrpc0:amd64 (9.2-1) ...
Step 3: Start the FTP service by using below command
[root@linuxhelp ~]# systemctl Start Ftp
Step 4: Create a folder using the below command
[root@linuxhelp ~]# mkdir /home/share
Step 5: Create 3 Users and Grant Home Directory as Share for User (1,2,3) using the below commands
[root@linuxhelp ~]#  adduser --home /home/share u1

[root@linuxhelp ~]# adduser --home /home/share u2

[root@linuxhelp ~]#  adduser --home /home/share u3
Step 6: Create a passwd 3 users using the below commands
[root@linuxhelp ~]# passwd u1

[root@linuxhelp ~]#  passwd u2

[root@linuxhelp ~]#  passwd u3
Step 7: Create Directory inside share using the below commands
[root@linuxhelp ~]# cd/ home/share/

[root@linuxhelp ~]# mkdir s1 s2 s3
Step 8: Create a file using the below commands
[root@linuxhelp ~]# touch s1/f1

[root@linuxhelp ~]# touch s2/f2

[root@linuxhelp ~]#  touch s3/f3
Step 9: Create Two Group using the below commands
[root@linuxhelp ~]#  groupadd g1

[root@linuxhelp ~]# groupadd g2
Step 10: Add user in Group using the below commands
[root@linuxhelp ~]# usermod -a -G g1 u1

[root@linuxhelp ~]#  usermod -a -G g1 u3

[root@linuxhelp ~]# usermod -a -G g2 u2

[root@linuxhelp ~]# usermod -a -G g2 u3
Step 11: Grant Ownership for the Directory using the below commands
[root@linuxhelp ~]# chown -R u2:g1 s1/

[root@linuxhelp ~]#  chown -R u1:g2 s2/

[root@linuxhelp ~]#  chown -R u2:u3 s3/
Step 12: Grant Permission to the directory using the below commands
[root@linuxhelp ~]#  chmod -R 470 s1

[root@linuxhelp ~]# chmod -R 470 s2

[root@linuxhelp ~]# chmod -R 470 s3
Step 13: Restart the FTP Server by using the below command
[root@linuxhelp ~]# Systemctl restart vsftpd
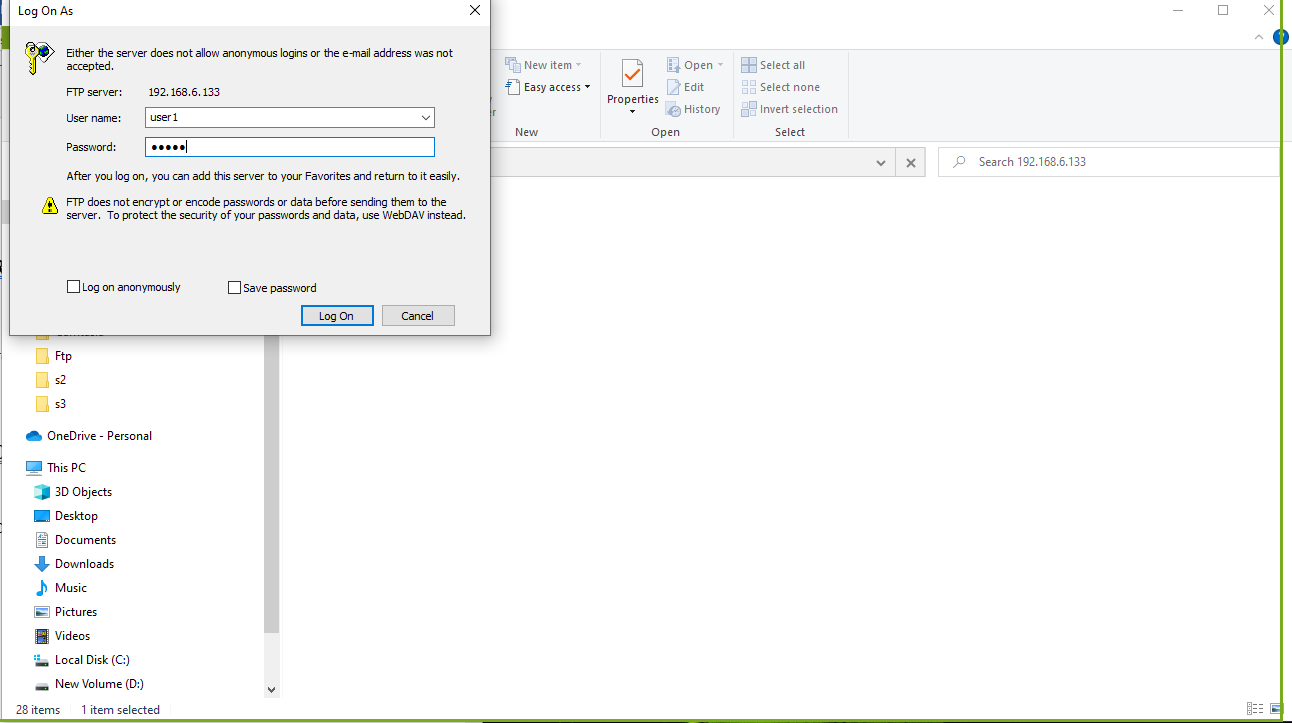
Step 14: Open windows File Explorer and login Ftp server as shown in the below images.Show the FTP user folder’s .permission folder only access.not access for without folder error can be occurred.

Conclusion:
We have reached the end of this article. In this guide, we have walked you through the steps required to install FTP Server and Permission Based Configuration on Debian 11.3. Your feedback is much welcome.


Comments ( 0 )
No comments available