How to install and configure OpenSSL for Apache on Rocky Linux 8.6
- 00:36 cat /etc/os-release
- 00:50 yum install httpd* -y
- 01:47 firewall-cmd --add-service=http --permanent
- 02:06 firewall-cmd --add-service=https --permanent
- 02:24 firewall-cmd –reload
- 02:40 yum install mod_ssl* -y
- 03:08 openssl req -x509 -nodes -days 365 -newkey rsa:2048 -keyout /etc/pki/tls/private/apache-selfsigned.key -out /etc/pki/tls/certs/apache-selfsigned.crt
- 04:21 vim index.html
- 05:26 vim /etc/httpd/conf.d/apache.conf
- 07:43 systemctl restart httpd
To Install And Configure OpenSSL For Apache On Rocky Linux 8.6
Introduction
OpenSSL is a general-purpose cryptography library that implements the Secure Sockets Layer (SSL) and Transport Layer Security (TLS) protocols. The SSL protocol keeps an internet connection secure and safeguards sensitive data sent between two systems, preventing criminals from viewing or altering any information sent.
Installation Steps:
Step 1: Check the OS version by using the below command
[root@linuxhelp ~]# cat /etc/os-release
NAME="Rocky Linux"
VERSION="8.6 (Green Obsidian)"
ID="rocky"
ID_LIKE="rhel centos fedora"
VERSION_ID="8.6"
PLATFORM_ID="platform:el8"
PRETTY_NAME="Rocky Linux 8.6 (Green Obsidian)"
ANSI_COLOR="0;32"
CPE_NAME="cpe:/o:rocky:rocky:8:GA"
HOME_URL="https://rockylinux.org/"
BUG_REPORT_URL="https://bugs.rockylinux.org/"
ROCKY_SUPPORT_PRODUCT="Rocky Linux"
ROCKY_SUPPORT_PRODUCT_VERSION="8"
REDHAT_SUPPORT_PRODUCT="Rocky Linux"
REDHAT_SUPPORT_PRODUCT_VERSION="8"
Step 2: Install the Apache Web Server by using the below command
[root@linuxhelp ~]# yum install httpd* -y
Rocky Linux 8 - AppStream                                        6.4 kB/s | 4.8 kB     00:00
Rocky Linux 8 - BaseOS                                           5.3 kB/s | 4.3 kB     00:00
Rocky Linux 8 - Extras                                           4.4 kB/s | 3.5 kB     00:00
Docker CE Stable - x86_64                                         28 kB/s | 3.5 kB     00:00
Dependencies resolved.
=================================================================================================
 Package              Arch      Version                                       Repository    Size
=================================================================================================
Installing:
 httpd                x86_64    2.4.37-47.module+el8.6.0+985+b8ff6398.2       appstream    1.4 M
 httpd-devel          x86_64    2.4.37-47.module+el8.6.0+985+b8ff6398.2       appstream    223 k
 httpd-filesystem     noarch    2.4.37-47.module+el8.6.0+985+b8ff6398.2       appstream     40 k
 httpd-manual         noarch    2.4.37-47.module+el8.6.0+985+b8ff6398.2       appstream    2.4 M
 httpd-tools          x86_64    2.4.37-47.module+el8.6.0+985+b8ff6398.2       appstream    107 k
Complete!
Step 3: Enable the services of Apache by using the below command
[root@linuxhelp ~]# systemctl enable httpd
Created symlink /etc/systemd/system/multi-user.target.wants/httpd.service → /usr/lib/systemd/system/httpd.service.
Step 4: Start the Services of Apache by using the below command
[root@linuxhelp ~]# systemctl start httpd
Step 5: Add the firewall for http by using the below command
[root@linuxhelp ~]# firewall-cmd --add-service=http --permanent
Success
Step 6: Add the firewall for https by using the below command
[root@linuxhelp ~]# firewall-cmd --add-service=https --permanent
Success
Step 7: Reload the Firewall by using the below command
[root@linuxhelp ~]# firewall-cmd –reload
Step 8: Install the mod_ssl by using the below command
[root@linuxhelp ~]# yum install mod_ssl* -y
Last metadata expiration check: 0:02:38 ago on Mon 29 Aug 2022 08:42:00 PM EDT.
Dependencies resolved.
=================================================================================================
 Package      Arch        Version                                           Repository      Size
=================================================================================================
Installing:
 mod_ssl      x86_64      1:2.4.37-47.module+el8.6.0+985+b8ff6398.2         appstream      137 k

Transaction Summary
=================================================================================================
Install  1 Package
Total download size: 137 k
Installed size: 266 k

Downloading Packages:
mod_ssl-2.4.37-47.module+el8.6.0+985+b8ff6398.2.x86_64.rpm       642 kB/s | 137 kB     00:00
Step 9: create the SSL key and certificate by using the below command
[root@linuxhelp ~]# openssl req -x509 -nodes -days 365 -newkey rsa:2048 -keyout /etc/pki/tls/private/apache-selfsigned.key -out /etc/pki/tls/certs/apache-selfsigned.crt
Generating a RSA private key
.................................................................................................................+++++
..........................................+++++
writing new private key to '/etc/pki/tls/private/apache-selfsigned.key'
-----
You are about to be asked to enter information that will be incorporated
into your certificate request.
What you are about to enter is what is called a Distinguished Name or a DN.
There are quite a few fields but you can leave some blank
For some fields there will be a default value,
If you enter '.', the field will be left blank.
-----
Country Name (2 letter code) [XX]:IN
State or Province Name (full name) []:TN
Locality Name (eg, city) [Default City]:CHENNAI
Organization Name (eg, company) [Default Company Ltd]:EXAMPLE
Organizational Unit Name (eg, section) []:TEST
Common Name (eg, your name or your server's hostname) []:192.168.6.122
Step 10: Create a Directory in Apache root by using the below command
[root@linuxhelp ~]# mkdir /var/www/html/apache
Step 11: change the directory on following path by using the below command
[root@linuxhelp ~]# cd /var/www/html/apache/
Step 12: Create .html extension by using the below command
[root@linuxhelp apache]# vim index.html
	<h1> welcome To Linuxhelp.com</h1>
Step 13: Give Ownership by using the below command
[root@linuxhelp apache]# chown -R apache:apache /var/www/html/apache/
Step14: Create the Virtual Host configuration by using the below command
[root@linuxhelp apache]# vim /etc/httpd/conf.d/apache.conf
<virtualhost *:443>
   ServerName linuxhelp1.com
Documentroot /var/www/html/ apache
   SSLEngine on
    SSLCertificateFile /etc/pki/tls/certs/apache-selfsigned.crt
    SSLCertificateKeyFile /etc/pki/tls/private/apache-selfsigned.key
</virtualhost>
Step 15: Create host entry by using the below command
[root@linuxhelp apache]# vim /etc/hosts
192.168.6.127 linuxhelp1.com
Step 16: Restart the Apache server by using the below command
[root@linuxhelp apache]# systemctl restart httpd
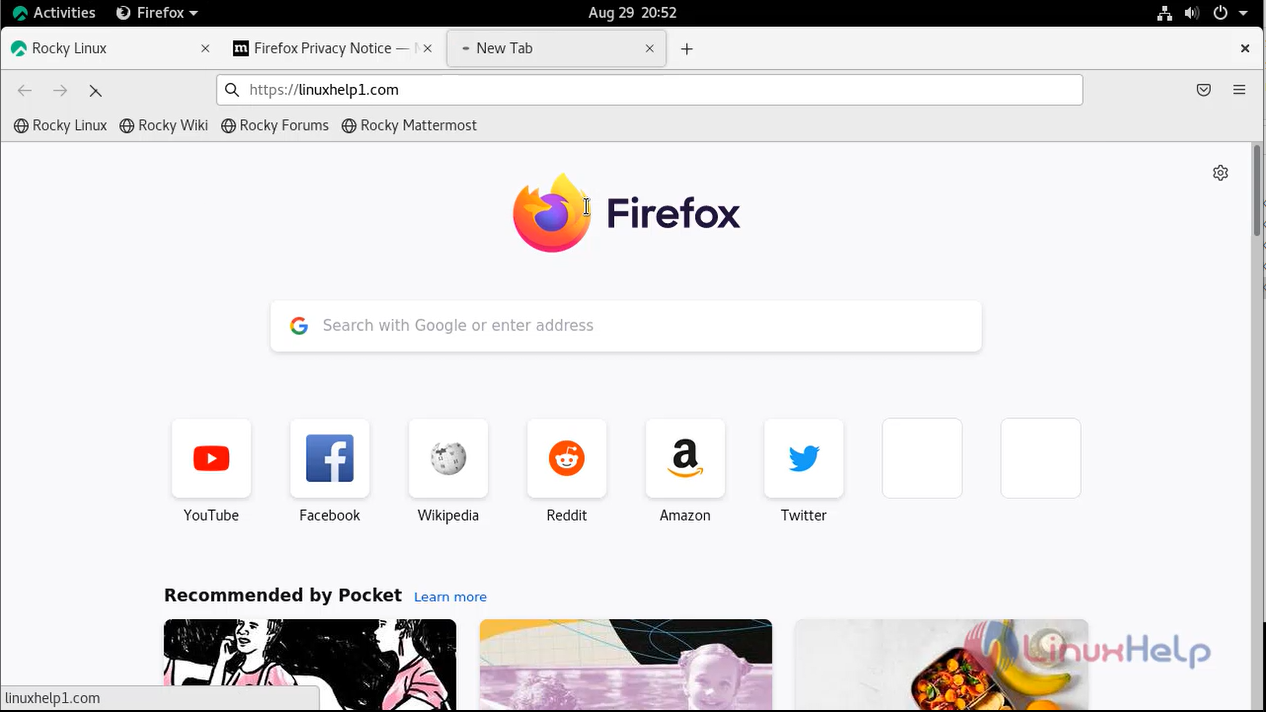
Step 17: Go to Browser and search your domain as shown in the below image
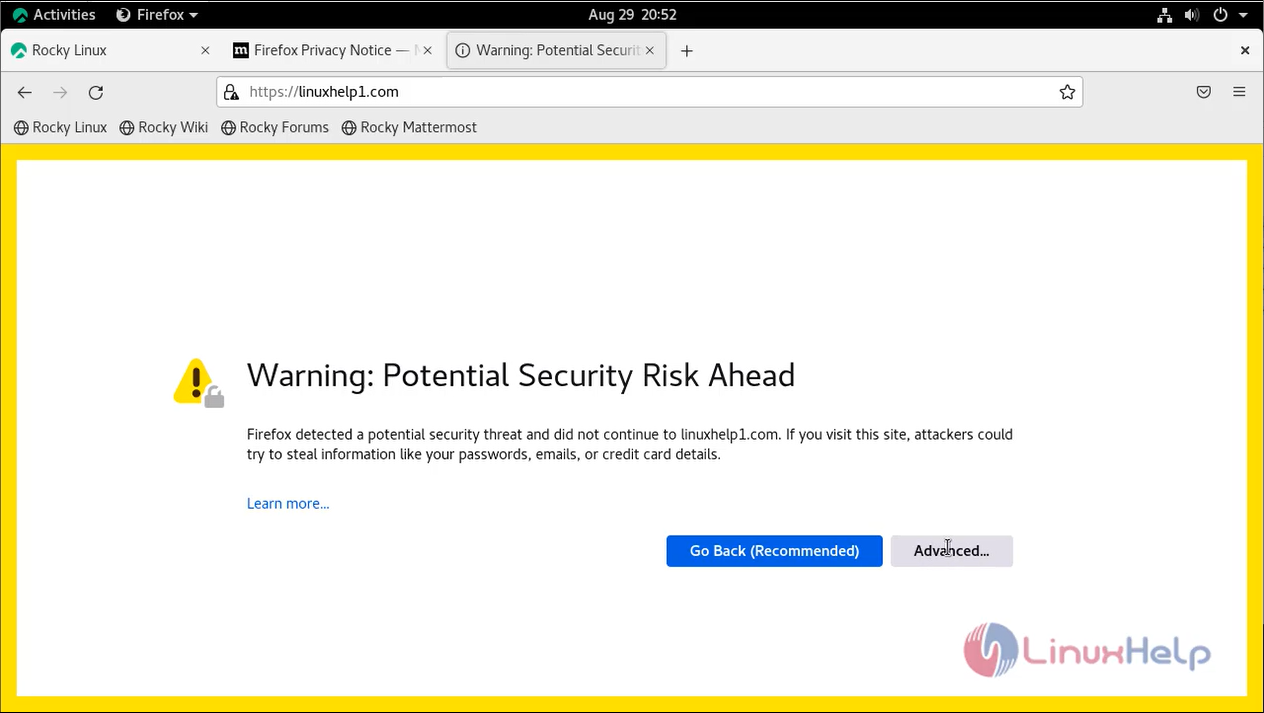
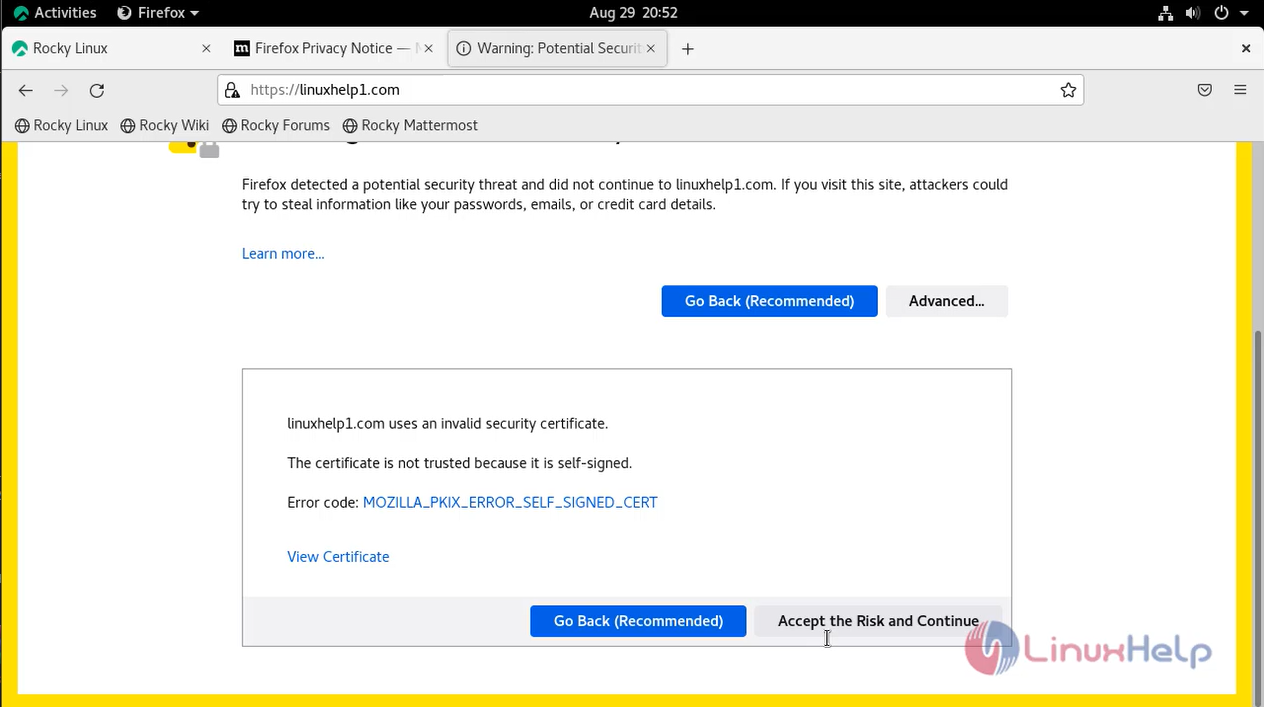
Step 18: Click Advanced and then click Accept the Risk and Continue as shown in the below images
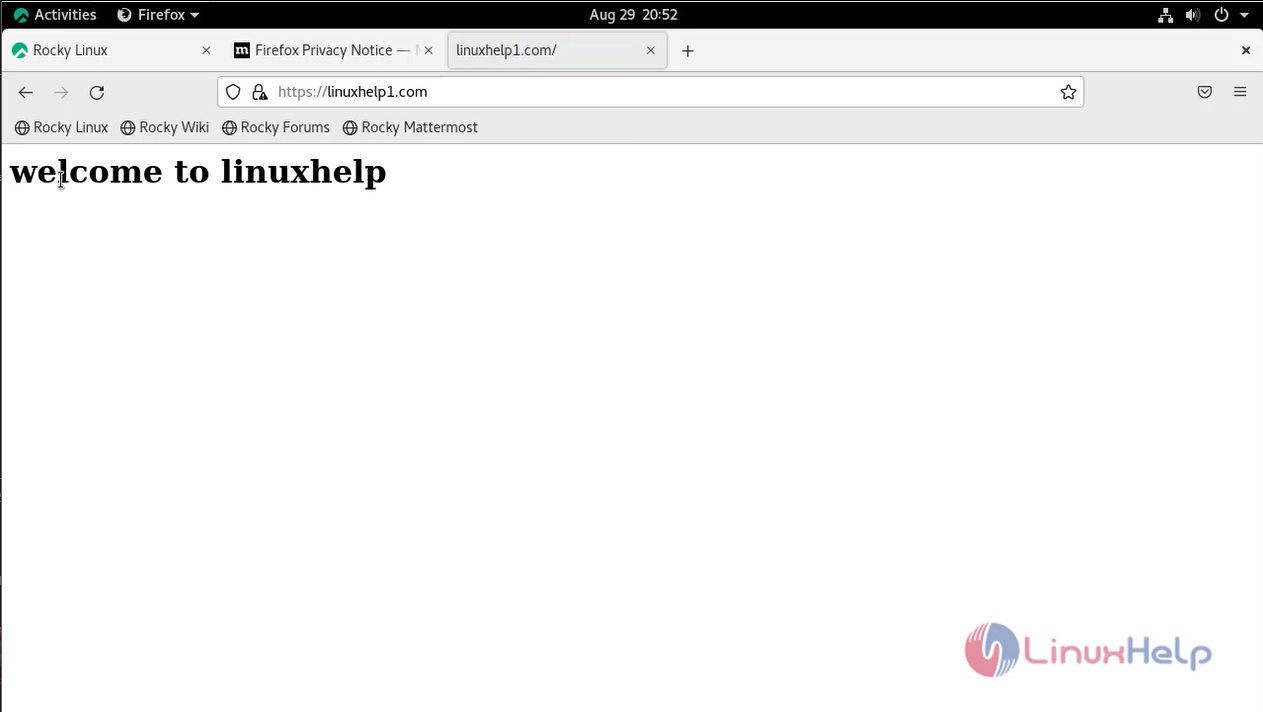
Output
Conclusion:
We have reached the end of this article. In this guide, we have walked you through the steps required to install and configure OpenSSL for apache on Rocky Linux 8.6. Your feedback is much welcome.
Comments ( 0 )
No comments available