How to Install Pligg - Content Management System
To install Pligg - A Content Management System
Pligg is a free CMS social publishing software in which an individual user can enter their websites and connect with other users. Installation of Pligg is explained in this manual.
To install Pligg
Before installing Pligg, install the required dependency packages.
[root@linuxhelp1 ~]# yum install mysql mysql-server httpd php php-mysql php-gd php-imap php-ldap php-odbc php-pear php-xml php-xmlrpc php-mbstring -y
Loaded plugins: fastestmirror, refresh-packagekit, security
Setting up Install Process
Loading mirror speeds from cached hostfile
 * base: centos.webwerks.com
 * extras: centos.webwerks.com
 * updates: centos.webwerks.com
Resolving Dependencies
-->  Running transaction check
--->  Package httpd.x86_64 0:2.2.15-53.el6.centos will be updated
--->  Package httpd.x86_64 0:2.2.15-54.el6.centos will be an update
-->  Processing Dependency: httpd-tools = 2.2.15-54.el6.centos for package: httpd-2.2.15-54.el6.centos.x86_64
--->  Package mysql.x86_64 0:5.1.73-7.el6 will be installed
--->  Package mysql-server.x86_64 0:5.1.73-7.el6 will be installed
-->  Processing Dependency: perl-DBI for package: mysql-server-5.1.73-7.el6.x86_64
-->  Processing Dependency: perl-DBD-MySQL for package: mysql-server-5.1.73-7.el6.x86_64
-->  Processing Dependency: perl(DBI) for package: mysql-server-5.1.73-7.el6.x86_64
--->  Package php.x86_64 0:5.3.3-47.el6 will be installed
.
.
.
Installed:
  mysql.x86_64 0:5.1.73-7.el6      mysql-server.x86_64 0:5.1.73-7.el6   php.x86_64 0:5.3.3-47.el6            php-gd.x86_64 0:5.3.3-47.el6
  php-imap.x86_64 0:5.3.3-47.el6   php-ldap.x86_64 0:5.3.3-47.el6       php-mbstring.x86_64 0:5.3.3-47.el6   php-mysql.x86_64 0:5.3.3-47.el6
  php-odbc.x86_64 0:5.3.3-47.el6   php-pear.noarch 1:1.9.4-5.el6        php-xml.x86_64 0:5.3.3-47.el6        php-xmlrpc.x86_64 0:5.3.3-47.el6

Dependency Installed:
  libXpm.x86_64 0:3.5.10-2.el6    libc-client.x86_64 0:2007e-11.el6   perl-DBD-MySQL.x86_64 0:4.013-3.el6   perl-DBI.x86_64 0:1.609-4.el6
  php-cli.x86_64 0:5.3.3-47.el6   php-common.x86_64 0:5.3.3-47.el6    php-pdo.x86_64 0:5.3.3-47.el6         unixODBC.x86_64 0:2.2.14-14.el6

Updated:
  httpd.x86_64 0:2.2.15-54.el6.centos

Dependency Updated:
  httpd-tools.x86_64 0:2.2.15-54.el6.centos

Complete!
Start the mysql and Apache services.
[root@linuxhelp1 ~]# /etc/init.d/mysqld start
Initializing MySQL database:  Installing MySQL system tables...
OK
Filling help tables...
OK

To start mysqld at boot time you have to copy
support-files/mysql.server to the right place for your system

PLEASE REMEMBER TO SET A PASSWORD FOR THE MySQL root USER !
To do so, start the server, then issue the following commands:

/usr/bin/mysqladmin -u root password ' new-password'
/usr/bin/mysqladmin -u root -h linuxhelp1 password ' new-password'

Alternatively you can run:
/usr/bin/mysql_secure_installation

which will also give you the option of removing the test
databases and anonymous user created by default.  This is
strongly recommended for production servers.

See the manual for more instructions.

You can start the MySQL daemon with:
cd /usr   /usr/bin/mysqld_safe &

You can test the MySQL daemon with mysql-test-run.pl
cd /usr/mysql-test   perl mysql-test-run.pl

Please report any problems with the /usr/bin/mysqlbug script!

                                                           [  OK  ]
Starting mysqld:                                           [  OK  ]
[root@linuxhelp1 ~]# chkconfig mysqld on
[root@linuxhelp1 ~]# /etc/init.d/httpd start
Starting httpd:                                            [  OK  ]
[root@linuxhelp1 ~]# chkconfig httpd on
Set the password for MySQL Root by using the following command.
[root@linuxhelp1 ~]# mysql_secure_installation
NOTE: RUNNING ALL PARTS OF THIS SCRIPT IS RECOMMENDED FOR ALL MySQL
      SERVERS IN PRODUCTION USE!  PLEASE READ EACH STEP CAREFULLY!

In order to log into MySQL to secure it, we' ll need the current
password for the root user.  If you' ve just installed MySQL, and
you haven' t set the root password yet, the password will be blank,
so you should just press enter here.

Enter current password for root (enter for none):
OK, successfully used password, moving on...

Setting the root password ensures that nobody can log into the MySQL
root user without the proper authorisation.

Set root password? [Y/n]
New password:
Re-enter new password:
Password updated successfully!
Reloading privilege tables..
 ... Success!

By default, a MySQL installation has an anonymous user, allowing anyone
to log into MySQL without having to have a user account created for
them.  This is intended only for testing, and to make the installation
go a bit smoother.  You should remove them before moving into a
production environment.

Remove anonymous users? [Y/n]
 ... Success!

Normally, root should only be allowed to connect from ' localhost' .  This
ensures that someone cannot guess at the root password from the network.

Disallow root login remotely? [Y/n]
 ... Success!

By default, MySQL comes with a database named ' test'  that anyone can
access.  This is also intended only for testing, and should be removed
before moving into a production environment.

Remove test database and access to it? [Y/n]
 - Dropping test database...
 ... Success!
 - Removing privileges on test database...
 ... Success!

Reloading the privilege tables will ensure that all changes made so far
will take effect immediately.

Reload privilege tables now? [Y/n]
 ... Success!

Cleaning up...


All done!  If you' ve completed all of the above steps, your MySQL
installation should now be secure.

Thanks for using MySQL!
Utilise the following command to create MySQL Database and user for Pligg
[root@linuxhelp1 ~]# mysql -u root -p
Enter password:
Welcome to the MySQL monitor.  Commands end with   or g.
Your MySQL connection id is 11
Server version: 5.1.73 Source distribution

Copyright (c) 2000, 2013, Oracle and/or its affiliates. All rights reserved.

Oracle is a registered trademark of Oracle Corporation and/or its
affiliates. Other names may be trademarks of their respective
owners.

Type ' help '  or ' h'  for help. Type ' c'  to clear the current input statement.

mysql>  create database pligg
Query OK, 1 row affected (0.00 sec)

mysql>  grant all privileges on pligg.* to user1 identified by ' linuxc'
Query OK, 0 rows affected (0.00 sec)

mysql>  flush privileges
Query OK, 0 rows affected (0.00 sec)

mysql>  exit
Bye
Open iptables file and enable the apache default port 80 in the firewall.
[root@linuxhelp1 ~]# vim /etc/sysconfig/iptables
-A INPUT -p udp -m state --state NEW --dport 80 -j ACCEPT
-A INPUT -p tcp -m state --state NEW --dport 80 -j ACCEPT
[root@linuxhelp1 ~]# service iptables save
iptables: Saving firewall rules to /etc/sysconfig/iptables:[  OK  ]
[root@linuxhelp1 ~]# service iptables restart
iptables: Setting chains to policy ACCEPT: filter          [  OK  ]
iptables: Flushing firewall rules:                         [  OK  ]
iptables: Unloading modules:                               [  OK  ]
iptables: Applying firewall rules:                         [  OK  ]
Now Disable SELinux and reboot your system
# This file controls the state of SELinux on the system.
# SELINUX= can take one of these three values:
#     enforcing - SELinux security policy is enforced.
#     permissive - SELinux prints warnings instead of enforcing.
#     disabled - No SELinux policy is loaded.
SELINUX=disabled
# SELINUXTYPE= can take one of these two values:
#     targeted - Targeted processes are protected,
#     mls - Multi Level Security protection.
SELINUXTYPE=targeted
[root@linuxhelp1 ~]# setenforce 0
[root@linuxhelp1 ~]# sestatus
SELinux status:                 enabled
SELinuxfs mount:                /selinux
Current mode:                   permissive
Mode from config file:          disabled
Policy version:                 24
Policy from config file:        targeted
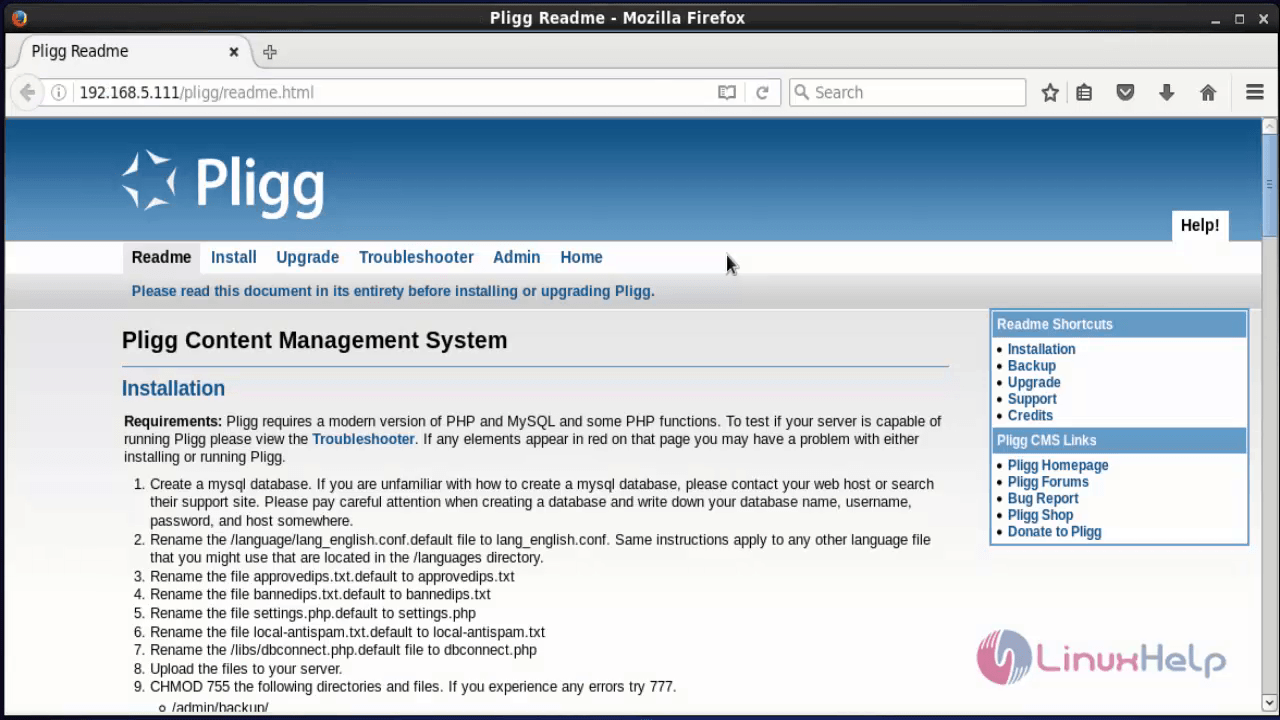
Download the pligg by using the wget command.
[root@linuxhelp1 ~]# wget http://liquidtelecom.dl.sourceforge.net/project/pligg/Pligg%20CMS/Pligg%20CMS%201.2.2.zip
Resolving liquidtelecom.dl.sourceforge.net... 197.155.77.8
Connecting to liquidtelecom.dl.sourceforge.net|197.155.77.8|:80... connected.
HTTP request sent, awaiting response... 200 OK
Length: 1599431 (1.5M) [application/octet-stream]
Saving to: “ download?source=typ_redirect”

100%[======================================================================================================> ] 1,599,431    210K/s   in 9.7s

2016-07-23 10:36:22 (161 KB/s) - “ download?source=typ_redirect”  saved [1599431/1599431]
Extract the downloaded package.
[root@linuxhelp1 ~]# ls
anaconda-ks.cfg  Documents  download?source=typ_redirect  install.log.syslog  Pictures  Templates
Desktop          Downloads  install.log                   Music               Public    Videos
[root@linuxhelp1 ~]# unzip download?source=typ_redirect -d /var/www/html/
Archive:  download?source=typ_redirect
   creating: /var/www/html/pligg/
  inflating: /var/www/html/Pligg Homepage.url
  inflating: /var/www/html/Pligg README.txt
   creating: /var/www/html/pligg/3rdparty/
   creating: /var/www/html/pligg/3rdparty/API/
  inflating: /var/www/html/pligg/3rdparty/API/api.php
.
.
.
extracting: /var/www/html/pligg/widgets/statistics/templates/index.html
  inflating: /var/www/html/pligg/widgets/statistics/templates/settings.tpl
  inflating: /var/www/html/pligg/widgets/statistics/templates/widget.tpl
Move to the web root directory and rename the default files.
[root@linuxhelp1 ~]# cd /var/www/html/pligg/
[root@linuxhelp1 pligg]# mv languages/lang_english.conf.default languages/lang_english.conf
[root@linuxhelp1 pligg]# mv libs/dbconnect.php.default libs/dbconnect.php
[root@linuxhelp1 pligg]# mv settings.php.default settings.php
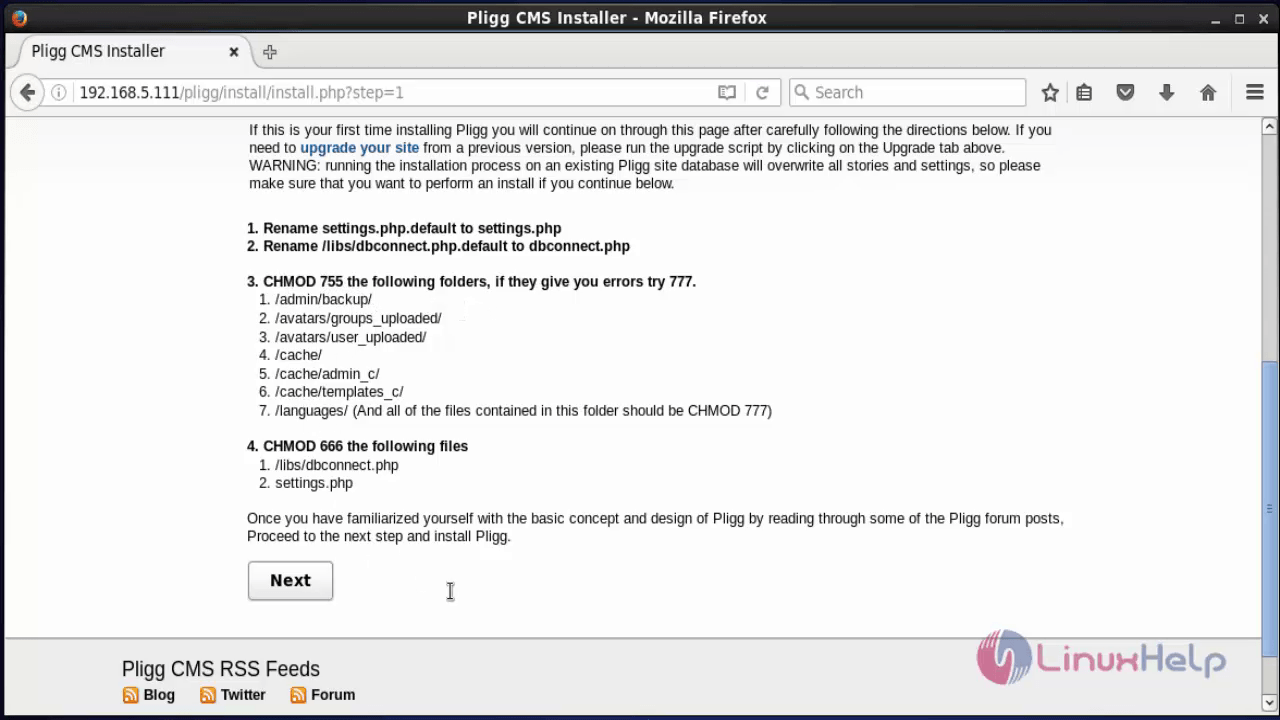
Set required permissions to the following folders by using the following command.
[root@linuxhelp1 pligg]# chmod 755 admin/backup/
[root@linuxhelp1 pligg]# chmod 755 avatars/groups_uploaded/
[root@linuxhelp1 pligg]# chmod 755 avatars/user_uploaded/
[root@linuxhelp1 pligg]# chmod 755 cache/
[root@linuxhelp1 pligg]# chmod 755 cache/admin_c/
[root@linuxhelp1 pligg]# chmod 755 cache/templates_c/*.*
[root@linuxhelp1 pligg]# chmod 755 templates/*.*
[root@linuxhelp1 pligg]# chmod 755 languages/*.*
[root@linuxhelp1 pligg]# chmod 666 libs/dbconnect.php
[root@linuxhelp1 pligg]# chmod 666 settings.php
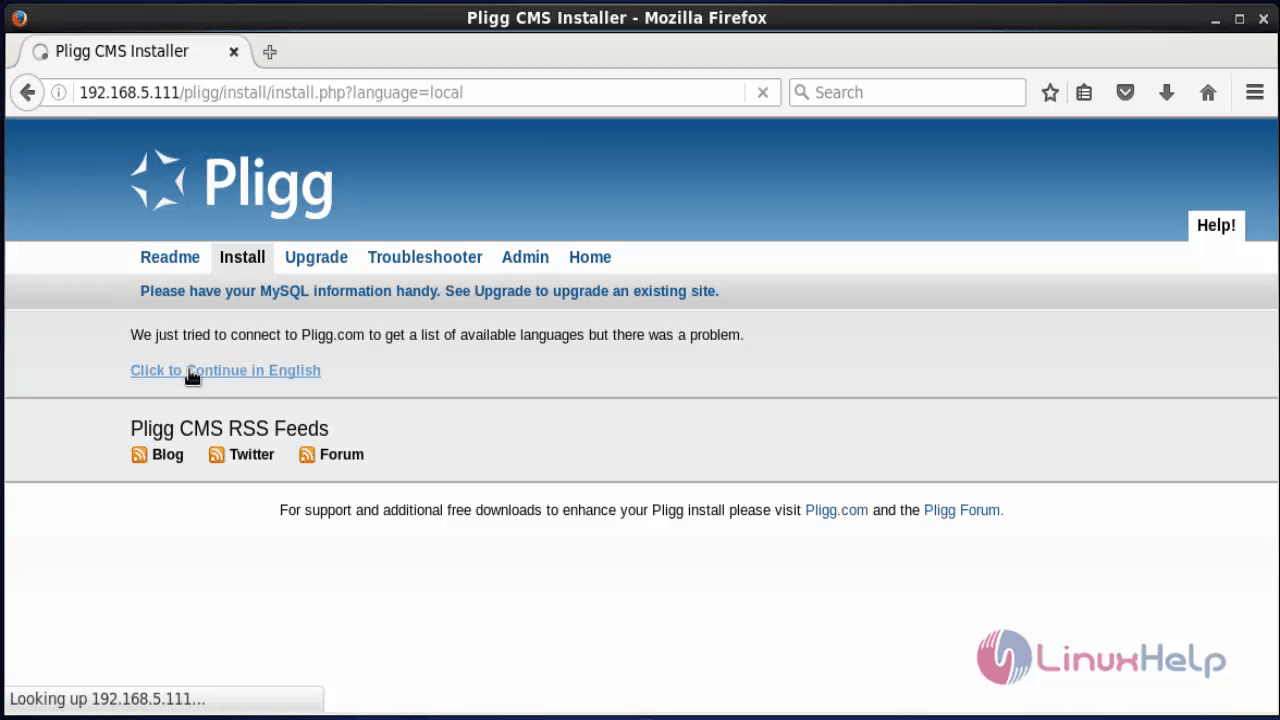
Navigate to http://< IP_address> /pligg/install/index.php and start installing.
Hit " Click to continue in English"
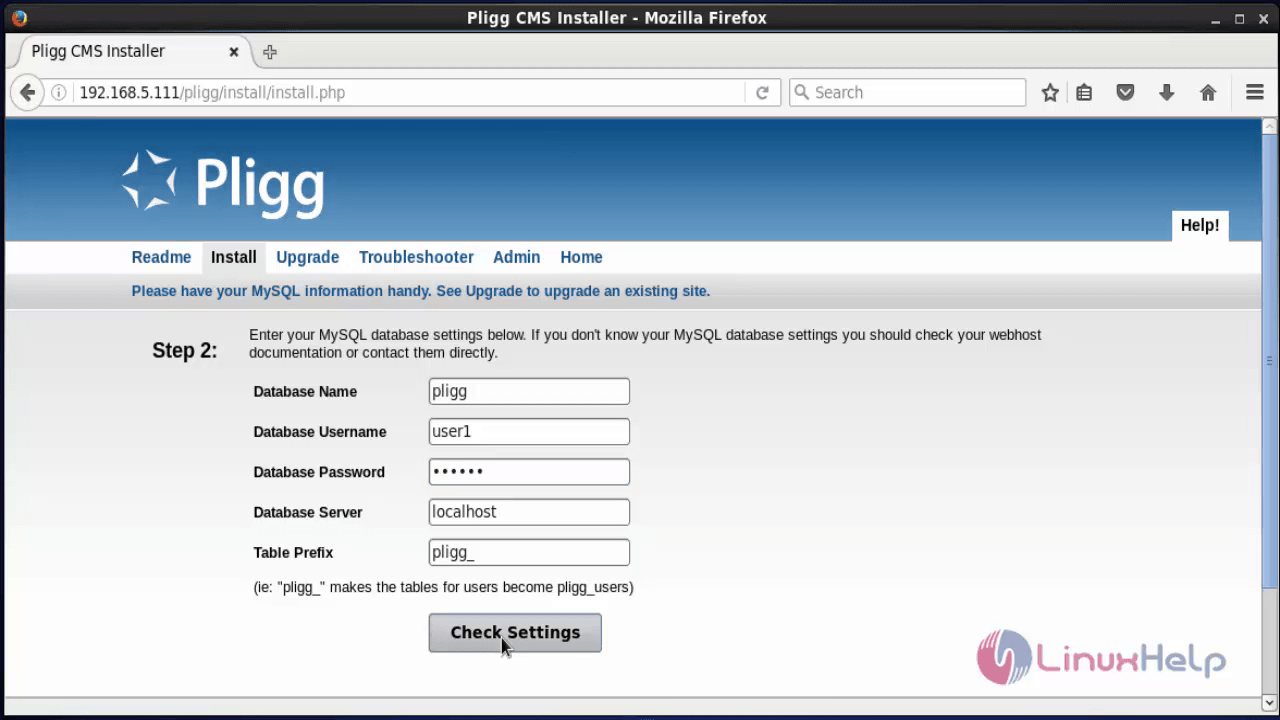
Enter the Database name, username and password. Click Check Settings to verify.
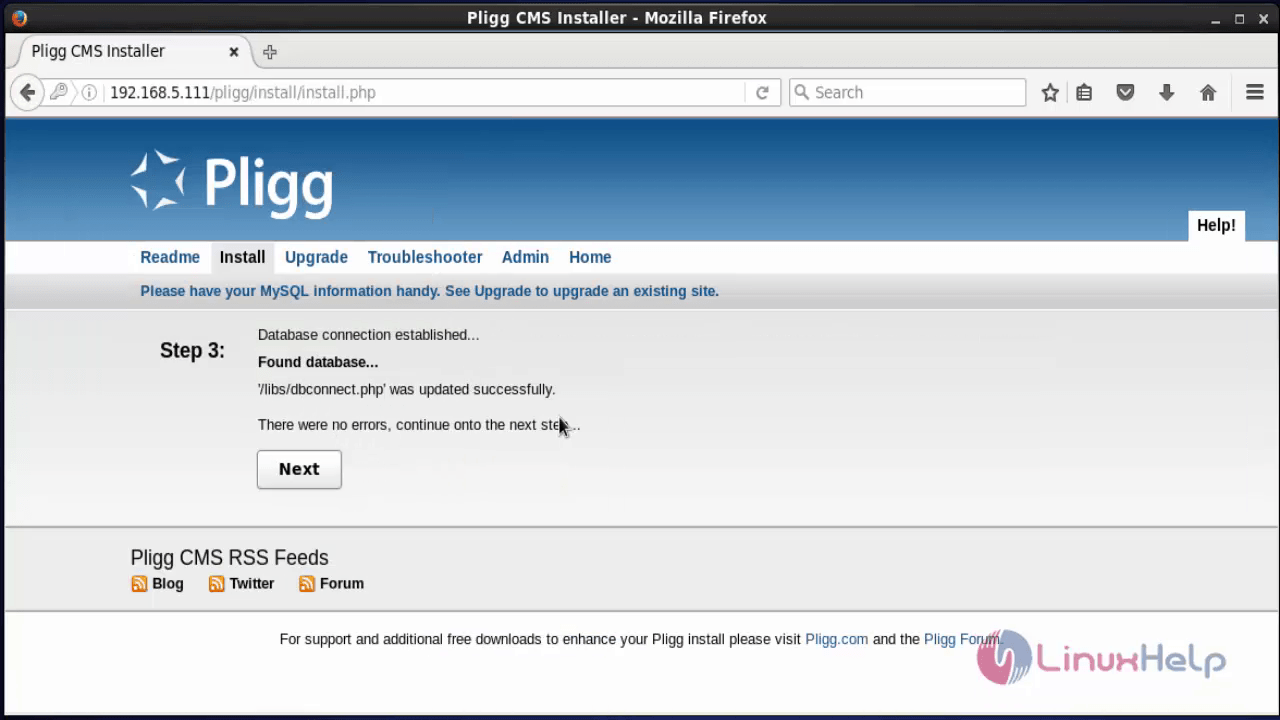
Now the database connection is established successfully. click Next to proceed further.
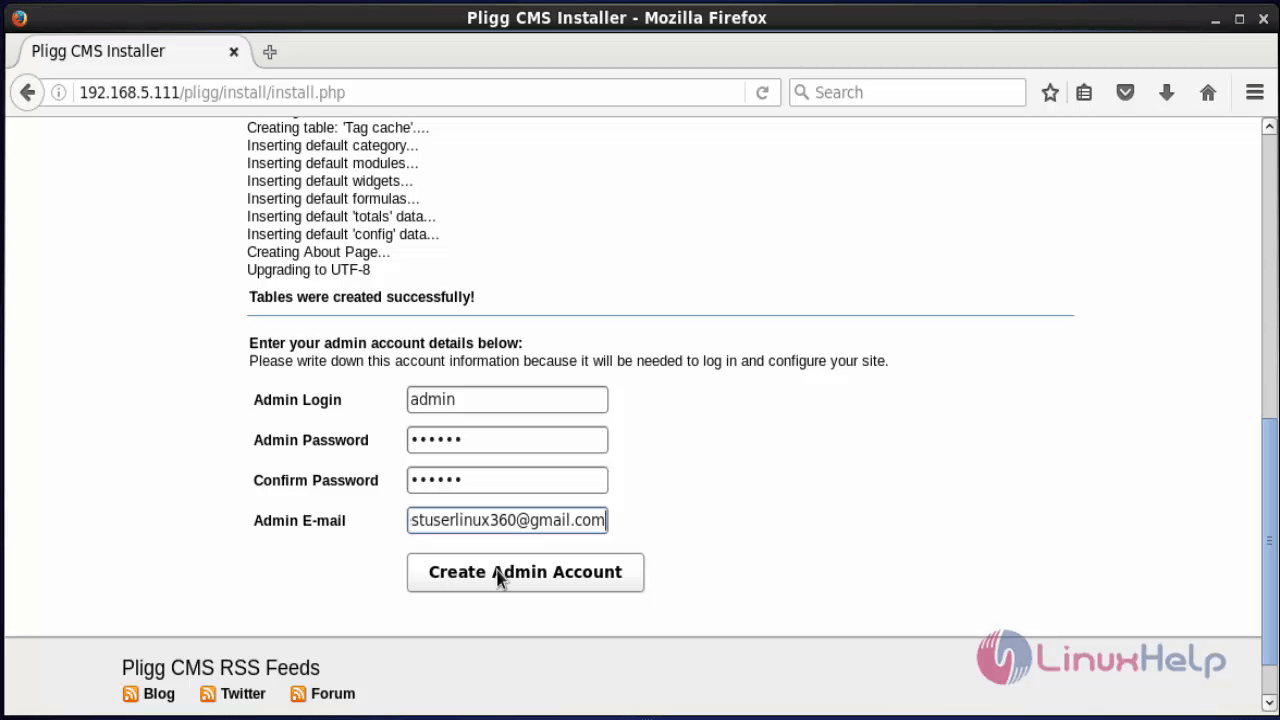
Enter the administrative account details and click Create Admin Account.
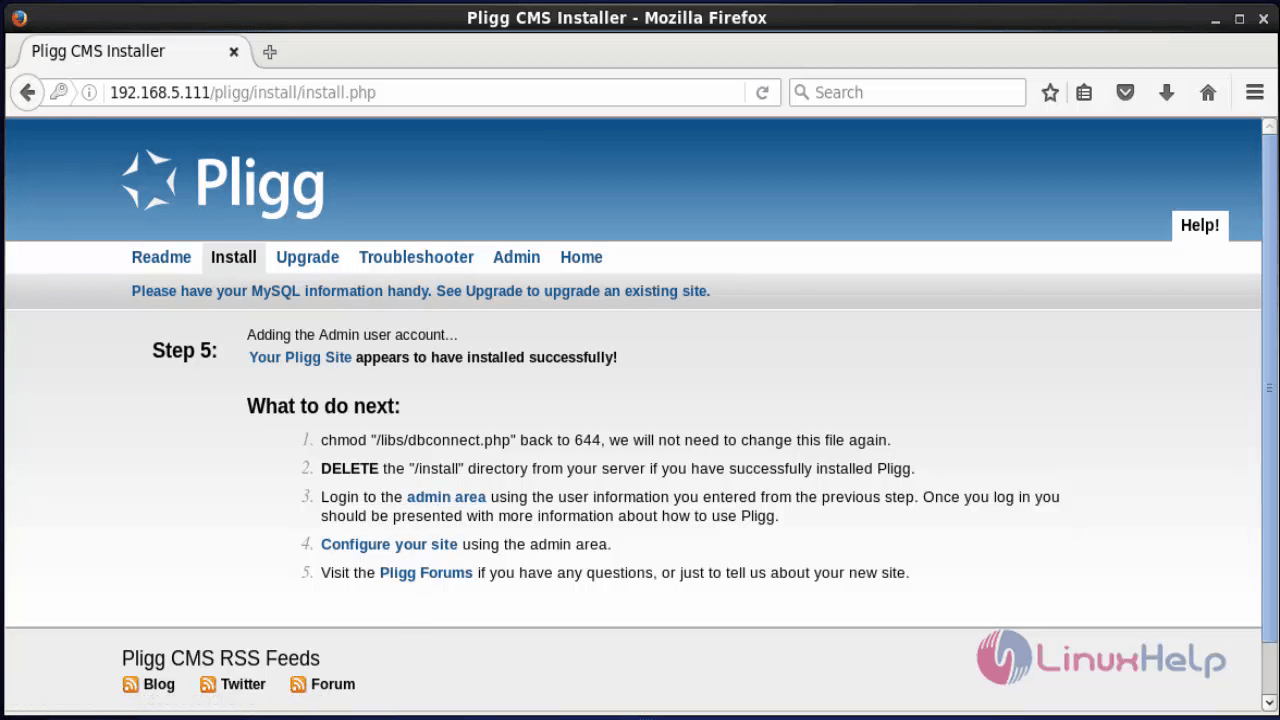
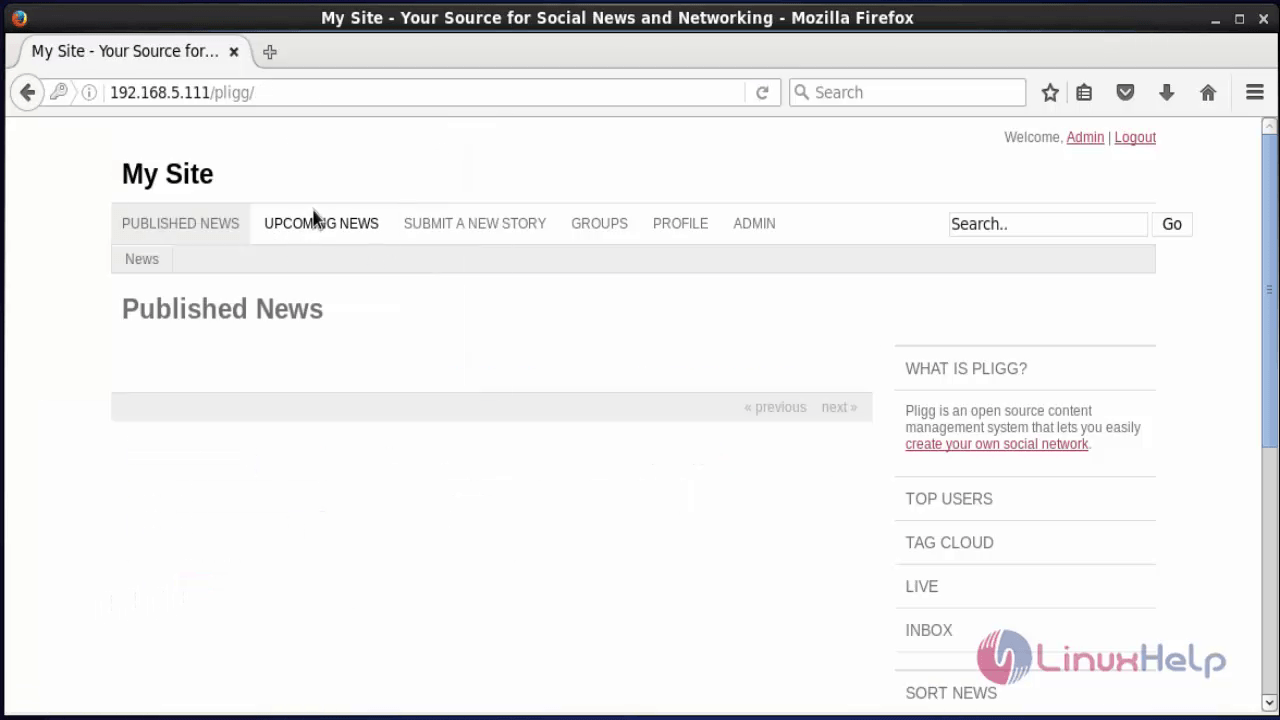
The Pligg site is successfully installed.
Delete the Install folder, by running the following command.
[root@linuxhelp1 pligg]# rm -rf install/
Change the permission “ dbconnect.php” file to 644
[root@linuxhelp1 pligg]# chmod 644 libs/dbconnect.php
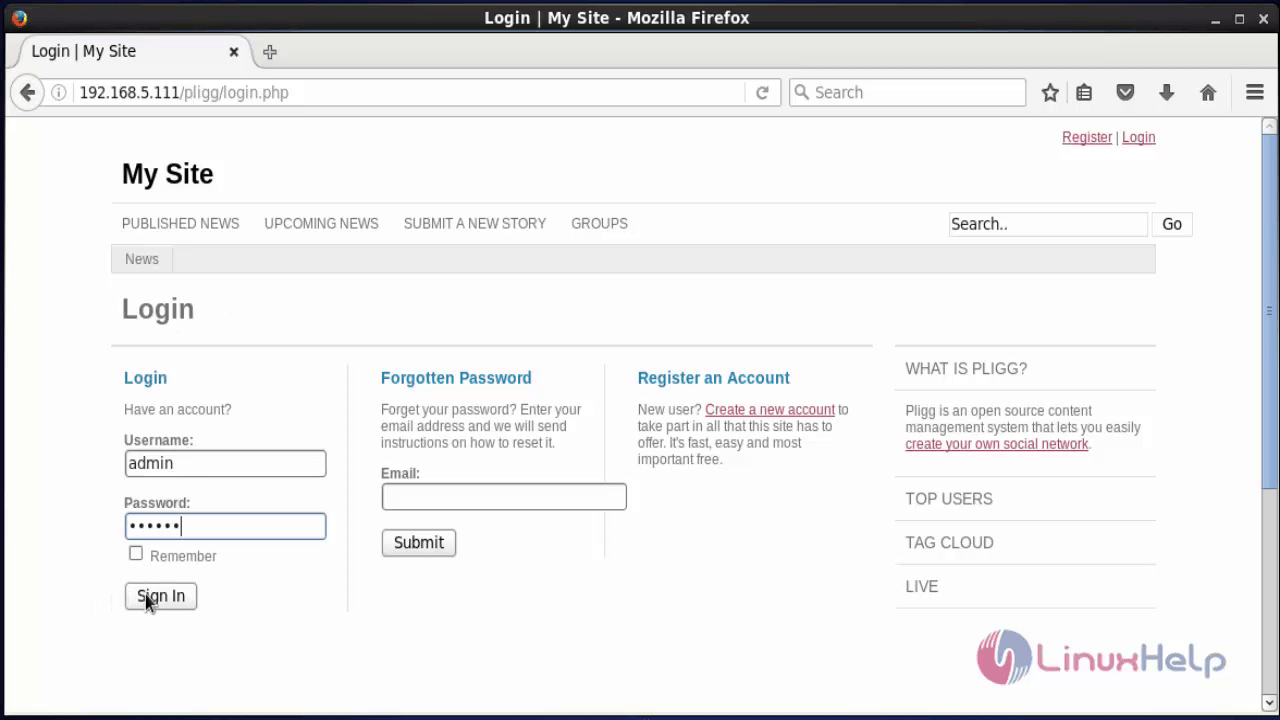
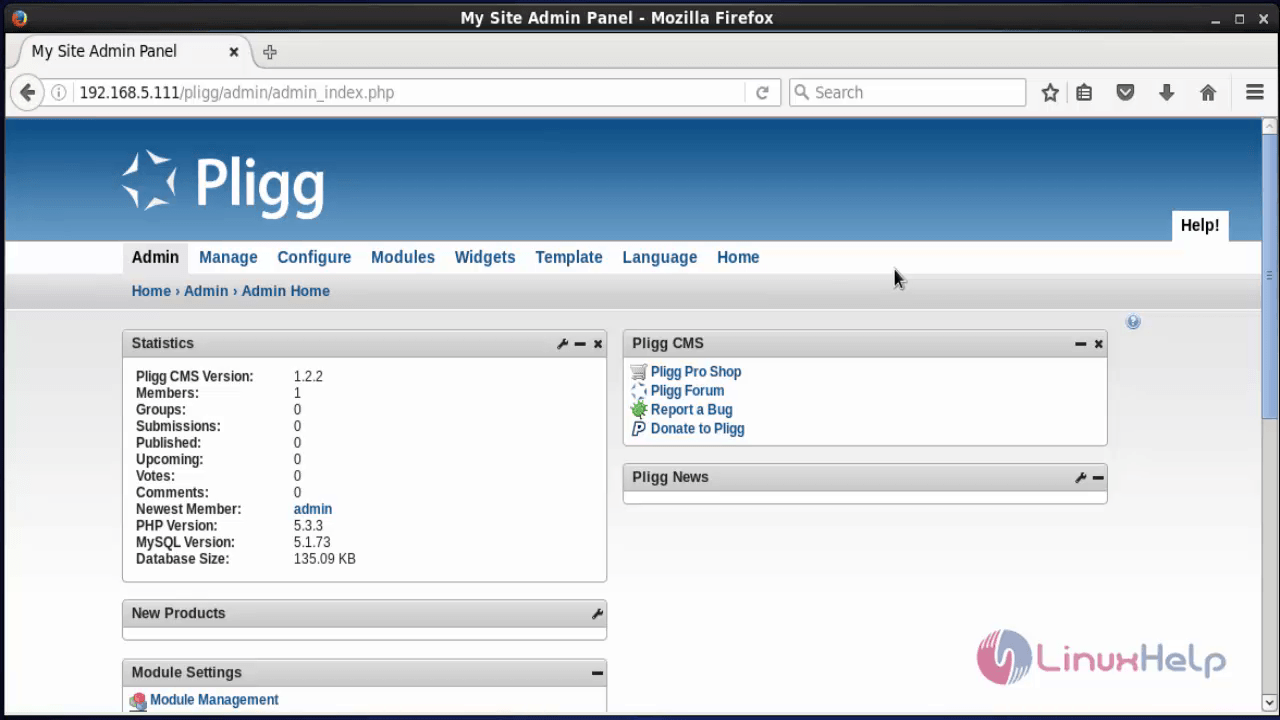
Login to admin console.
To publish articles in Pligg using Admin credentials, visit
https://www.linuxhelp.com/how-to-publish-articles-in-pligg-using-admin-credentials/
To create new user and create articles in `Pligg, visit
https://www.linuxhelp.com/how-to-create-new-user-and-publish-articles-in-pligg/
To manage Admin in Pligg, visit
https://www.linuxhelp.com/how-to-manage-admin-in-pligg/
Comments ( 0 )
No comments available