How to use Asterisk AMD Answering Machine Detection on Debian 12
To Use Asterisk AMD Answering Machine Detection On Debian 12
Introduction
This application attempts to detect answering machines at the beginning of outbound calls.Simply call this application after the call has been answered (outbound only, of course).
Procedure Steps:
Step 1: Check the OS version by using the below command.
root@linuxhelp:~# cat /etc/os-release
PRETTY_NAME="Debian GNU/Linux 12 (bookworm)"
NAME="Debian GNU/Linux"
VERSION_ID="12"
VERSION="12 (bookworm)"
VERSION_CODENAME=bookworm
ID=debian
HOME_URL=https://www.debian.org/
SUPPORT_URL=https://www.debian.org/support
BUG_REPORT_URL=https://bugs.debian.org/
Step 2: Check the asterisk version by using the below command.
root@linuxhelp:~# asterisk -V
Asterisk 20.4.0
Step 3: Go to the following location by using the below command.
root@linuxhelp:~# cd /etc/asterisk/
Step 4: Open the extensions.conf file and make dialplan configuration with amd application by using the below command.
root@linuxhelp:/etc/asterisk# vim extensions.conf
exten => 110,1,NoOp(Extension 110)
same=>n,Answer()
same=>n,AMD()
same=>n,GotoIf($[ "${AMDSTATUS}" = "HUMAN" ]?111,human)
same=>n,GotoIF($[ "${AMDSTATUS}" = "MACHINE" ]?111,machine)
same=>n,Dial(PJSIP/110,10)
same=>n,Playback(tt-hangup)
same=>n,Hangup()
exten=>111,1(human),NoOp(Extension 111)
same=>n,Answer()
same=>n,Dial(PJSIP/111,10)
same=>n(machine),Playback(tt-hangup)
same=>n,Hangup()
exten=>112,1,NoOp(Extension 112)
same=>n,Answer()
same=>n,Dial(PJSIP/112,10)
same=>n,Playback(welcome)
same=>n,Hangup()
Step 5: Open the amd.conf file and make the configuration for amd by using the below command.
root@linuxhelp:/etc/asterisk# vim amd.conf
 ; Answering Machine Detection Configuration
;
[general]
total_analysis_time = 5000	; Maximum time allowed for the algorithm to decide
				; on whether the audio represents a HUMAN, or a MACHINE
silence_threshold = 256		; If the average level of noise in a sample does not reach
				; this value, from a scale of 0 to 32767, then we will consider
				; it to be silence.
;playback_file = 		; Audio file to play while AMD is running, so the caller
				; does not just hear silence. Note that specifying this here
				; will apply to ALL AMD runs, so you may wish to set it
				; in the dialplan as an argument to AMD() instead.
				; Default is no audio file (not to play anything).
; Greeting ;
initial_silence = 2500		; Maximum silence duration before the greeting.
				; If exceeded, then the result is detection as a MACHINE.
after_greeting_silence = 800	; Silence after detecting a greeting.
				; If exceeded, then the result is detection as a HUMAN
greeting = 1500			; Maximum length of a greeting. If exceeded, then the
				; result is detection as a MACHINE.
                                                          ; Word detection ;
min_word_length = 100		; Minimum duration of Voice to considered as a word
maximum_word_length = 5000	; Maximum duration of a single Voice utterance allowed.
between_words_silence = 50	; Minimum duration of silence after a word to consider
				; the audio what follows as a new word

maximum_number_of_words = 2	; Maximum number of words in the greeting
				; If exceeded, then the result is detection as a MACHINE
Step 6: Login to the Asterisk Console by using the below command.
root@linuxhelp:~# asterisk -rvvvvvvvvvvvvvvvvvvvvvvvvvvvvv
Asterisk 20.4.0, Copyright (C) 1999 - 2022, Sangoma Technologies Corporation and others.
Created by Mark Spencer <markster@digium.com>
Asterisk comes with ABSOLUTELY NO WARRANTY; type 'core show warranty' for details.
This is free software, with components licensed under the GNU General Public
License version 2 and other licenses; you are welcome to redistribute it under
certain conditions. Type 'core show license' for details.
=========================================================================
Connected to Asterisk 20.4.0 currently running on linuxhelp (pid = 1281)
linuxhelp*CLI>
Step 7: Reload the dialplan by using the below command.
linuxhelp*CLI> dialplan reload
Dialplan reloaded.
    -- Time to scan old dialplan and merge leftovers back into the new: 0.000006 sec
    -- Time to restore hints and swap in new dialplan: 0.000007 sec
    -- Time to delete the old dialplan: 0.000027 sec
    -- Total time merge_contexts_delete: 0.000040 sec
    -- pbx_config successfully loaded 1 contexts (enable debug for details).
Step 8: Reload the Module for applying the changes of the configuration by using the below command.
linuxhelp*CLI> core reload app_amd
Usage: core reload
       Execute a global reload.
Step 9: Make the call to check the AMD Status value HUMAN by using the below command.
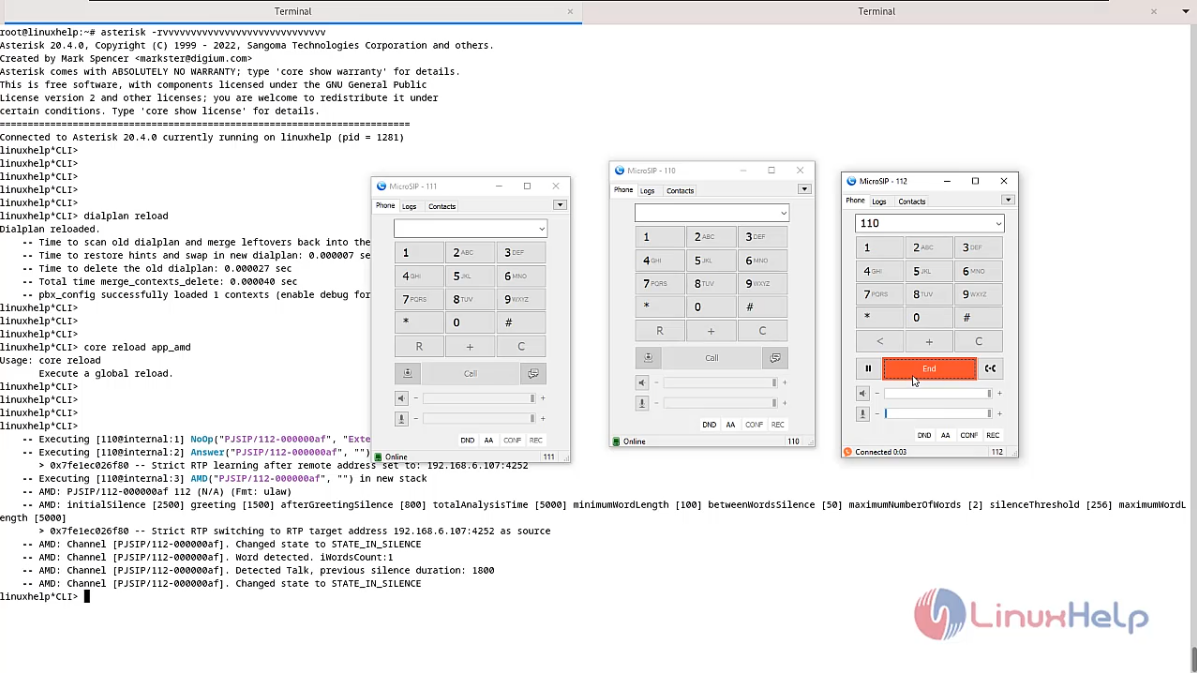
linuxhelp*CLI>
    -- Executing [110@internal:1] NoOp("PJSIP/112-000000af", "Extension 110") in new stack
    -- Executing [110@internal:2] Answer("PJSIP/112-000000af", "") in new stack
       > 0x7fe1ec026f80 -- Strict RTP learning after remote address set to: 192.168.6.107:4252
    -- Executing [110@internal:3] AMD("PJSIP/112-000000af", "") in new stack
    -- AMD: PJSIP/112-000000af 112 (N/A) (Fmt: ulaw)
    -- AMD: initialSilence [2500] greeting [1500] afterGreetingSilence [800] totalAnalysisTime [5000] minimumWordLength [100] betweenWordsSilence [50] maximumNumberOfWords [2] silenceThreshold [256] maximumWordLength [5000]
       > 0x7fe1ec026f80 -- Strict RTP switching to RTP target address 192.168.6.107:4252 as source
    -- AMD: Channel [PJSIP/112-000000af]. Changed state to STATE_IN_SILENCE
    -- AMD: Channel [PJSIP/112-000000af]. Word detected. iWordsCount:1
    -- AMD: Channel [PJSIP/112-000000af]. Detected Talk, previous silence duration: 1800
    -- AMD: Channel [PJSIP/112-000000af]. Changed state to STATE_IN_SILENCE
    -- AMD: Channel [PJSIP/112-000000af]. HUMAN: silenceDuration:800 afterGreetingSilence:800
    -- Executing [110@internal:4] GotoIf("PJSIP/112-000000af", "1?111,human") in new stack
    -- Goto (internal,111,1)
    -- Executing [111@internal:1] NoOp("PJSIP/112-000000af", "Extension 111") in new stack
    -- Executing [111@internal:2] Answer("PJSIP/112-000000af", "") in new stack
    -- Executing [111@internal:3] Dial("PJSIP/112-000000af", "PJSIP/111,10") in new stack
    -- Called PJSIP/111
    -- PJSIP/111-000000b0 is ringing
       > 0x7fe1ec026f80 -- Strict RTP learning complete - Locking on source address 192.168.6.107:4252
  == Spawn extension (internal, 111, 3) exited non-zero on 'PJSIP/112-000000af'
Step 10: Make the call to check the AMD status value MACHINE by using the below command.

linuxhelp*CLI>
    -- Executing [110@internal:1] NoOp("PJSIP/112-000000b1", "Extension 110") in new stack
    -- Executing [110@internal:2] Answer("PJSIP/112-000000b1", "") in new stack
       > 0x7fe1ec026f80 -- Strict RTP learning after remote address set to: 192.168.6.107:4254
    -- Executing [110@internal:3] AMD("PJSIP/112-000000b1", "") in new stack
    -- AMD: PJSIP/112-000000b1 112 (N/A) (Fmt: ulaw)
    -- AMD: initialSilence [2500] greeting [1500] afterGreetingSilence [800] totalAnalysisTime [5000] minimumWordLength [100] betweenWordsSilence [50] maximumNumberOfWords [2] silenceThreshold [256] maximumWordLength [5000]
       > 0x7fe1ec026f80 -- Strict RTP switching to RTP target address 192.168.6.107:4254 as source
    -- AMD: Channel [PJSIP/112-000000b1]. Changed state to STATE_IN_SILENCE
    -- AMD: Channel [PJSIP/112-000000b1]. ANSWERING MACHINE: silenceDuration:2500 initialSilence:2500
    -- Executing [110@internal:4] GotoIf("PJSIP/112-000000b1", "0?111,human") in new stack
    -- Executing [110@internal:5] GotoIf("PJSIP/112-000000b1", "1?111,machine") in new stack
    -- Goto (internal,111,4)
    -- Executing [111@internal:4] Playback("PJSIP/112-000000b1", "tt-hangup") in new stack
    -- <PJSIP/112-000000b1> Playing 'tt-hangup.ulaw' (language 'en')
       > 0x7fe1ec026f80 -- Strict RTP learning complete - Locking on source address 192.168.6.107:4254
    -- Executing [111@internal:5] Hangup("PJSIP/112-000000b1", "") in new stack
  == Spawn extension (internal, 111, 5) exited non-zero on 'PJSIP/112-000000b1'
Conclusion:
We have reached the end of this article. In this guide, we have walked you through the steps required to use Asterisk AMD Answering Machine Detection on Debian 12. Your feedback is much welcome.
Comments ( 0 )
No comments available