How to install SSL Certificate to Secure Apache on Debian 11.3
- 00:35 cat /etc/os-release
- 00:46 apt-get install openssl
- 01:00 openssl req -x509 -nodes -days 365 -newkey rsa:2048 -keyout /etc/ssl/private/ca.key -out /etc/ssl/certs/ca.crt
- 02:05 mkdir /var/www/mine
- 02:20 nano /var/www/mine/index.php
- 02:51 chown -R www-data.www-data /var/www/mine/
- 03:18 chmod -R 775 /var/www/mine/
- 03:40 nano /etc/apache2/sites-available/mine-ssl.conf
- 04:28 a2ensite mine-ssl.conf
- 04:46 a2dissite default-ssl.conf
- 05:04 a2enmod ssl
- 05:17 systemctl restart apache2
TO Install SSL Certificate Secure Apache On Debian 11.3
Introduction:
SSL is a web protocol that allows sending traffic between server and client in a secured manner.It supplies secure and encrypted transactions between the browser and websites. This protocol generates a certificate that the end-user has to authenticate.
Installation Procedure:
Step 1: Check the OS version by using the below command
[root@linuxhelp ~]# cat /etc/os-release
PRETTY_NAME="Debian GNU/Linux 11 (bullseye)"
NAME="Debian GNU/Linux"
VERSION_ID="11"
VERSION="11 (bullseye)"
VERSION_CODENAME=bullseye
Step 2: Install OpenSSL by using the below command
[root@linuxhelp ~]#  apt-get install openssl
Reading package lists... Done
Building dependency tree... Done
Reading state information... Done
openssl is already the newest version (1.1.1n-0+deb11u2).
openssl set to manually installed.
0 upgraded, 0 newly installed, 0 to remove and 94 not upgraded.
Step 3 : Create The SSL Certificate as Follows by using the below command
[root@linuxhelp ~]# openssl req -x509 -nodes -days 365 -newkey rsa:2048 -keyout /etc/ssl/private/ca.key -out /etc/ssl/certs/ca.crt
Generating a RSA private key
......................................+++++
..............................................................................+++++
writing new private key to '/etc/ssl/private/ca.key'
-----
You are about to be asked to enter information that will be incorporated

into your certificate request.
What you are about to enter is what is called a Distinguished Name or a DN.
There are quite a few fields but you can leave some blank
For some fields there will be a default value,
If you enter '.', the field will be left blank.
-----
Country Name (2 letter code) [AU]:IN
State or Province Name (full name) [Some-State]:TN
Locality Name (eg, city) []:Chennai
Organization Name (eg, company) [Internet Widgits Pty Ltd]:sample
Organizational Unit Name (eg, section) []:sample
Common Name (e.g. server FQDN or YOUR name) []:192.168.6.133
Email Address []:abc@gmail.com
Step 4: Create own HTML directory and site configuration by using the below command
[root@linuxhelp ~]# mkdir /var/www/mine
[root@linuxhelp ~]# nano /var/www/mine/index.php
<h1> Welcome to Linux help </h1>
Step 5: Change ownership and permission by using the below command
[root@linuxhelp ~]# chown -R www-data.www-data /var/www/mine/
[root@linuxhelp ~]# chmod -R 775 /var/www/mine/
Step 6: Create Virtual Host for accessing the site with SSL by using the below command
[root@linuxhelp ~]# nano /etc/apache2/sites-available/mine-ssl.conf
Step 7: Enable site access by using the below command
[root@linuxhelp ~]# a2ensite mine-ssl.conf
Enabling site mine-ssl.
To activate the new configuration, you need to run:
  systemctl reload apache2
Step 8: Disable default site access by using the below command
[root@linuxhelp ~]# a2dissite default-ssl.conf
Site default-ssl already disabled
Step 9: Enable SSL module by using the below command
[root@linuxhelp ~]# a2enmod ssl
Considering dependency setenvif for ssl:
Module setenvif already enabled
Considering dependency mime for ssl:
Module mime already enabled
Considering dependency socache_shmcb for ssl:
Enabling module socache_shmcb.
Enabling module ssl.
Step 10: Restart the Apache service to make the changes effect by using the below command
[root@linuxhelp ~]# systemctl restart apache2
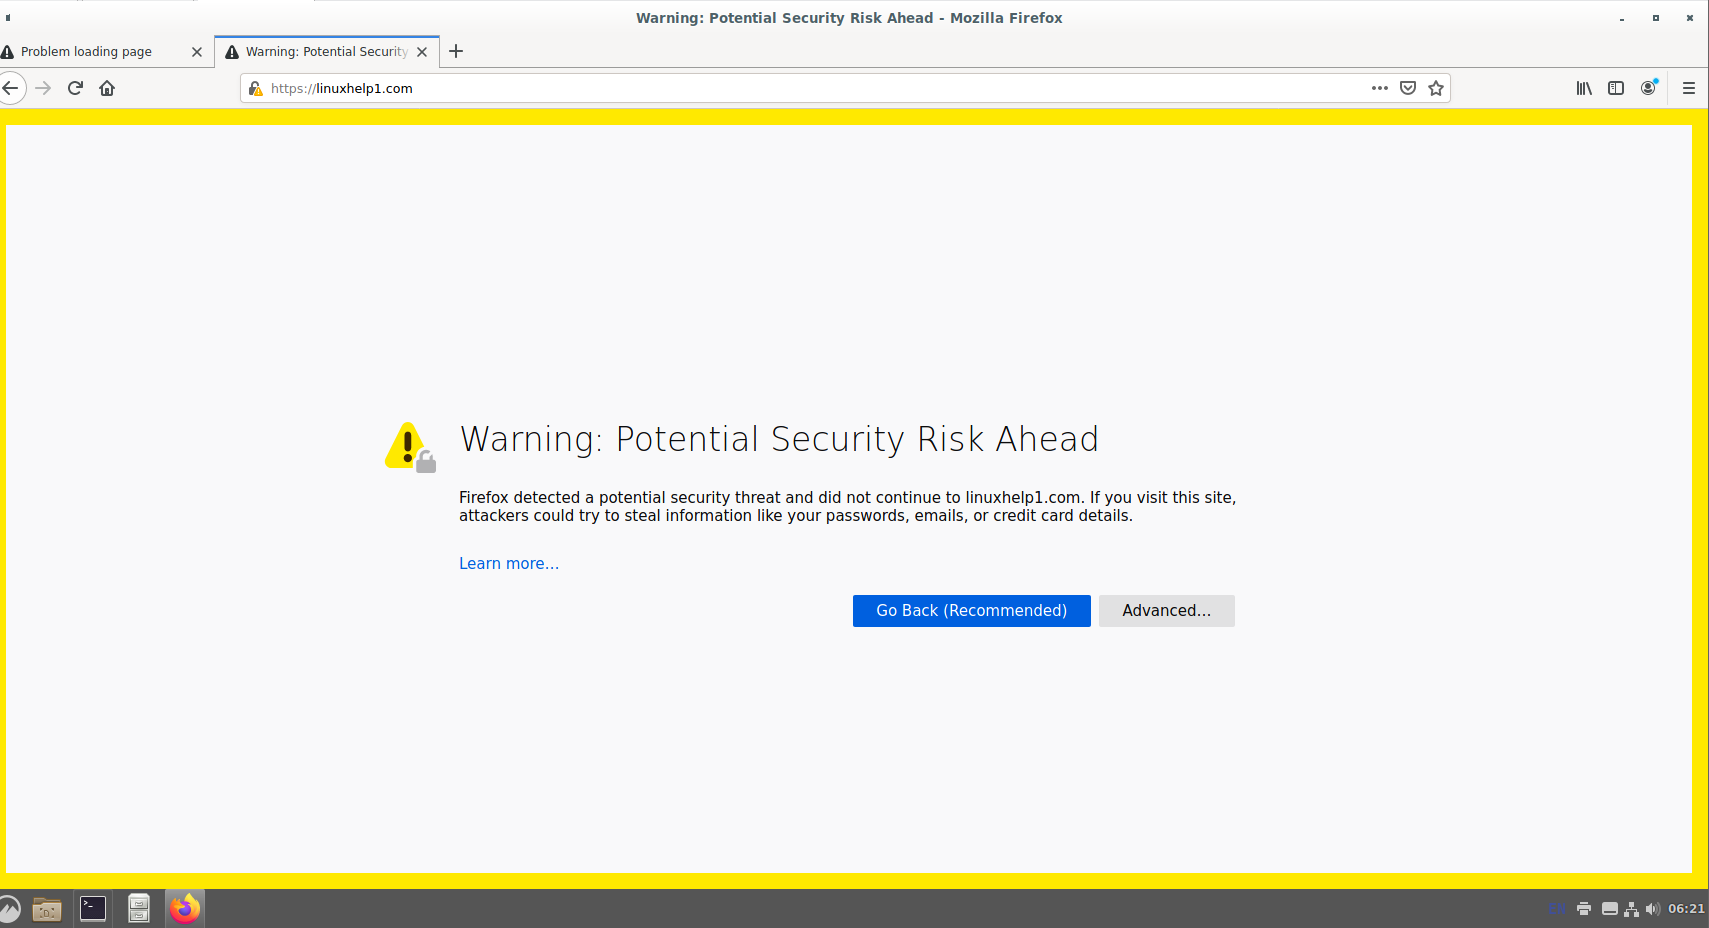
Step 11: Go to the browser and browse the URL. The untrusted connection page appears. Click 'Advanced'. Here you can view the SSL Certificate Secure Apache as shown in the below images

Conclusion:
We have reached the end of this article. In this guide, we have walked you through the steps required to How to Installation SSL Certificate Secure Apache on Debian 11.3. Your feedback is much welcome.
Comments ( 0 )
No comments available