How to install Joomla CMS on Ubuntu 22.04
- 00:40 lsb_release -a
- 00:53 apt install apache2 -y
- 01:39 systemctl start apache2
- 01:46 systemctl enable apache2
- 01:56 systemctl status apache2
- 02:13 apt install php libapache2-mod-php php-dev php-bcmath php-intl php-soap php-zip php-curl php-mbstring php-mysql php-gd php-xml -y
- 03:25 php -v
- 03:40 apt install mariadb-server -y
- 04:34 systemctl start mariadb
- 04:40 systemctl enable mariadb
- 04:54 systemctl status mariadb
- 05:06 mysql
- 05:33 create database joomla_db;
- 06:14 create user 'joomla_user'@'localhost' identified by '123456';
- 07:08 grant all on joomla_db.* to 'joomla_user'@'localhost';
- 07:21 flush privileges;
- 07:37 wget https://downloads.joomla.org/cms/joomla4/4-1-2/Joomla_4-1-2-Stable-Full_Package.zip
- 08:40 unzip Joomla_4-1-2-Stable-Full_Package.zip -d /var/www/html/joomla
- 08:40 unzip Joomla_4-1-2-Stable-Full_Package.zip -d /var/www/html/joomla
- 09:15 chown -R www-data: /var/www/html/joomla
- 09:47 vim /etc/apache2/sites-available/joomla.conf
- 10:49 a2ensite joomla.conf
- 11:18 a2dissite 000-default.conf
- 11:48 apachectl -t
- 11:52 systemctl restart apache2
To Install Joomla CMS On Ubuntu 22.04
Introduction :
Joomla is a free, open-source, and one of the most popular Content Management System (CMS) around the world which allows users to create or build their own website and applications. It is built on PHP and stores its data on an SQL-based database engine on the backend such as MySQL/MariaDB.
Procedure :
Step 1: Check the OS version by using the below command
root@linuxhelp:~# lsb_release -a
No LSB modules are available.
Distributor ID: Ubuntu
Description: Ubuntu 22.04.3 LTS
Release: 22.04
Codename: jammy
Step 2: Install Apache web server by using the below command
root@linuxhelp:~# apt install apache2 -y
Reading package lists... Done
Building dependency tree... Done
Reading state information... Done
The following packages were automatically installed and are no longer required:
libflashrom1 libftdi1-2 libllvm13
Use 'apt autoremove' to remove them.
The following additional packages will be installed:
apache2-bin apache2-data apache2-utils libapr1 libaprutil1 libaprutil1-dbd-sqlite3 libaprutil1-ldap
Suggested packages:
apache2-doc apache2-suexec-pristine | apache2-suexec-custom
The following NEW packages will be installed:
apache2 apache2-bin apache2-data apache2-utils libapr1 libaprutil1 libaprutil1-dbd-sqlite3
libaprutil1-ldap
0 upgraded, 8 newly installed, 0 to remove and 66 not upgraded.
Need to get 1,918 kB of archives.
After this operation, 7,706 kB of additional disk space will be used.
Get:1 http://in.archive.ubuntu.com/ubuntu jammy-updates/main amd64 libapr1 amd64 1.7.0-8ubuntu0.22.04.1 [108 kB]
Get:2 http://in.archive.ubuntu.com/ubuntu jammy-updates/main amd64 libaprutil1 amd64 1.6.1-5ubuntu4.22.04.2 [92.8 kB]
Get:3 http://in.archive.ubuntu.com/ubuntu jammy-updates/main amd64 libaprutil1-dbd-sqlite3 amd64 1.6.1-5ubuntu4.22.04.2 [11.3 kB]
Get:4 http://in.archive.ubuntu.com/ubuntu jammy-updates/main amd64 libaprutil1-ldap amd64 1.6.1-5ubuntu4.22.04.2 [9,170 B]
Selecting previously unselected package apache2-utils.
Preparing to unpack .../6-apache2-utils_2.4.52-1ubuntu4.6_amd64.deb ...
Unpacking apache2-utils (2.4.52-1ubuntu4.6) ...


Selecting previously unselected package apache2.
Preparing to unpack .../7-apache2_2.4.52-1ubuntu4.6_amd64.deb ...
Unpacking apache2 (2.4.52-1ubuntu4.6) ...
Setting up libapr1:amd64 (1.7.0-8ubuntu0.22.04.1) ...
Setting up apache2-data (2.4.52-1ubuntu4.6) ...
Setting up libaprutil1:amd64 (1.6.1-5ubuntu4.22.04.2) ...
Setting up libaprutil1-ldap:amd64 (1.6.1-5ubuntu4.22.04.2) ...
Setting up libaprutil1-dbd-sqlite3:amd64 (1.6.1-5ubuntu4.22.04.2) ...
Processing triggers for ufw (0.36.1-4ubuntu0.1) ...
Processing triggers for man-db (2.10.2-1) ...
Processing triggers for libc-bin (2.35-0ubuntu3.1) ...
Step 3: Start and Enable Apache service by using the below command
root@linuxhelp:~# systemctl start apache2
root@linuxhelp:~# systemctl enable apache2
Synchronizing state of apache2.service with SysV service script with /lib/systemd/systemd-sysv-install.
Executing: /lib/systemd/systemd-sysv-install enable apache2
Step 4: Check the status of the Apache by using the below command
root@linuxhelp:~# systemctl status apache2
● apache2.service - The Apache HTTP Server
Loaded: loaded (/lib/systemd/system/apache2.service; enabled; vendor preset: enabled)
Active: active (running) since Mon 2023-09-11 17:33:09 IST; 3 weeks 2 days ago
Docs: https://httpd.apache.org/docs/2.4/
Main PID: 5550 (apache2)
Tasks: 55 (limit: 4556)
Memory: 5.0M
CPU: 104ms
CGroup: /system.slice/apache2.service
├─5550 /usr/sbin/apache2 -k start
├─5551 /usr/sbin/apache2 -k start
└─5552 /usr/sbin/apache2 -k start

Sep 11 17:33:09 linuxhelp systemd[1]: Starting The Apache HTTP Server...
Sep 11 17:33:09 linuxhelp apachectl[5549]: AH00558: apache2: Could not reliably determine the server's f>
Sep 11 17:33:09 linuxhelp systemd[1]: Started The Apache HTTP Server.
Step 5: Install PHP and dependencies modules by using the below command
root@linuxhelp:~# apt install php libapache2-mod-php php-dev php-bcmath php-intl php-soap php-zip php-curl php-mbstring php-mysql php-gd php-xml -y
Reading package lists... Done
Building dependency tree... Done
Reading state information... Done
The following packages were automatically installed and are no longer required:
libflashrom1 libftdi1-2 libllvm13
Use 'apt autoremove' to remove them.
The following additional packages will be installed:
autoconf automake autopoint autotools-dev binutils binutils-common binutils-x86-64-linux-gnu
build-essential debhelper debugedit dh-autoreconf dh-strip-nondeterminism dpkg-dev dwz fakeroot g++
g++-11 gcc gcc-11 gettext intltool-debian libalgorithm-diff-perl libalgorithm-diff-xs-perl
libalgorithm-merge-perl libapache2-mod-php8.1 libarchive-cpio-perl libarchive-zip-perl libasan6
libbinutils libc-dev-bin libc-devtools libc6 libc6-dbg libc6-dev libcc1-0 libcrypt-dev libctf-nobfd0
libctf0 libdebhelper-perl libdpkg-perl libfakeroot libfile-fcntllock-perl
libfile-stripnondeterminism-perl libgcc-11-dev libitm1 liblsan0 libltdl-dev libmail-sendmail-perl
libnsl-dev libonig5 libpcre2-16-0 libpcre2-dev libpcre2-posix3 libquadmath0 libsigsegv2 libssl-dev
libstdc++-11-dev libsub-override-perl libsys-hostname-long-perl libtirpc-dev libtool libtsan0
After this operation, 249 MB of additional disk space will be used.
Get:1 http://in.archive.ubuntu.com/ubuntu jammy-updates/main amd64 libc6-dbg amd64 2.35-0ubuntu3.4 [13.9 MB]
Get:2 http://in.archive.ubuntu.com/ubuntu jammy-updates/main amd64 libc6 amd64 2.35-0ubuntu3.4 [3,234 kB]
Get:3 http://in.archive.ubuntu.com/ubuntu jammy/main amd64 libsigsegv2 amd64 2.13-1ubuntu3 [14.6 kB]
Get:4 http://in.archive.ubuntu.com/ubuntu jammy/main amd64 m4 amd64 1.4.18-5ubuntu2 [199 kB]
Get:5 http://in.archive.ubuntu.com/ubuntu jammy/main amd64 autoconf all 2.71-2 [338 kB]
Fetched 86.5 MB in 39s (2,228 kB/s)


Extracting templates from packages: 100%
Preconfiguring packages ...
(Reading database ... 202844 files and directories currently installed.)
Preparing to unpack .../libc6-dbg_2.35-0ubuntu3.4_amd64.deb ...
Unpacking libc6-dbg:amd64 (2.35-0ubuntu3.4) over (2.35-0ubuntu3.1) ...
Preparing to unpack .../libc6_2.35-0ubuntu3.4_amd64.deb ...
Unpacking libc6:amd64 (2.35-0ubuntu3.4) over (2.35-0ubuntu3.1) ...
Setting up libc6:amd64 (2.35-0ubuntu3.4) ...
Selecting previously unselected package libsigsegv2:amd64.
(Reading database ... 202842 files and directories currently installed.)
Processing triggers for man-db (2.10.2-1) ...
Processing triggers for install-info (6.8-4build1) ...
Processing triggers for libc-bin (2.35-0ubuntu3.1) ...
Processing triggers for php8.1-cli (8.1.2-1ubuntu2.14) ...
Processing triggers for libapache2-mod-php8.1 (8.1.2-1ubuntu2.14) ...
Step 6: Check the version of the PHP by using the below command
root@linuxhelp:~# php -v
PHP 8.1.2-1ubuntu2.14 (cli) (built: Aug 18 2023 11:41:11) (NTS)
Copyright (c) The PHP Group
Zend Engine v4.1.2, Copyright (c) Zend Technologies
with Zend OPcache v8.1.2-1ubuntu2.14, Copyright (c), by Zend Technologies
Step 7: Install MariaDB server by using the below command
root@linuxhelp:~# apt install mariadb-server -y
Reading package lists... Done
Building dependency tree... Done
Reading state information... Done
The following packages were automatically installed and are no longer required:
libflashrom1 libftdi1-2 libllvm13
Use 'apt autoremove' to remove them.
The following additional packages will be installed:
galera-4 gawk libcgi-fast-perl libcgi-pm-perl libconfig-inifiles-perl libdaxctl1 libdbd-mysql-perl
libdbi-perl libfcgi-bin libfcgi-perl libfcgi0ldbl libhtml-template-perl libmariadb3 libmysqlclient21
libndctl6 libpmem1 libsnappy1v5 libterm-readkey-perl liburing2 mariadb-client-10.6
mariadb-client-core-10.6 mariadb-common mariadb-server-10.6 mariadb-server-core-10.6 mysql-common


socat
Suggested packages:
gawk-doc libmldbm-perl libnet-daemon-perl libsql-statement-perl libipc-sharedcache-perl mailx
mariadb-test
The following NEW packages will be installed:
galera-4 gawk libcgi-fast-perl libcgi-pm-perl libconfig-inifiles-perl libdaxctl1 libdbd-mysql-perl
libdbi-perl libfcgi-bin libfcgi-perl libfcgi0ldbl libhtml-template-perl libmariadb3 libmysqlclient21
libndctl6 libpmem1 libsnappy1v5 libterm-readkey-perl liburing2 mariadb-client-10.6
mariadb-client-core-10.6 mariadb-common mariadb-server mariadb-server-10.6 mariadb-server-core-10.6
mysql-common socat
0 upgraded, 27 newly installed, 0 to remove and 64 not upgraded.
Need to get 18.7 MB of archives.
After this operation, 165 MB of additional disk space will be used.
Get:1 http://in.archive.ubuntu.com/ubuntu jammy-updates/main amd64 gawk amd64 1:5.1.0-1ubuntu0.1 [447 kB]
Get:2 http://in.archive.ubuntu.com/ubuntu jammy/main amd64 mysql-common all 5.8+1.0.8 [7,212 B]
Get:3 http://in.archive.ubuntu.com/ubuntu jammy-updates/universe amd64 mariadb-common all 1:10.6.12-0ubuntu0.22.04.1 [16.4 kB]
Get:4 http://in.archive.ubuntu.com/ubuntu jammy/universe amd64 galera-4 amd64 26.4.9-1build1 [720 kB]
Setting up mariadb-server (1:10.6.12-0ubuntu0.22.04.1) ...
Processing triggers for man-db (2.10.2-1) ...
Processing triggers for libc-bin (2.35-0ubuntu3.1) ...
Step 8: Start and Enable MariaDB by using the below command
root@linuxhelp:~# systemctl start mariadb
root@linuxhelp:~# systemctl enable mariadb
Synchronizing state of mariadb.service with SysV service script with /lib/systemd/systemd-sysv-install.
Executing: /lib/systemd/systemd-sysv-install enable mariadb
Step 9: Check the status of the MariaDB by using the below command
root@linuxhelp:~# systemctl status mariadb
● mariadb.service - MariaDB 10.6.12 database server


Loaded: loaded (/lib/systemd/system/mariadb.service; enabled; vendor preset: enabled)
Active: active (running) since Thu 2023-10-05 01:18:06 IST; 43s ago
Docs: man:mariadbd(8)
https://mariadb.com/kb/en/library/systemd/
Main PID: 23596 (mariadbd)
Status: "Taking your SQL requests now..."
Tasks: 17 (limit: 4556)
Memory: 61.5M
CPU: 1.148s
CGroup: /system.slice/mariadb.service
└─23596 /usr/sbin/mariadbd

Oct 05 01:18:06 linuxhelp mariadbd[23596]: Version: '10.6.12-MariaDB-0ubuntu0.22.04.1' socket: '/run/my>
Oct 05 01:18:06 linuxhelp systemd[1]: Started MariaDB 10.6.12 database server.
Oct 05 01:18:06 linuxhelp /etc/mysql/debian-start[23622]: Upgrading MySQL tables if necessary.
Oct 05 01:18:06 linuxhelp /etc/mysql/debian-start[23625]: Looking for 'mariadb' as: /usr/bin/mariadb
Oct 05 01:18:06 linuxhelp /etc/mysql/debian-start[23625]: Looking for 'mariadb-check' as: /usr/bin/maria>
Oct 05 01:18:06 linuxhelp /etc/mysql/debian-start[23625]: This installation of MariaDB is already upgrad>
Oct 05 01:18:06 linuxhelp /etc/mysql/debian-start[23625]: There is no need to run mysql_upgrade again fo>
Oct 05 01:18:06 linuxhelp /etc/mysql/debian-start[23625]: You can use --force if you still want to run m>
Oct 05 01:18:06 linuxhelp /etc/mysql/debian-start[23633]: Checking for insecure root accounts.
Oct 05 01:18:06 linuxhelp /etc/mysql/debian-start[23639]: Triggering myisam-recover for all MyISAM table>
Step 10: Login to the MySQL console by using the below command
root@linuxhelp:~# mysql
Welcome to the MariaDB monitor. Commands end with ; or \g.
Your MariaDB connection id is 31
Server version: 10.6.12-MariaDB-0ubuntu0.22.04.1 Ubuntu 22.04

Copyright (c) 2000, 2018, Oracle, MariaDB Corporation Ab and others.


Type 'help;' or '\h' for help. Type '\c' to clear the current input statement.
Step 11: Create a database by using the below command
MariaDB [(none)]> create database joomla_db;
Query OK, 1 row affected (0.002 sec)
Step 12: Create a user by using the below command
MariaDB [(none)]> create user 'joomla_user'@'localhost' identified by '123456';
Query OK, 0 rows affected (0.001 sec)
Step 13: Grant privileges to the user for that database by using the below command
MariaDB [(none)]> grant all on joomla_db.* to 'joomla_user'@'localhost';
Query OK, 0 rows affected (0.001 sec)
Step 14: Flush the privileges by using the below command
MariaDB [(none)]> flush privileges;
Query OK, 0 rows affected (0.001 sec)
Step 15: Download the Joomla package by using wget command
root@linuxhelp:~# wget https://downloads.joomla.org/cms/joomla4/4-1-2/Joomla_4-1-2-Stable-Full_Package.zip
--2023-10-05 02:57:04--  https://downloads.joomla.org/cms/joomla4/4-1-2/Joomla_4-1-2-Stable-Full_Package.zip
Resolving downloads.joomla.org (downloads.joomla.org)... 104.26.15.15, 104.26.14.15, 172.67.74.86, ...
Connecting to downloads.joomla.org (downloads.joomla.org)|104.26.15.15|:443... connected.
HTTP request sent, awaiting response... 303 See Other
Location: https://s3-us-west-2.amazonaws.com/joomla-official-downloads/joomladownloads/joomla4/Joomla_4.1.2-Stable-Full_Package.zip?X-Amz-Algorithm=AWS4-HMAC-SHA256&X-Amz-Credential=AKIA6LXDJLNUINX2AVMH%2F20231004%2Fus-west-2%2Fs3%2Faws4_request&X-Amz-Date=20231004T212704Z&X-Amz-Expires=60&X-Amz-SignedHeaders=host&X-Amz-Signature=056ae481d19c19badd5bfe5a485ddd7381cc7eb843417c5f1d14e1b336d12bb9 [following]
--2023-10-05 02:57:05--  https://s3-us-west-2.amazonaws.com/joomla-official-downloads/joomladownloads/joomla4/Joomla_4.1.2-Stable-


Full_Package.zip?X-Amz-Algorithm=AWS4-HMAC-SHA256&X-Amz-Credential=AKIA6LXDJLNUINX2AVMH%2F20231004%2Fus-west-2%2Fs3%2Faws4_request&X-Amz-Date=20231004T212704Z&X-Amz-Expires=60&X-Amz-SignedHeaders=host&X-Amz-Signature=056ae481d19c19badd5bfe5a485ddd7381cc7eb843417c5f1d14e1b336d12bb9
Resolving s3-us-west-2.amazonaws.com (s3-us-west-2.amazonaws.com)... 52.92.242.104, 52.92.137.200, 52.92.250.120, ...
Connecting to s3-us-west-2.amazonaws.com (s3-us-west-2.amazonaws.com)|52.92.242.104|:443... connected.
HTTP request sent, awaiting response... 200 OK
Length: 27629652 (26M) [application/zip]
Saving to: ‘Joomla_4-1-2-Stable-Full_Package.zip.1’

Joomla_4-1-2-Stable-Full_Package.zip.1              100%[=================================================================================================================>]  26.35M  3.34MB/s    in 9.3s

2023-10-05 02:57:15 (2.83 MB/s) - ‘Joomla_4-1-2-Stable-Full_Package.zip.1’ saved [27629652/27629652]
Step 16: Extract the package into the directory by using the below command
root@linuxhelp:~# unzip Joomla_4-1-2-Stable-Full_Package.zip -d /var/www/html/joomla
inflating: /var/www/html/joomla/administrator/language/en-GB/mod_login.sys.ini
inflating: /var/www/html/joomla/administrator/language/en-GB/mod_loginsupport.ini
inflating: /var/www/html/joomla/administrator/language/en-GB/mod_loginsupport.sys.ini
inflating: /var/www/html/joomla/administrator/language/en-GB/mod_menu.ini
inflating: /var/www/html/joomla/administrator/language/en-GB/mod_menu.sys.ini
inflating: /var/www/html/joomla/administrator/language/en-GB/mod_messages.ini
inflating: /var/www/html/joomla/administrator/language/en-GB/mod_messages.sys.ini


inflating: /var/www/html/joomla/administrator/language/en-GB/mod_multilangstatus.ini
inflating: /var/www/html/joomla/administrator/language/en-GB/mod_multilangstatus.sys.ini
inflating: /var/www/html/joomla/administrator/language/en-GB/mod_popular.ini
inflating: /var/www/html/joomla/administrator/language/en-GB/mod_popular.sys.ini
inflating: /var/www/html/joomla/administrator/language/en-GB/mod_post_installation_messages.ini
inflating: /var/www/html/joomla/administrator/language/en-GB/mod_post_installation_messages.sys.ini
inflating: /var/www/html/joomla/administrator/language/en-GB/mod_privacy_dashboard.ini
inflating: /var/www/html/joomla/administrator/language/en-GB/mod_privacy_dashboard.sys.ini
inflating: /var/www/html/joomla/administrator/language/en-GB/mod_privacy_status.ini
inflating: /var/www/html/joomla/administrator/language/en-
inflating: /var/www/html/joomla/tmp/index.html
inflating: /var/www/html/joomla/web.config.txt
Step 17: Change the ownership of the directory by using the below command
root@linuxhelp:~# chown -R www-data: /var/www/html/joomla
Step 18: Create a joomla.conf file in the apache sites-available directory by using the below command
root@linuxhelp:~# vim /etc/apache2/sites-available/joomla.conf
Step 19: Enable the Joomla virtual host by using the below command
root@linuxhelp:~# a2ensite joomla.conf
Enabling site joomla.
To activate the new configuration, you need to run:
systemctl reload apache2
Step 20: Disable the Apache default welcome page by using the below command
root@linuxhelp:~# a2dissite 000-default.conf
Site 000-default disabled.
To activate the new configuration, you need to run:
systemctl reload apache2
Step 21: Check the syntax by using the below command
root@linuxhelp:~# apachectl -t
AH00558: apache2: Could not reliably determine the server's fully qualified domain name, using 127.0.1.1. Set the 'ServerName' directive globally to suppress this message
Syntax OK
Step 22: Restart the Apache by using the below command
root@linuxhelp:~# systemctl restart apache2
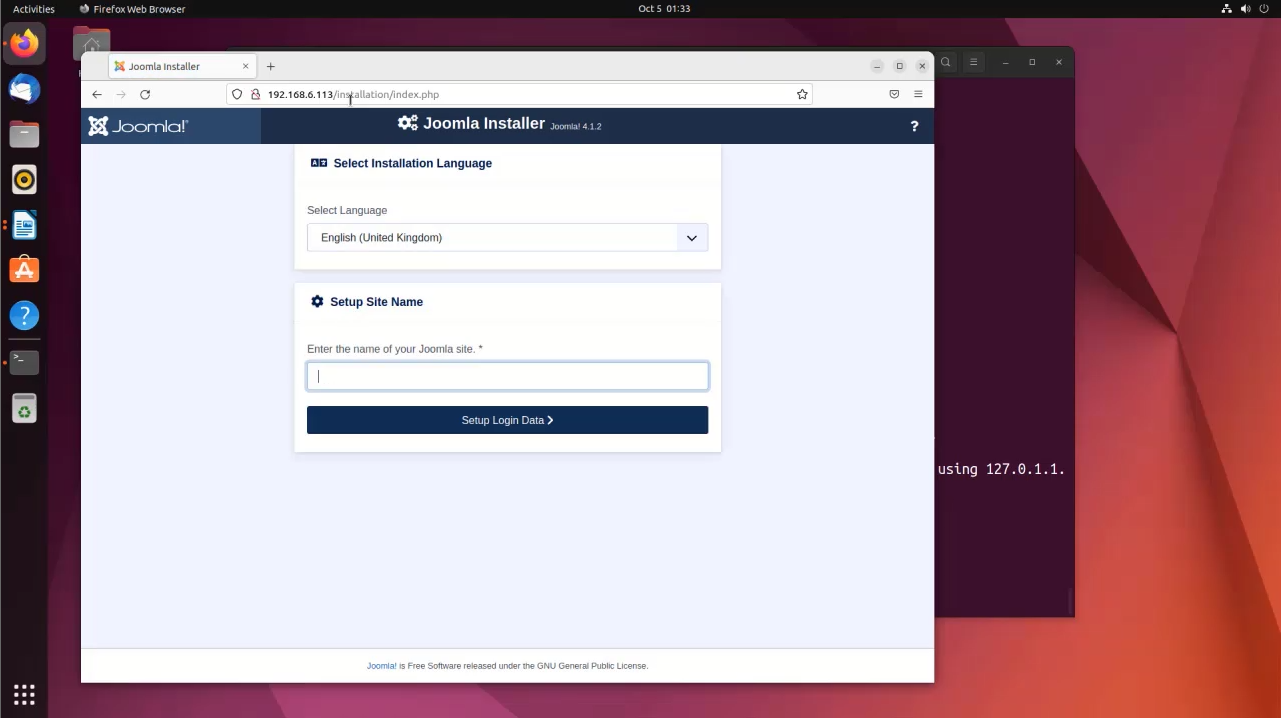
Step 23: Now you will see a following page, Enter your site name and click Setup Logon Data as shown in the below image
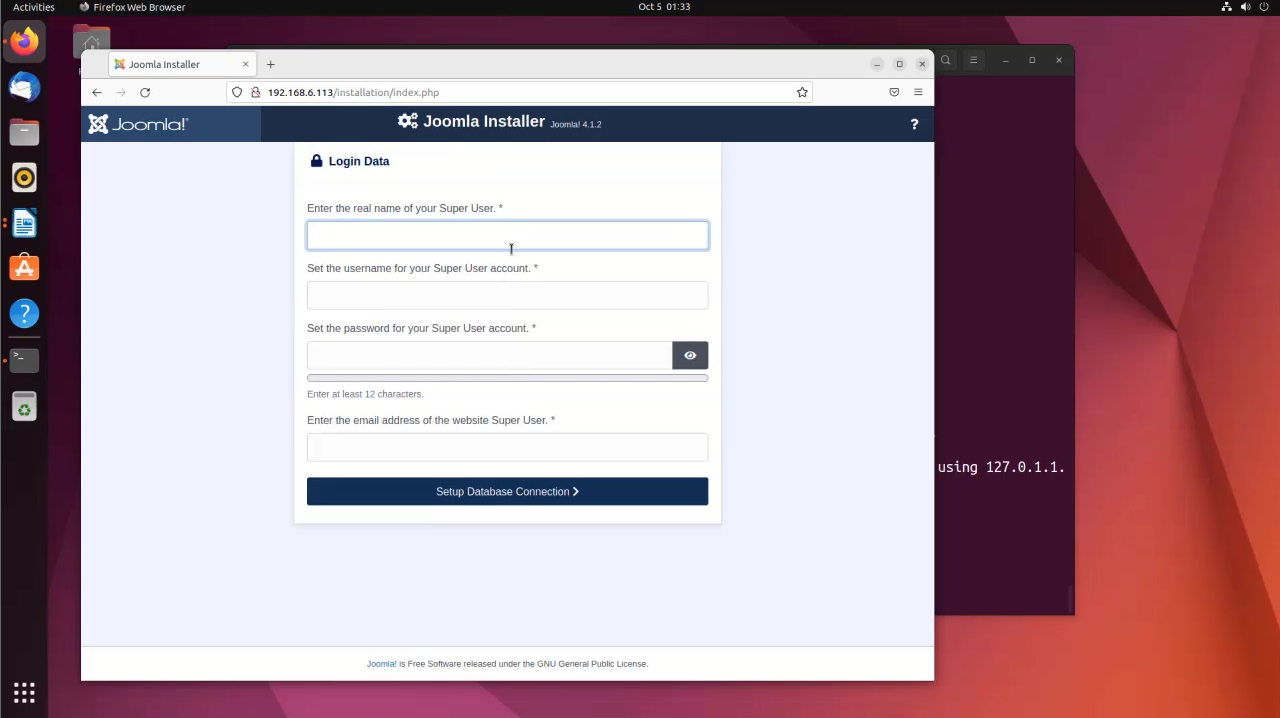
 Step 24: Create a user and set password for the user and click Setup Database Connection as shown in the below image
 Step 25: Enter the database credentials and click Install Joomla as shown in the below image
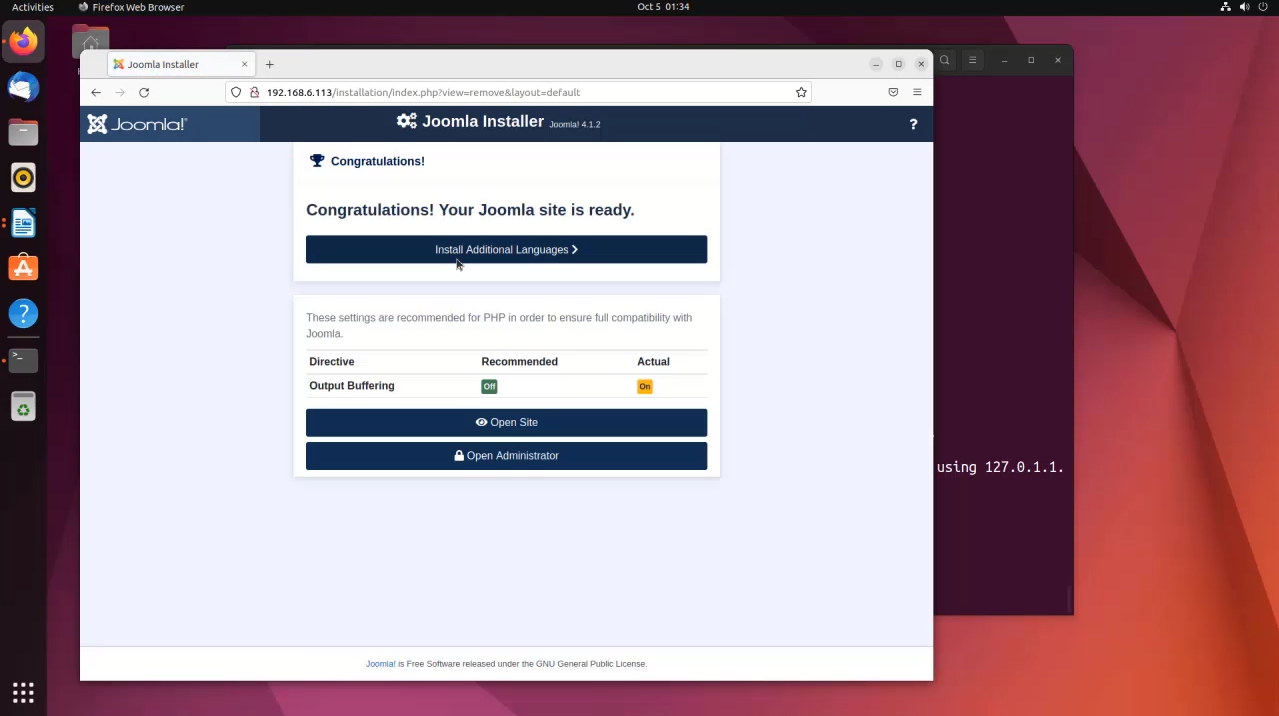
 Step 26: Next the congratulation page is display here click the Open Administrator button to enter into your site as shown in the below image
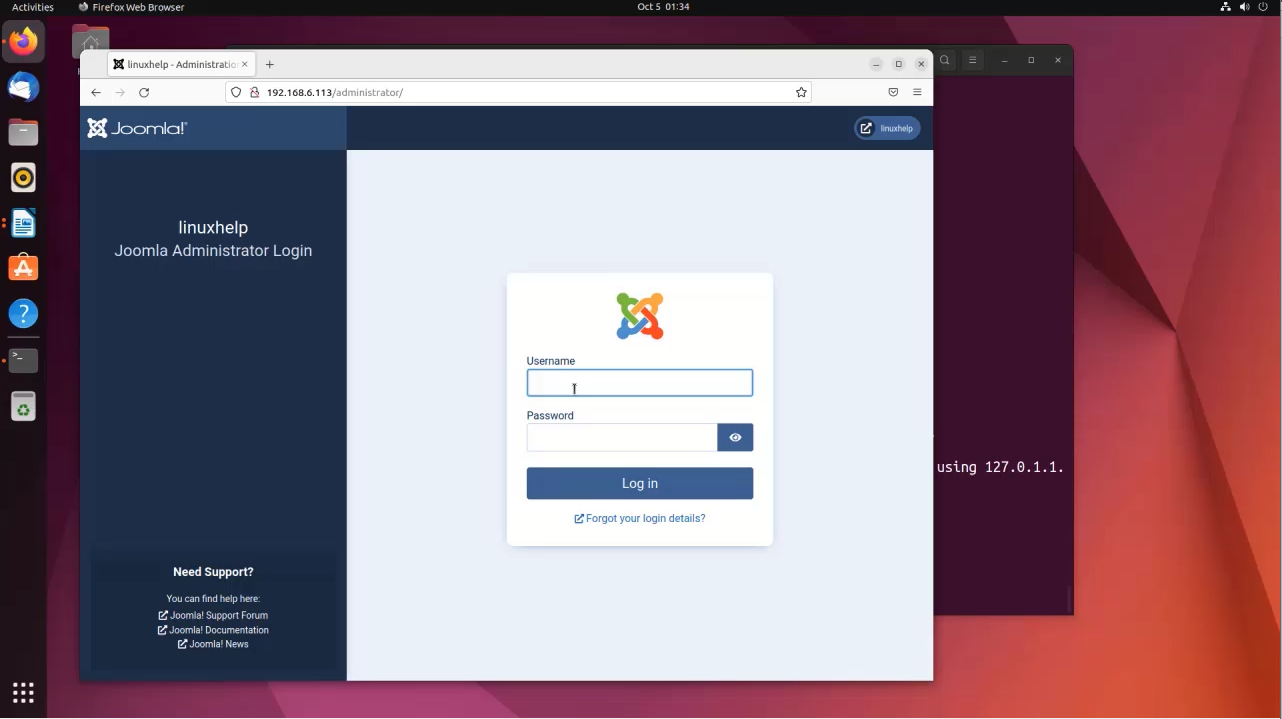
 Step 27: Now enter your Admin credentials and click Log in button as shown in the below image
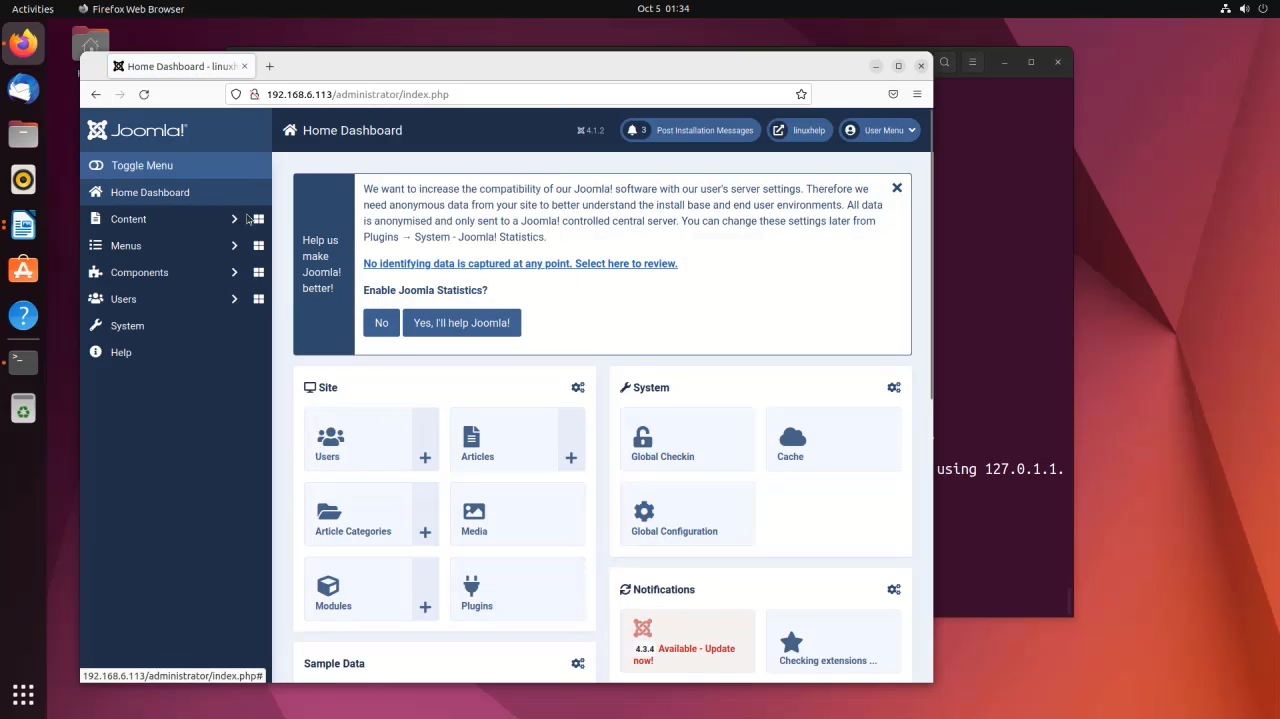
 Step 28: You will see the following Home Dashboard
Conclusion:
We have reached the end of this article. In this guide, we have walked you through the steps required to Installation of Joomla CMS on Ubuntu 22.04. Your feedback is much welcome.
Comments ( 0 )
No comments available