How to install Cockpit on Ubuntu 22.04
To Install Cockpit On Ubuntu 22.04
Introduction
Cockpit is a web-based GUI for management servers that typically ships with RHEL-based distributions such as Red Hat Enterprise Linux, CentOS Stream, Rocky Linux, and AlmaLinux. It’s a great way to keep tabs on your servers, manage users/groups/storage/services, update software, view logs and so much more.
Procedure Steps
Step – 1 : Check the OS version by using the below command
root@linuxhelp:~# lsb_release -a
No LSB modules are available.
Distributor ID:	Ubuntu
Description:	Ubuntu 22.04.3 LTS
Release:	22.04
Codename:	jammy
Step – 2 : Now I’m going to update the repository by using apt update command
root@linuxhelp:~# apt update
Hit:1 http://in.archive.ubuntu.com/ubuntu jammy InRelease
Get:2 http://security.ubuntu.com/ubuntu jammy-security InRelease [110 kB]
Get:3 http://in.archive.ubuntu.com/ubuntu jammy-updates InRelease [119 kB]
Get:4 http://in.archive.ubuntu.com/ubuntu jammy-backports InRelease [109 kB]
Get:5 http://security.ubuntu.com/ubuntu jammy-security/main i386 Packages [421 kB]
Get:6 http://in.archive.ubuntu.com/ubuntu jammy-updates/main i386 Packages [587 kB]
Get:7 http://security.ubuntu.com/ubuntu jammy-security/main amd64 Packages [1,246 kB]
Get:8 http://in.archive.ubuntu.com/ubuntu jammy-updates/main amd64 Packages [1,462 kB]
Get:9 http://security.ubuntu.com/ubuntu jammy-security/main Translation-en [225 kB]
Get:10 http://security.ubuntu.com/ubuntu jammy-security/restricted amd64 Packages [1,531 kB]
Get:11 http://security.ubuntu.com/ubuntu jammy-security/restricted Translation-en [255 kB]
Get:12 http://security.ubuntu.com/ubuntu jammy-security/universe i386 Packages [598 kB]
Get:13 http://in.archive.ubuntu.com/ubuntu jammy-updates/main Translation-en [285 kB]
Get:14 http://security.ubuntu.com/ubuntu jammy-security/universe amd64 Packages [850 kB]
Get:15 http://in.archive.ubuntu.com/ubuntu jammy-updates/restricted amd64 Packages [1,559 kB]
Get:16 http://security.ubuntu.com/ubuntu jammy-security/universe Translation-en [162 kB]
Get:17 http://in.archive.ubuntu.com/ubuntu jammy-updates/restricted Translation-en [259 kB]
Get:18 http://in.archive.ubuntu.com/ubuntu jammy-updates/universe i386 Packages [695 kB]
Get:19 http://in.archive.ubuntu.com/ubuntu jammy-updates/universe amd64 Packages [1,056 kB]
Get:20 http://in.archive.ubuntu.com/ubuntu jammy-updates/universe Translation-en [238 kB]
Get:21 http://in.archive.ubuntu.com/ubuntu jammy-backports/main i386 Packages [59.2 kB]
Get:22 http://in.archive.ubuntu.com/ubuntu jammy-backports/main amd64 Packages [67.1 kB]
Get:23 http://in.archive.ubuntu.com/ubuntu jammy-backports/main Translation-en [11.0 kB]
Get:24 http://in.archive.ubuntu.com/ubuntu jammy-backports/universe amd64 Packages [28.4 kB]
Get:25 http://in.archive.ubuntu.com/ubuntu jammy-backports/universe i386 Packages [17.2 kB]
Get:26 http://in.archive.ubuntu.com/ubuntu jammy-backports/universe Translation-en [16.6 kB]
Fetched 12.0 MB in 8s (1,555 kB/s)
Reading package lists... Done
Building dependency tree... Done
Reading state information... Done
251 packages can be upgraded. Run 'apt list --upgradable' to see them.
Step – 3 : Then use the below command to install cockpit on Ubuntu machine
root@linuxhelp:~# apt-get install cockpit -y
Reading package lists... Done
Building dependency tree... Done
Reading state information... Done
The following packages were automatically installed and are no longer required:
  libflashrom1 libftdi1-2 libllvm13
Use 'apt autoremove' to remove them.
The following additional packages will be installed:
  cockpit-bridge cockpit-networkmanager cockpit-packagekit cockpit-storaged cockpit-system cockpit-ws finalrd libblockdev-mdraid2
  libbytesize-common libbytesize1 libpwquality-tools mdadm
Suggested packages:
  cockpit-doc cockpit-pcp cockpit-sosreport udisks2-lvm2 sssd-dbus default-mta | mail-transport-agent dracut-core
The following NEW packages will be installed:
  cockpit cockpit-bridge cockpit-networkmanager cockpit-packagekit cockpit-storaged cockpit-system cockpit-ws finalrd
  libblockdev-mdraid2 libbytesize-common libbytesize1 libpwquality-tools mdadm
0 upgraded, 13 newly installed, 0 to remove and 251 not upgraded.
Need to get 6,313 kB of archives.
After this operation, 9,253 kB of additional disk space will be used.
Get:1 http://in.archive.ubuntu.com/ubuntu jammy-updates/universe amd64 cockpit-bridge amd64 264-1ubuntu0.22.04.1 [469 kB]
Get:2 http://in.archive.ubuntu.com/ubuntu jammy-updates/universe amd64 cockpit-ws amd64 264-
Processing triggers for man-db (2.10.2-1) ...
Processing triggers for libc-bin (2.35-0ubuntu3.1) ...
Processing triggers for initramfs-tools (0.140ubuntu13.4) ...
update-initramfs: Generating /boot/initrd.img-6.2.0-32-generic
Step – 4 : Once the installation completed, start and enable Cockpit with the below command
root@linuxhelp:~# systemctl enable --now cockpit.socket
Step – 5 : Now create a user for login by using the below command
root@linuxhelp:~# useradd linuxhelp
Step – 6 : For log into Cockpit need sudo privileges. So use the below command to add the sudo privileges for the user
root@linuxhelp:~# usermod -aG sudo linuxhelp
Step – 7 : Add container support to our instance for that install podman by using below command
root@linuxhelp:~# apt-get install podman cockpit-podman -y
Reading package lists... Done
Building dependency tree... Done
Reading state information... Done
The following packages were automatically installed and are no longer required:
  libflashrom1 libftdi1-2 libllvm13
Use 'apt autoremove' to remove them.
The following additional packages will be installed:
  buildah catatonit conmon containernetworking-plugins crun fuse-overlayfs golang-github-containernetworking-plugin-dnsname
  golang-github-containers-common golang-github-containers-image libostree-1-1 libslirp0 slirp4netns uidmap
Suggested packages:
  containers-storage docker-compose
The following NEW packages will be installed:
  buildah catatonit cockpit-podman conmon containernetworking-plugins crun fuse-overlayfs
  golang-github-containernetworking-plugin-dnsname golang-github-containers-common golang-github-containers-image libostree-1-1
  libslirp0 podman slirp4netns uidmap
0 upgraded, 15 newly installed, 0 to remove and 251 not upgraded.
Need to get 25.9 MB of archives.
After this operation, 110 MB of additional disk space will be used.
Get:1 http://in.archive.ubuntu.com/ubuntu jammy-updates/universe amd64 uidmap amd64 1:4.8.1-2ubuntu2.2 [22.4 kB]
Get:2 http://in.archive.ubuntu.com/ubuntu jammy/universe amd64 golang-github-containers-image all 5.16.0-3 [29.3 kB]
Get:3 http://in.archive.ubuntu.com/ubuntu jammy/universe amd64 golang-github-containers-common all 0.44.4+ds1-1 [28.1 kB]
Get:4 http://in.archive.ubuntu.com/ubuntu jammy/universe amd64 libostree-1-1 amd64 2022.2-3 [333 kB]
Created symlink /etc/systemd/system/timers.target.wants/podman-auto-update.timer → /lib/systemd/system/podman-auto-update.timer.
Created symlink /etc/systemd/system/default.target.wants/podman-restart.service → /lib/systemd/system/podman-restart.service.
Setting up cockpit-podman (45-1) ...
Processing triggers for man-db (2.10.2-1) ...
Processing triggers for libc-bin (2.35-0ubuntu3.1) ...
Step – 8 : Once the installation completed, need to enable podman by using the below command
root@linuxhelp:~# systemctl enable --now podman
Step – 9 : Now open the web browser and search with your system ip address along with the port 9090

Step – 10 : Click Advanced option
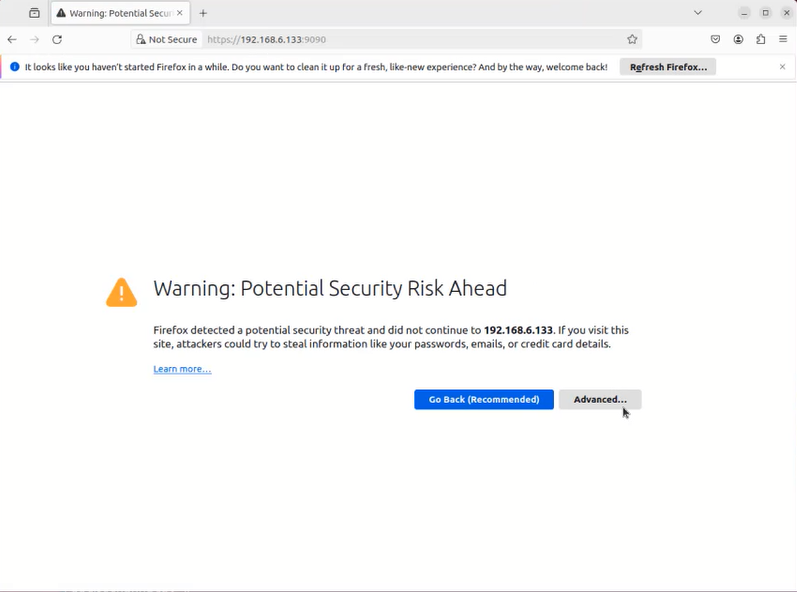
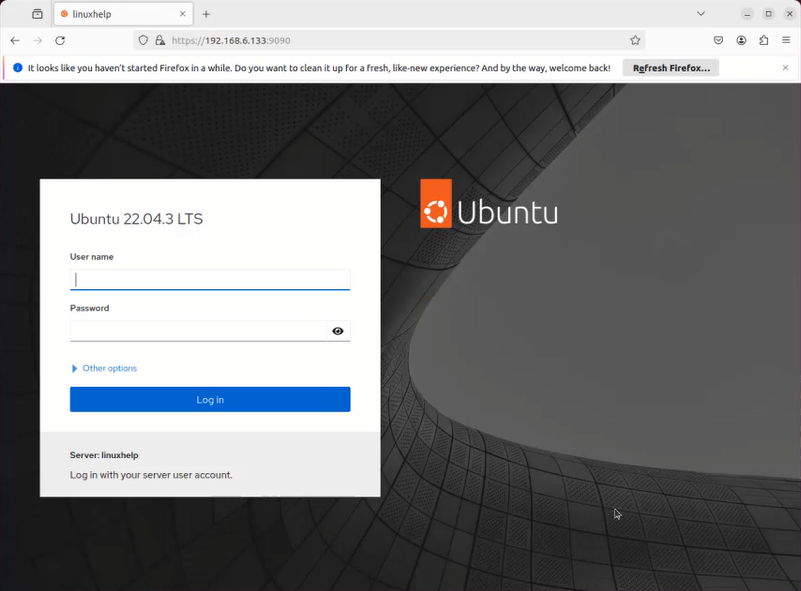
Step – 11 : Now click Accept the risk and continue

Step – 12 : Now You should be greeted by the login screen.
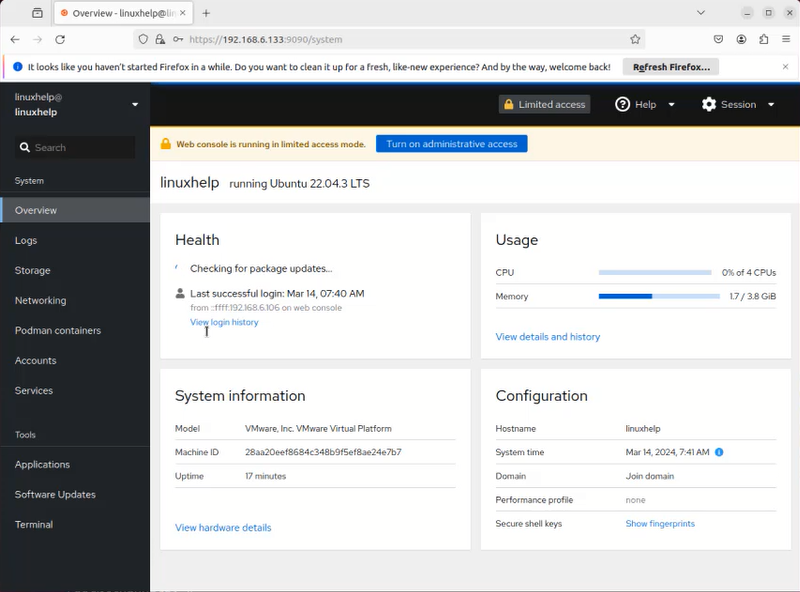
Step – 13 : After logging in, you will see that the web console is running in limited access mode.
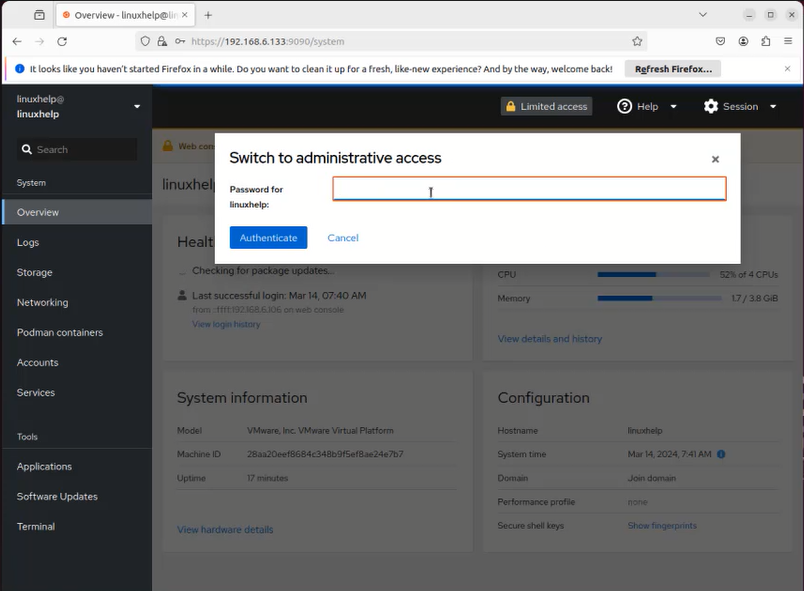
Step – 14 : Click Turn On Administrative Access. Then, when prompted and ask for password, type your user’s password to grant administrative access.
Conclusion :
We have reached the end of this article. In this guide, we have walked you through the steps required to Installation of Cockpit on Ubuntu 22.04. Your feedback is much welcome.


Comments ( 0 )
No comments available