How to Install and Configure Samba on Linux Mint 20
- 00:46 cat /etc/os-release
- 01:04 apt-get install samba -y
- 01:19 systemctl stasrt samba
- 01:53 mkdir /home/user
- 02:02 mkdir /home/user/share1
- 02:10 mkdir /home/user/share2
- 02:24 chmod 777 /home/user/share1
- 02:36 chmod 777 /home/user/share2
- 02:51 useradd user1
- 02:59 useradd user2
- 03:11 smbpasswd -a user1
- 03:24 smbpasswd -a user2
- 03:45 vi /etc/samba/smb.conf
- 05:46 tesrparm
- 06:01 systemctl restart smbd
- 06:16 ip a
To Install and Configure Samba Server on Linux Mint 20
Introduction:
Samba is an open-source software suite that runs on Unix/Linux. It is mainly used for communicating with Windows clients like a native application. This is done by SAMBA since it employs the Common Internet File System (CIFS). This tutorial covers the installation process and configuration of Samba proxy on Linux Mint 20.
PORT Number of samba server is
1. UDP(User Datagram Protocol) - 137,138
2. TCP(Transfer Control Protocol) – 139,445
Samba Server have TWO Protocols
1. SMB – Server Message Protocol
2. NMB – Network Message Protocol
Let’s check the version of OS by using following command.
root@linuxhelp:~# cat /etc/os-release
NAME="Linux Mint"
VERSION="20 (Ulyana)"
ID=linuxmint
ID_LIKE=ubuntu
PRETTY_NAME="Linux Mint 20"
VERSION_ID="20"
HOME_URL="https://www.linuxmint.com/"
SUPPORT_URL="https://forums.ubuntu.com/"
BUG_REPORT_URL="http://linuxmint-troubleshooting-guide.readthedocs.io/en/latest/"
PRIVACY_POLICY_URL="https://www.linuxmint.com/"
VERSION_CODENAME=ulyana
UBUNTU_CODENAME=focal
Once the version is checked, let’s proceed with the installation of the samba service by using following command
root@linuxhelp:~# apt install samba -y
Reading package lists... Done
Building dependency tree
Reading state information... Done
The following additional packages will be installed:
  ibverbs-providers libcephfs2 libibverbs1 libldb2 librados2 librdmacm1 libsmbclient libwbclient0
Processing triggers for systemd (245.4-4ubuntu3) ...
.
.
.
Processing triggers for man-db (2.9.1-1) ...
Processing triggers for libc-bin (2.31-0ubuntu9) ...
Once the installation is completed, start with the smbd service by using following command
root@linuxhelp:~# systemctl start smbd
And then, check the status of smbd service by using following command
root@linuxhelp:~# systemctl status smbd
● smbd.service - Samba SMB Daemon
     Loaded: loaded (/lib/systemd/system/smbd.service; enabled; vendor preset: enabled)
     Active: active (running) since Mon 2020-11-02 10:49:19 IST; 40s ago
       Docs: man:smbd(8)
             man:samba(7)
             man:smb.conf(5)
   Main PID: 2896 (smbd)
     Status: "smbd: ready to serve connections..."
      Tasks: 4 (limit: 2244)
     Memory: 9.6M
     CGroup: /system.slice/smbd.service
             ├─2896 /usr/sbin/smbd --foreground --no-process-group
             ├─2898 /usr/sbin/smbd --foreground --no-process-group
             ├─2899 /usr/sbin/smbd --foreground --no-process-group
             └─2902 /usr/sbin/smbd --foreground --no-process-group

Nov 02 10:49:18 linuxhelp systemd[1]: Starting Samba SMB Daemon...
Nov 02 10:49:18 linuxhelp update-apparmor-samba-profile[2890]: grep: /etc/apparmor.d/samba/smbd-shares: No such fil>
Nov 02 10:49:18 linuxhelp update-apparmor-samba-profile[2893]: diff: /etc/apparmor.d/samba/smbd-shares: No such fil>
Nov 02 10:49:19 linuxhelp systemd[1]: Started Samba SMB Daemon.
After that, create the required directories by using the following command
root@linuxhelp:~# mkdir /home/user
root@linuxhelp:~# mkdir /home/user/share1
root@linuxhelp:~# mkdir /home/user/share2
Now that the directories are created, let’s give permissions to those directories by using the following command
root@linuxhelp:~# chmod 777 /home/user/share1
root@linuxhelp:~# chmod 777 /home/user/share2
Next add the users to the smbd service by using the following command
root@linuxhelp:~# useradd user1
root@linuxhelp:~# useradd user2
Once the users are added, Create credentials on users by using the following command
root@linuxhelp:~# smbpasswd -a user1
New SMB password:
Retype new SMB password:
Added user user1.

root@linuxhelp:~# smbpasswd -a user2
New SMB password:
Retype new SMB password:
Added user user2.
Once the credentials are created, Configure some rules to the smb.conf file by using the following command
root@linuxhelp:~# vi /etc/samba/smb.conf
[share1]
path = /home/user/share1
valid users = user1, user2
read list = user2
write list = user1
browseable = yes

[share2]
path = home/user/share2
valid users = user1, user2
read list = user1
write list = user2
browseable = yes
Once the configuration is completed, check the parameters by using the following command
root@linuxhelp:~# testparm
Load smb config files from /etc/samba/smb.conf
Loaded services file OK.
Server role: ROLE_STANDALONE
Press enter to see a dump of your service definitions
#Global parameters
[global]
	log file = /var/log/samba/log.%m
	logging = file
	map to guest = Bad User
	max log size = 1000
	obey pam restrictions = Yes
	pam password change = Yes
	panic action = /usr/share/samba/panic-action %d
	passwd chat = *Enter\snew\s*\spassword:* %n\n *Retype\snew\s*\spassword:* %n\n *password\supdated\ssuccessfully* .
	passwd program = /usr/bin/passwd %u
	server role = standalone server
	server string = %h server (Samba, Ubuntu)
	unix password sync = Yes
	usershare allow guests = Yes
	idmap config * : backend = tdb
[printers]
	browseable = No
	comment = All Printers
	create mask = 0700
	path = /var/spool/samba
	printable = Yes
[print$]
	comment = Printer Drivers
	path = /var/lib/samba/printers
[share1]
	path = /home/user/share1
	read list = user2
	valid users = user1 user2
	write list = user1
[share2]
	path = home/user/share2
	read list = user1
	valid users = user1 user2
	write list = user2
Once the parameter is checked, restart the smbd service by using the following command
root@linuxhelp:~# systemctl restart smbd
Let check my ip by using the following command
root@linuxhelp:~# ip a
1: lo: <LOOPBACK,UP,LOWER_UP> mtu 65536 qdisc noqueue state UNKNOWN group default qlen 1000
    link/loopback 00:00:00:00:00:00 brd 00:00:00:00:00:00
    inet 127.0.0.1/8 scope host lo
       valid_lft forever preferred_lft forever
    inet6 ::1/128 scope host
       valid_lft forever preferred_lft forever
2: ens33: <BROADCAST,MULTICAST,UP,LOWER_UP> mtu 1500 qdisc fq_codel state UP group default qlen 1000
    link/ether 00:0c:29:be:4b:b2 brd ff:ff:ff:ff:ff:ff
    inet 192.168.7.236/24 brd 192.168.7.255 scope global noprefixroute ens33
       valid_lft forever preferred_lft forever
    inet6 fe80::960a:2495:896e:6cd1/64 scope link noprefixroute
       valid_lft forever preferred_lft forever
Open the windows explorer & search your IP. Then Open share1 directory and enter the credential of user1.
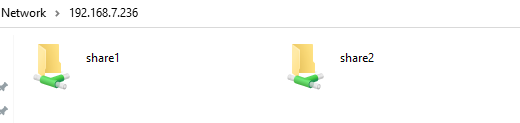
Create a new folder to share one directory

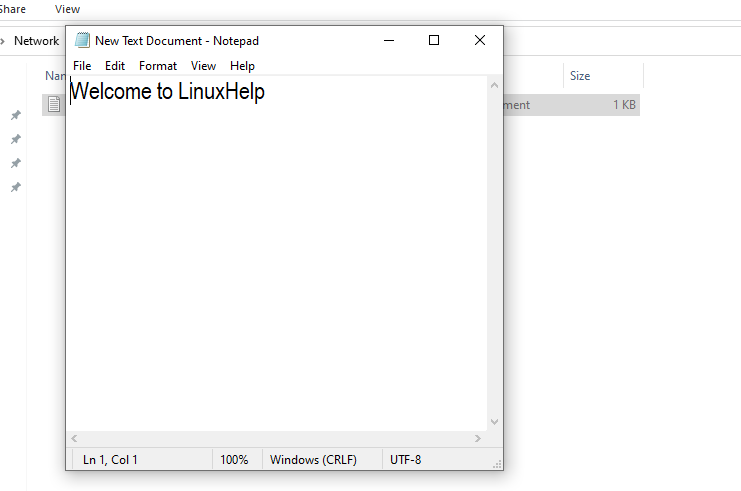
Create a new document file to the folder

Edit the file.
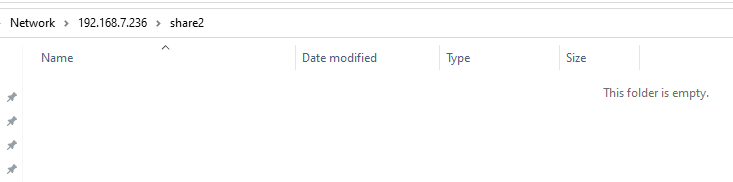
Open share2 directory as shown in the following image.
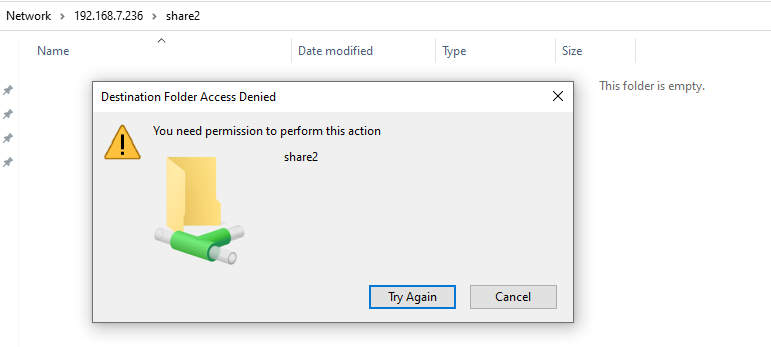
Try to create a new folder, you will notice an issue with it. This explains the user1 cannot access the share2 directory.
The installation and configuration process of SAMBA server on Linux Mint 20 comes to an end.
Comments ( 0 )
No comments available