How To Create Password Protect Directories With Apache On Oracle Linux 9.4
To Create Password Protect Directories With Apache On Oracle Linux 9.4
Introduction
Apache is the most widely utilized web server on Linux systems. Web servers facilitate the delivery of web pages requested by client computers. The htpasswd command enables us to create a password file for user authentication within Apache. This functionality allows us to implement password protection for directories on the Apache web server. In this video, we will provide a comprehensive overview of how to password protect directories.
Procedure
Step 1: Check the OS version
[root@linuxhelp ~]# cat /etc/os-release
NAME="Oracle Linux Server"
VERSION="9.4"
ID="ol"
ID_LIKE="fedora"
VARIANT="Server"
VARIANT_ID="server"
VERSION_ID="9.4"
PLATFORM_ID="platform:el9"
PRETTY_NAME="Oracle Linux Server 9.4"
ANSI_COLOR="0;31"
CPE_NAME="cpe:/o:oracle:linux:9:4:server"
HOME_URL="https://linux.oracle.com/"
BUG_REPORT_URL="https://github.com/oracle/oracle-linux"
ORACLE_BUGZILLA_PRODUCT="Oracle Linux 9"
ORACLE_BUGZILLA_PRODUCT_VERSION=9.4
ORACLE_SUPPORT_PRODUCT="Oracle Linux"
ORACLE_SUPPORT_PRODUCT_VERSION=9.4
Step 2: Install Apache by using the below command
[root@linuxhelp ~]# dnf install httpd -y
Oracle Linux 9 BaseOS Latest (x86_64)                                                                                           21 kB/s | 4.2 kB     00:00
Oracle Linux 9 BaseOS Latest (x86_64)                                                                                          9.1 MB/s |  45 MB     00:04
Oracle Linux 9 Application Stream Packages (x86_64)                                                                             34 kB/s | 4.5 kB     00:00

  Running scriptlet: httpd-2.4.62-1.0.1.el9.x86_64                                                                                                        5/10
  Running scriptlet: httpd-2.4.57-11.0.1.el9_4.1.x86_64                                                                                                   6/10
  Cleanup          : httpd-2.4.57-11.0.1.el9_4.1.x86_64                                                                                                   6/10
  Running scriptlet: httpd-2.4.57-11.0.1.el9_4.1.x86_64                                                                                                   6/10
  Cleanup          : mod_lua-2.4.57-11.0.1.el9_4.1.x86_64                                                                                                 7/10
  Cleanup          : httpd-core-2.4.57-11.0.1.el9_4.1.x86_64                                                                                              8/10
  Cleanup          : httpd-filesystem-2.4.57-11.0.1.el9_4.1.noarch                                                                                        9/10
  Cleanup          : httpd-tools-2.4.57-11.0.1.el9_4.1.x86_64                                                                                            10/10
  Running scriptlet: httpd-2.4.62-1.0.1.el9.x86_64                                                                                                       10/10
  Running scriptlet: httpd-tools-2.4.57-11.0.1.el9_4.1.x86_64                                                                                            10/10
  Verifying        : httpd-2.4.62-1.0.1.el9.x86_64                                                                                                        1/10
  Verifying        : httpd-2.4.57-11.0.1.el9_4.1.x86_64                                                                                                   2/10
  Verifying        : httpd-core-2.4.62-1.0.1.el9.x86_64                                                                                                   3/10
  Verifying        : httpd-core-2.4.57-11.0.1.el9_4.1.x86_64                                                                                              4/10
  Verifying        : httpd-filesystem-2.4.62-1.0.1.el9.noarch                                                                                             5/10
  Verifying        : httpd-filesystem-2.4.57-11.0.1.el9_4.1.noarch                                                                                        6/10
  Verifying        : httpd-tools-2.4.62-1.0.1.el9.x86_64                                                                                                  7/10
  Verifying        : httpd-tools-2.4.57-11.0.1.el9_4.1.x86_64                                                                                             8/10
  Verifying        : mod_lua-2.4.62-1.0.1.el9.x86_64                                                                                                      9/10
  Verifying        : mod_lua-2.4.57-11.0.1.el9_4.1.x86_64                                                                                                10/10

Upgraded:
  httpd-2.4.62-1.0.1.el9.x86_64      httpd-core-2.4.62-1.0.1.el9.x86_64    httpd-filesystem-2.4.62-1.0.1.el9.noarch    httpd-tools-2.4.62-1.0.1.el9.x86_64
  mod_lua-2.4.62-1.0.1.el9.x86_64

Complete!
Step 3: Using terminal move to the Apache Document Root by using the below command [root@linuxhelp ~]# cd /var/www/html/
Step 4: Create the "Protected" folder and go inside by using the below command [root@linuxhelp html]# mkdir protected && cd protected
Step 5: Use the vim editor to create the index.html file by using the below command [root@linuxhelp protected]# vim index.html
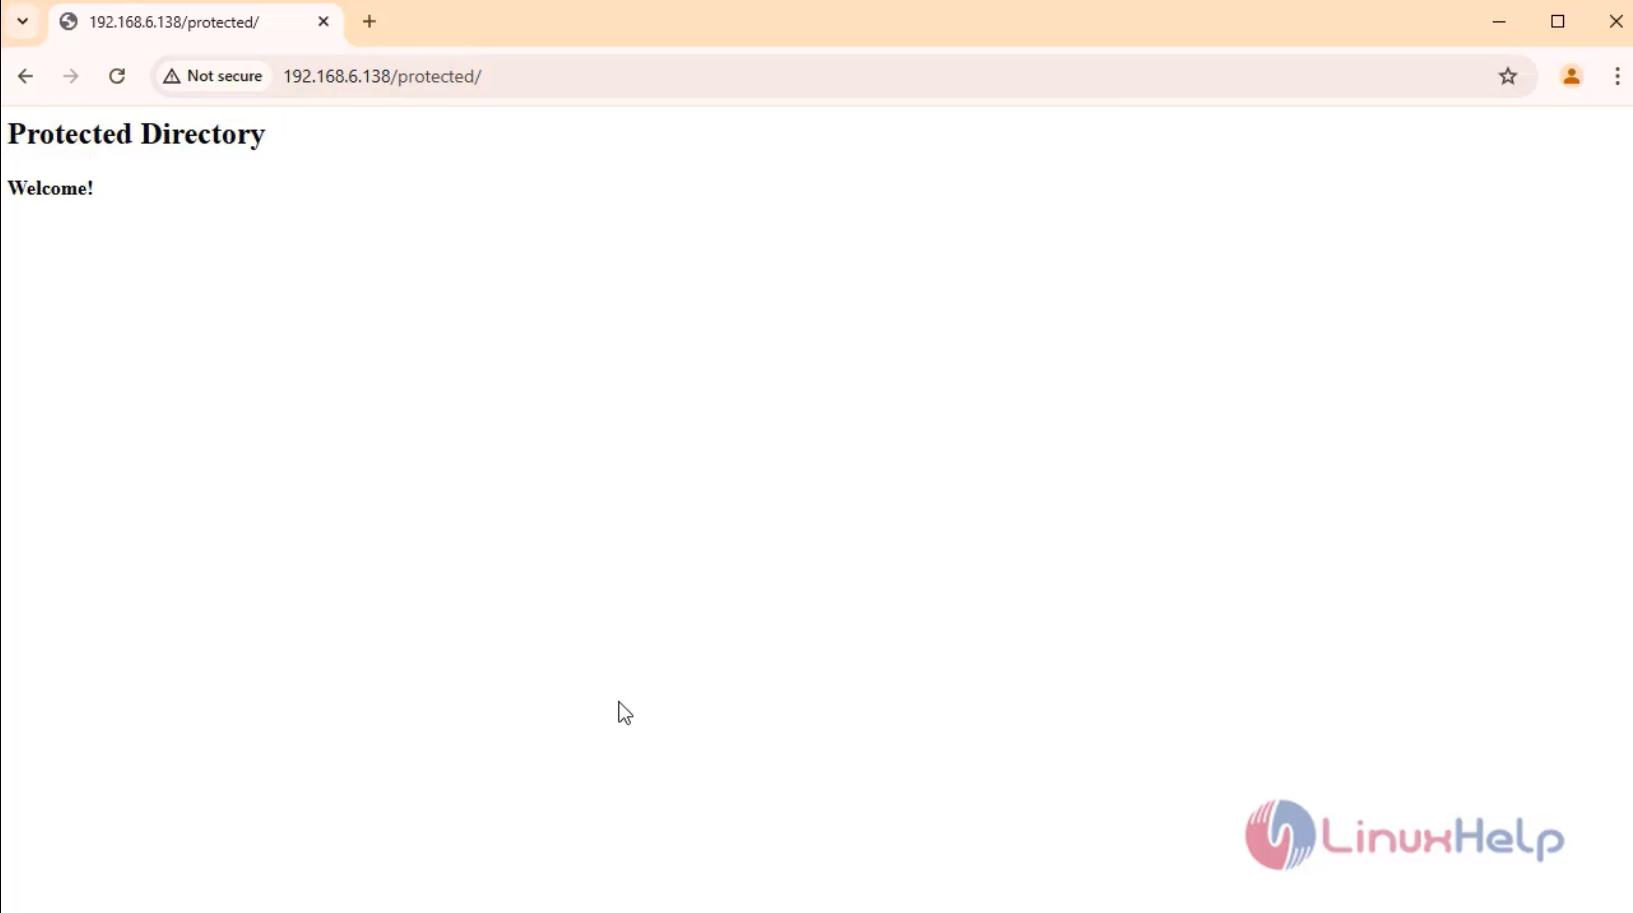
Step 6: Paste this sample content for the Protected area into the html file. Save the file by
<html>
<head></head>
<body>
 <h2>Protected Directory</h2>
 <b>Welcome!</b>
</body>
</html>
Step 7: Create the htpasswd file with the authentication data, then use the htpasswd command to create authentication credentials by using the below command.
[root@linuxhelp protected]# htpasswd -c /etc/httpd/.htpasswd testuser
New password:
Re-type new password:
Adding password for user testuser
Step 8: Configure Apache to restrict access to the directory only to users entered in the .htpasswd file. To do so, create a configuration file in the following location and paste the below content.
[root@linuxhelp protected]# vim /etc/httpd/conf.d/test.conf
<Directory "/var/www/html/protected">
 AuthType Basic
 AuthName "Protected Content"
 AuthUserFile /etc/httpd/.htpasswd
 Require valid-user
</Directory>
Step 9: Then, go to the "protected" folder and create the ".htaccess" file and paste the below content
[root@linuxhelp protected]# vim .htaccess

AuthType Basic
AuthName "Restricted Content"
AuthUserFile /etc/httpd/.htpasswd
Require valid-user
Step 10: Restart the Apache service by using the below command [root@linuxhelp protected]# systemctl restart httpd
Step 11: To verify that the Protected area has been correctly configured
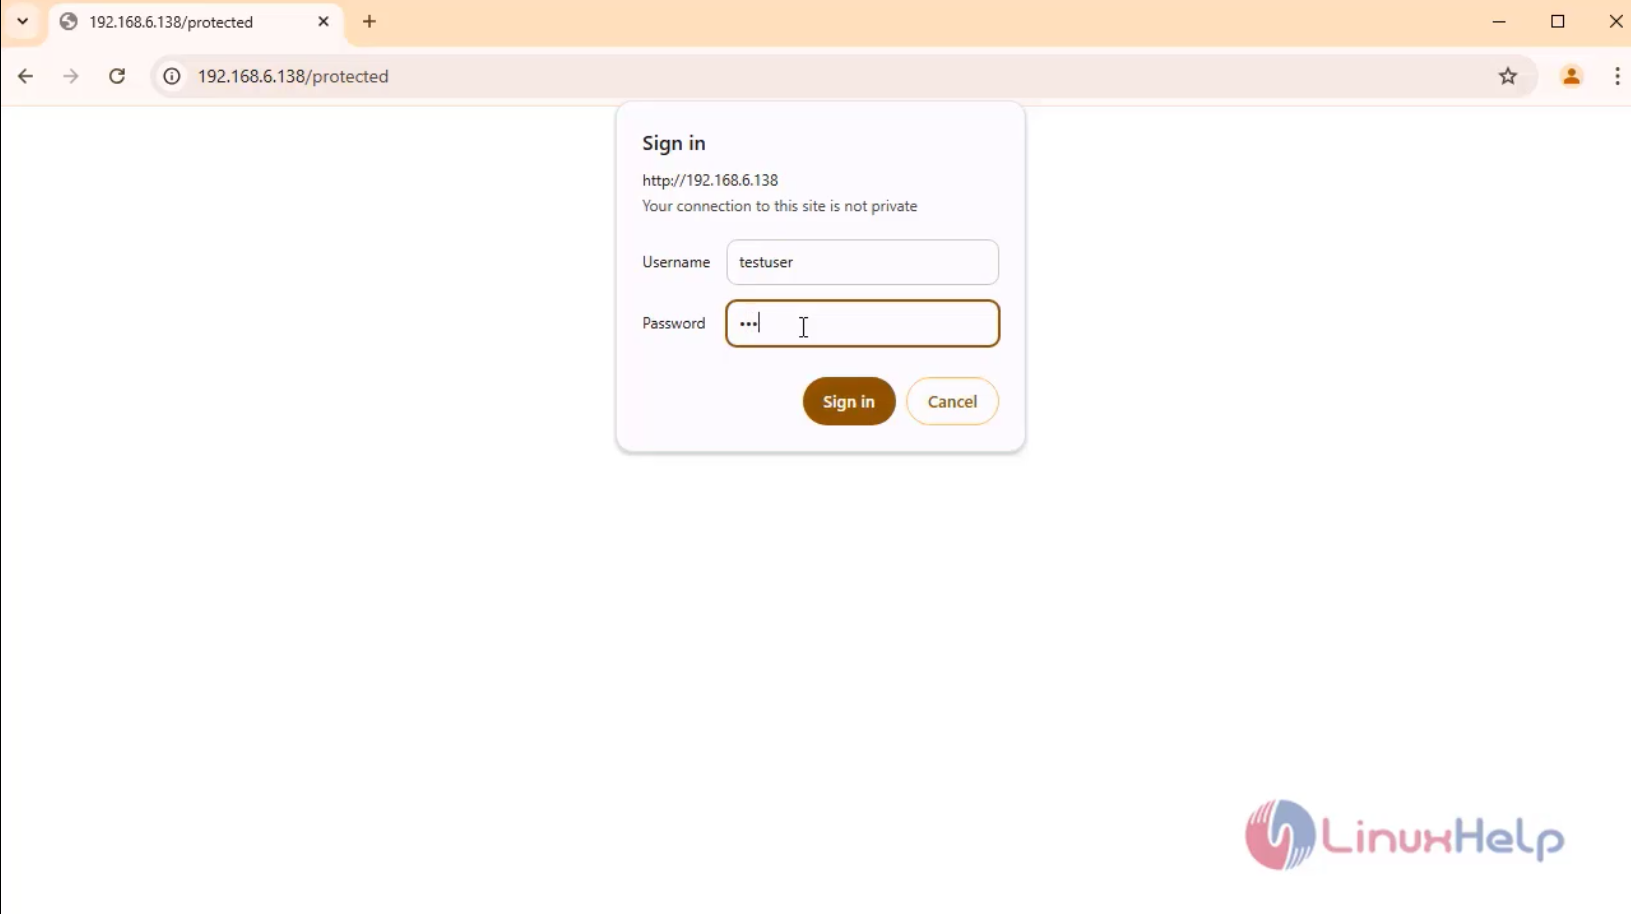
Step 12: Now ask credentials for the protected directory
Conclusion:
We have reached the end of this article. In this guide, we have walked you through the steps required to create password protect directories with Apache on Oracle Linux 9.4. Your feedback is much welcome.
Comments ( 0 )
No comments available