How to install ResourceSpace on CentOS 7 using LEMP
To install ResourceSpace on CentOS 7 using LEMP
ResourceSpace is a free and open-source Digital Asset Management (DAM) software. It is written in PHP and stores its database in MySQL server. It provides a better way to organize, manage and share the digital assets such as images, design files, photos, videos, audio and more into an organization. Users can create custom collections that include resources and saved searches that can be shared and viewed with other users. It contains features such as intelligent search ordering, automatic resizing, import and export option, multiple file uploads and minimal hosting requirements. This tutorial covers the ground on the installation procedure of ResourceSpace on CentOS 7 using LEMP.
Pre-Requisite
LEMP Setup
- Nginx
- MariaDB
- PHP 5.6
Installation procedure
To proceed with the installation procedure, download the latest stable version of ResourceSpace using wget command followed by the download link.
[root@linuxhelp ~]# wget https://www.resourcespace.com/downloads/ResourceSpace_8_1_10036.zip
--2017-10-19 10:16:47--  https://www.resourcespace.com/downloads/ResourceSpace_8_1_10036.zip
Resolving www.resourcespace.com (www.resourcespace.com)... 93.93.130.35
Connecting to www.resourcespace.com (www.resourcespace.com)|93.93.130.35|:443... connected.
HTTP request sent, awaiting response... 200 OK
Length: 27350568 (26M) [application/zip]
Saving to: ‘ ResourceSpace_8_1_10036.zip’

100%[======================================> ] 27,350,568   456KB/s   in 59s

2017-10-19 10:17:48 (449 KB/s) - ‘ ResourceSpace_8_1_10036.zip’  saved [27350568/27350568]
Extract the package in Nginx root directory using unzip command.
[root@linuxhelp ~]# unzip ResourceSpace_8_1_10036.zip -d /usr/share/nginx/html/
Archive:  ResourceSpace_8_1_10036.zip
   creating: /usr/share/nginx/html/api/
  inflating: /usr/share/nginx/html/api/index.php
  inflating: /usr/share/nginx/html/api/example.php
   creating: /usr/share/nginx/html/batch/
   creating: /usr/share/nginx/html/batch/cron_jobs/
 extracting: /usr/share/nginx/html/batch/cron_jobs/002_copy_hitcount.php
  inflating: /usr/share/nginx/html/batch/cron_jobs/006_update_disk_usage.php
 extracting: /usr/share/nginx/html/batch/cron_jobs/004_send_periodic_reports.php
  inflating: /usr/share/nginx/html/batch/cron_jobs/009_flush_unused_keywords.php

.
.
.
inflating: /usr/share/nginx/html/tests/test_list/001200_get_users.php
  inflating: /usr/share/nginx/html/tests/test.php
   creating: /usr/share/nginx/html/upgrade/
  inflating: /usr/share/nginx/html/upgrade/upgrade.php
  inflating: /usr/share/nginx/html/upgrade/readme.txt
   creating: /usr/share/nginx/html/upgrade/scripts/
  inflating: /usr/share/nginx/html/upgrade/scripts/001_migrate_to_nodes.php
  inflating: /usr/share/nginx/html/upgrade/scripts/002_check_resource_node_table.php
Enter into the HTML file of Nginx and create a php.ini configuration file. Make the following changes in the file and save it.
[root@linuxhelp ~]# cd /usr/share/nginx/html/

[root@linuxhelp html]# vim /etc/php.ini
upload_max_filesize = 512M
memory_limit = 512M
post_max_size 512M
Next create a PHP-FPM configuration file and enter the following content in the file and save it.
[root@linuxhelp html]# vim /etc/php-fpm.d/www.conf
listen = /run/php-fpm/php-fpm.sock
listen.owner = nginx
listen.group = nginx
user = nginx
group = nginx
Restart the php-fpm service by executing the following command.
[root@linuxhelp html]# systemctl restart php-fpm
Now create a configuration file named resource.conf and enter the following contents in the file. Save and exit the file.
[root@linuxhelp html]# vim /etc/nginx/conf.d/resource.conf
server {
    listen  80
  server_name www.linuxhelp1.com

    location / {
        root  /usr/share/nginx/html
        index  index.html index.htm index.php
    }

    error_page  500 502 503 504  /50x.html
    location = /50x.html {
        root  /usr/share/nginx/html
    }
location ~ \.php {
    fastcgi_index index.php
    fastcgi_split_path_info ^(.+\.php)(.*)$
    include /etc/nginx/fastcgi_params
    fastcgi_pass unix:/run/php-fpm/php-fpm.sock
    fastcgi_param SCRIPT_FILENAME $document_root$fastcgi_script_name
  }

}
Restart the Nginx service.
[root@linuxhelp html]# systemctl restart nginx
Provide the owner permission and file execution permission by executing the following set of commands.
[root@linuxhelp html]# chown -R nginx:nginx /usr/share/nginx/html/
[root@linuxhelp html]# chmod -R 777 /usr/share/nginx/html/
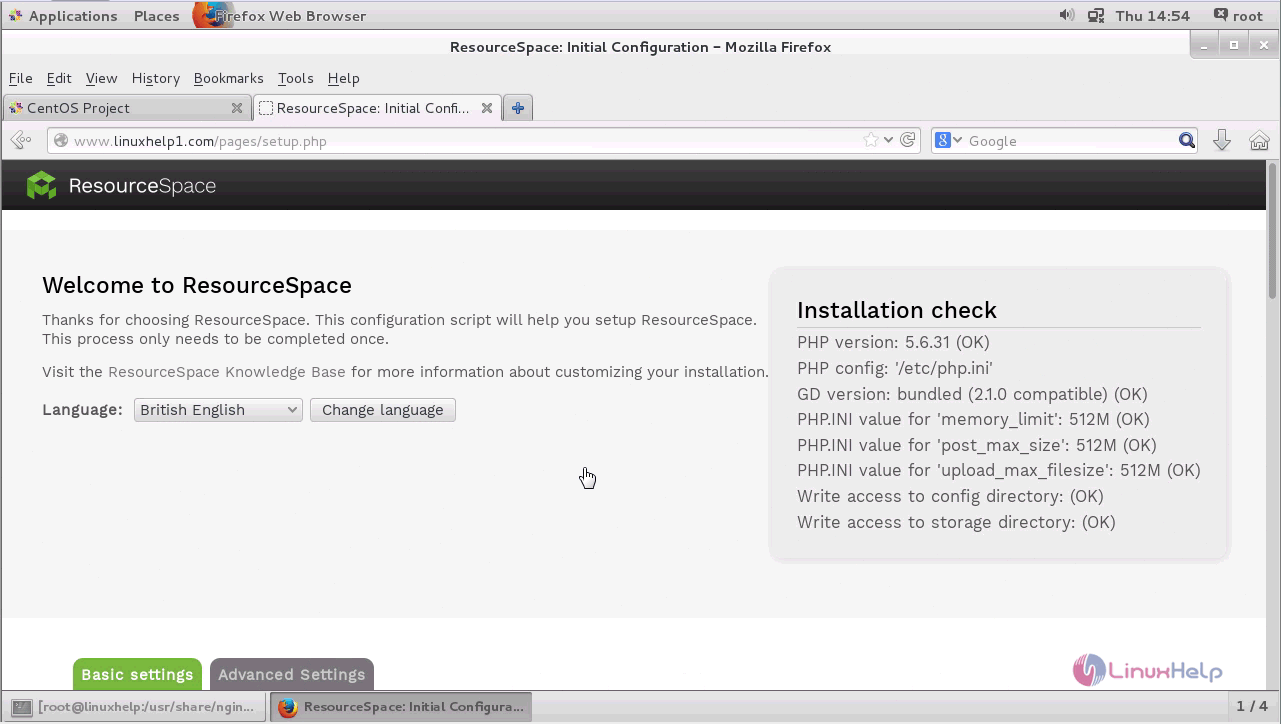
Switch over to the browser and enter the URL as http://yourdomain/index.php. The installation wizard of ResourceSpace appears on the screen. Select the required language.
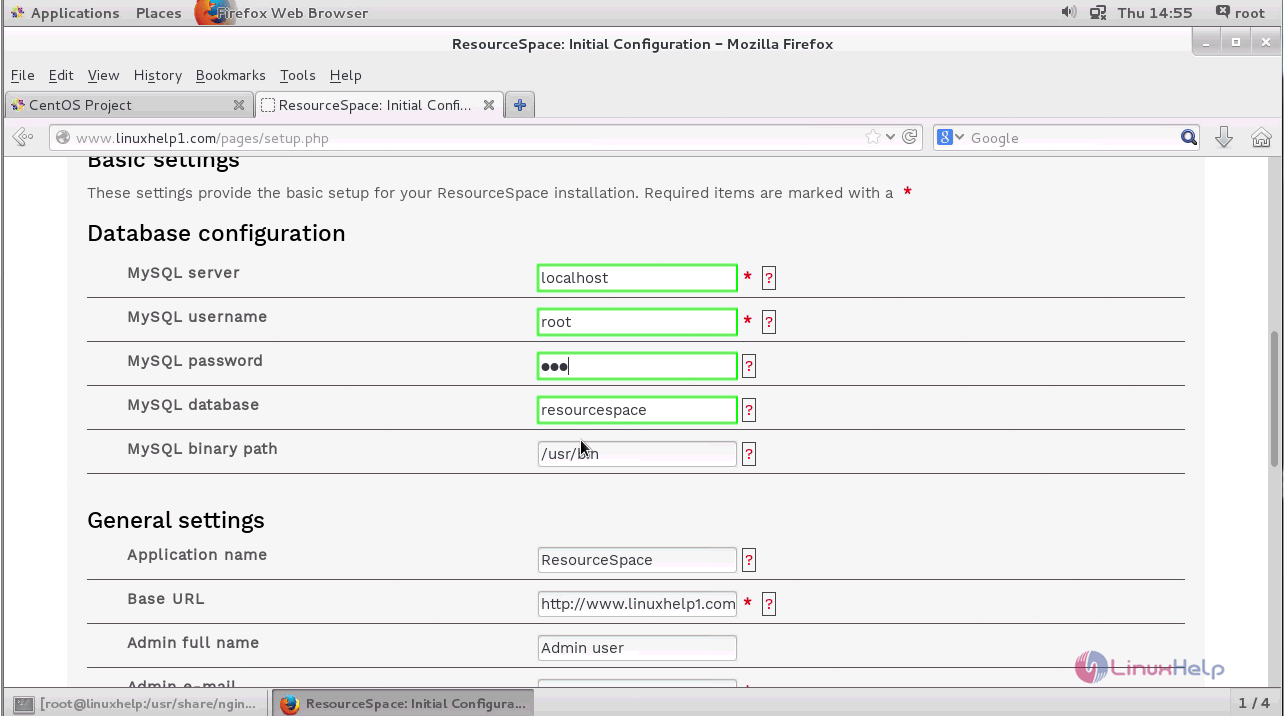
Enter the required database configuration details such as server name, username, password and database name.
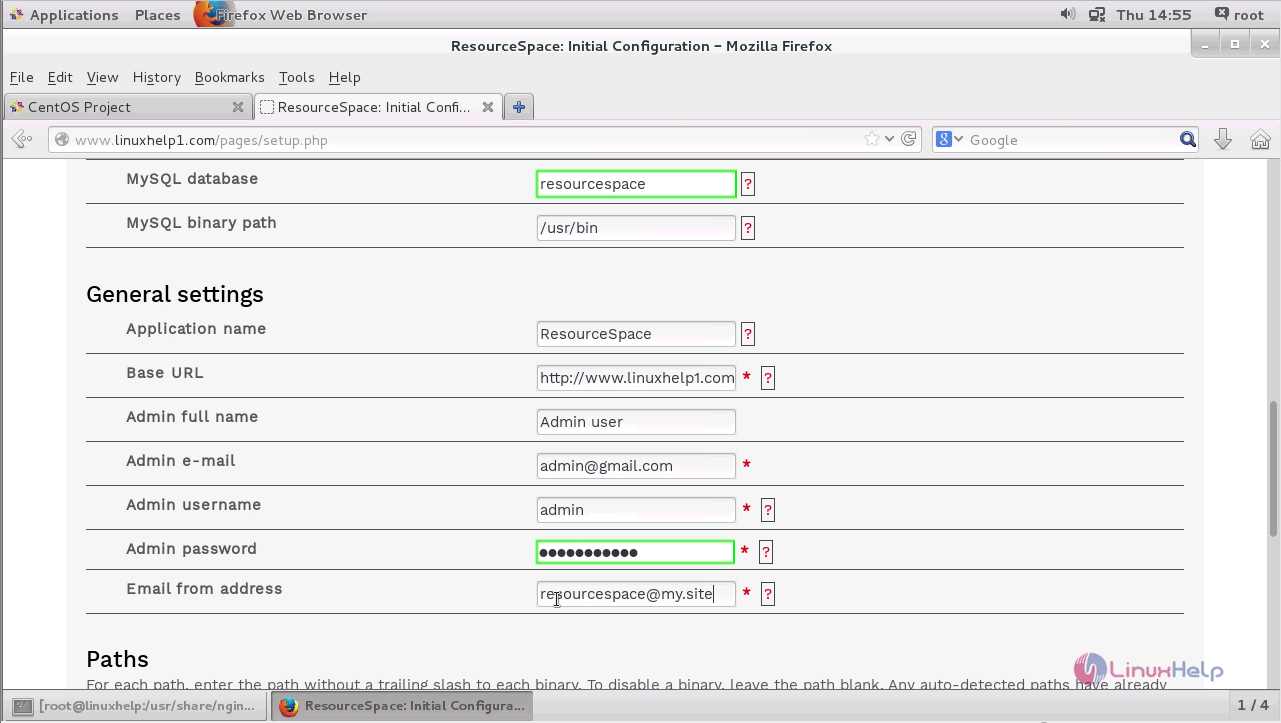
Enter the required general settings details as follows.
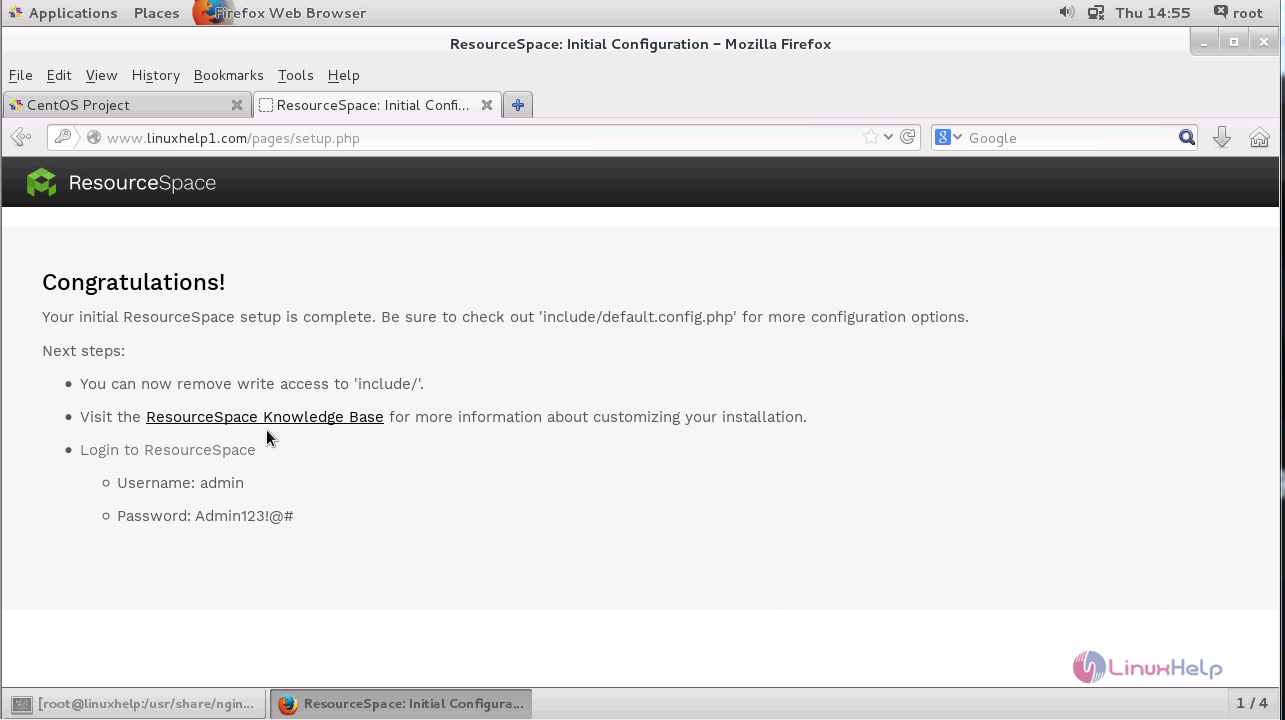
The configuration process of ResourceSpace is complete. The username and password for logging in to ResourceSpace is shown as below.
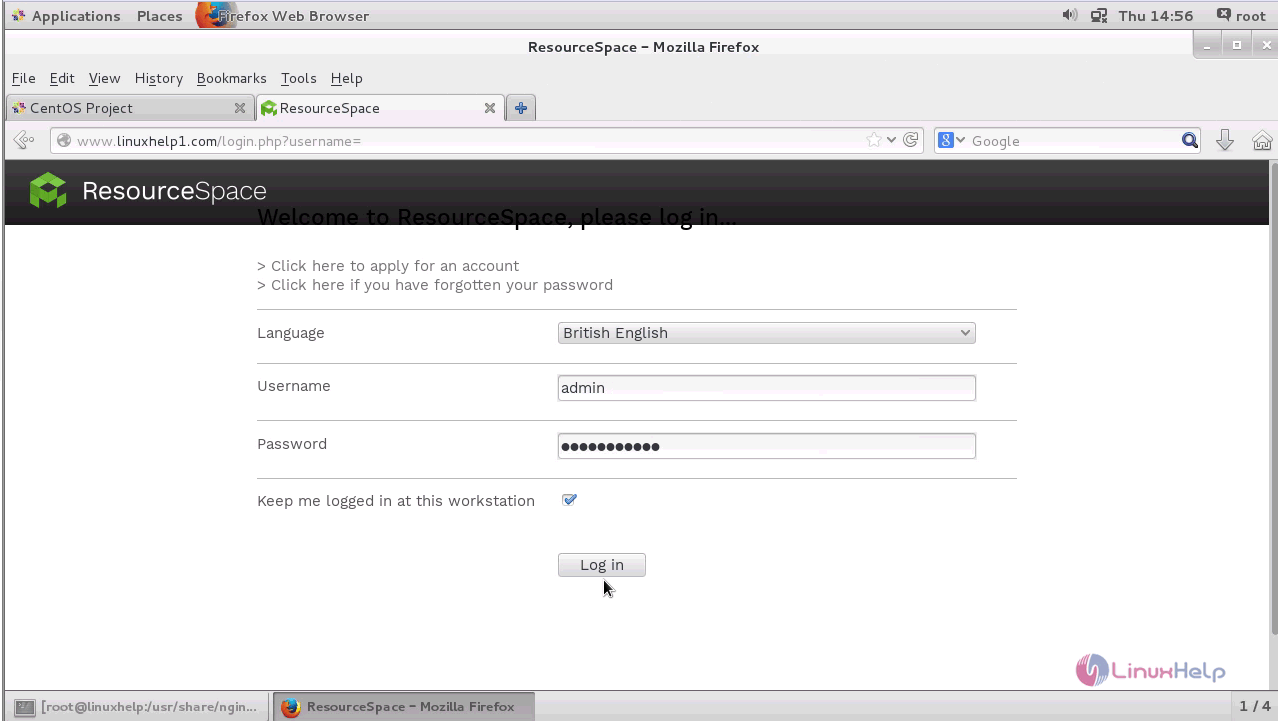
Enter the username and password for ResourceSpace and click Log in option.
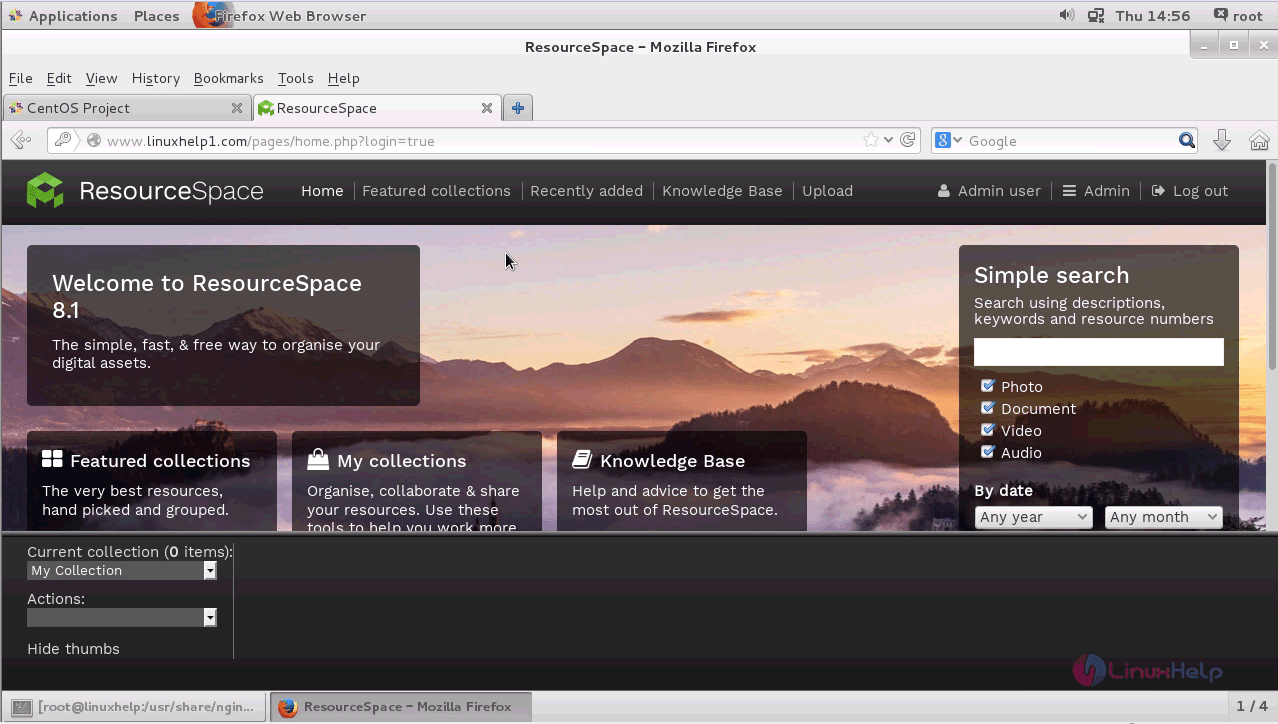
The dashboard of ResourceSpace appears on the screen.
The installation procedure of ResourceSpace on CentOS 7 using LEMP is done successfully.
Comments ( 0 )
No comments available