How to install Nextcloud on Ubuntu 22.04 version
- 00:28 lsb_release -a
- 00:41 install apt apache2
- 01:22 systemctl status apache2
- 01:47 apt-get install php8.1 php8.1-cli php8.1-common php8.1-imap php8.1-redis php8.1-snmp php8.1-xml php8.1-zip php8.1-mbstring php8.1-curl php8.1-gd php8.1-mysql
- 02:36 apt install mariadb-server
- 03:15 systemctl status mariadb
- 03:22 mysql -V
- 03:35 mysql
- 05:36 cd /var/www/html
- 06:45 unzip nextcloud-24.0.1.zip
- 07:15 chown -R www-data:www-data /var/www/html/nextcloud
- 07:50 vim /etc/apache2/sites-available/nextcloud.conf
- 08:43 a2ensite nextcloud.conf
- 09:01 a2enmod rewrite
- 09:23 a2dissite 000-default.conf
- 09:50 apachectl -t
- 10:02 systemctl restart apache2
To Install Nextcloud On Ubuntu 22.04 Version
Introduction :
The Nextcloud software suite is open-source software that provides functionality similar to Dropbox, Office 365, or Google Drive when used with integrated office software such as Collabora Online or OnlyOffice. The application can be hosted in the cloud or on-premises.
Installation Procedure:
Step 1: Check the OS version by using the below command
root@linuxhelp:~# lsb_release -a
No LSB modules are available.
Distributor ID: Ubuntu
Description:    Ubuntu 22.04.2 LTS
Release:        22.04
Codename:       jammy
Step 2: Install Apache web server by using the below command
root@linuxhelp:~# apt install apache2
Reading package lists... Done
Building dependency tree... Done
Reading state information... Done
The following packages were automatically installed and are no longer required:
  libflashrom1 libftdi1-2 libllvm13
Use 'apt autoremove' to remove them.
The following additional packages will be installed:
  apache2-bin apache2-data apache2-utils libapr1 libaprutil1 libaprutil1-dbd-sqlite3 libaprutil1-ldap
Suggested packages:
  apache2-doc apache2-suexec-pristine | apache2-suexec-custom www-browser
The following NEW packages will be installed:
  apache2 apache2-bin apache2-data apache2-utils libapr1 libaprutil1 libaprutil1-dbd-sqlite3 libaprutil1-ldap
0 upgraded, 8 newly installed, 0 to remove and 22 not upgraded.
Need to get 1,917 kB of archives.
After this operation, 7,706 kB of additional disk space will be used.
Do you want to continue? [Y/n] y
Get:1 http://in.archive.ubuntu.com/ubuntu jammy-updates/main amd64 libapr1 amd64 1.7.0-8ubuntu0.22.04.1 [108 kB]
Get:2 http://in.archive.ubuntu.com/ubuntu jammy-updates/main amd64 libaprutil1 amd64 1.6.1-5ubuntu4.22.04.1 [92.6 kB]
Get:3 http://in.archive.ubuntu.com/ubuntu jammy-updates/main amd64 libaprutil1-dbd-sqlite3 amd64 1.6.1-5ubuntu4.22.04.1 [11.3 kB]
Enabling module status.
Enabling module reqtimeout.
Enabling conf charset.
Enabling conf localized-error-pages.

Enabling conf other-vhosts-access-log.
Enabling conf security.
Enabling conf serve-cgi-bin.
Enabling site 000-default.
Created symlink /etc/systemd/system/multi-user.target.wants/apache2.service → /lib/systemd/system/apache2.service.
Created symlink /etc/systemd/system/multi-user.target.wants/apache-htcacheclean.service → /lib/systemd/system/apache-htcacheclean.service.
Processing triggers for ufw (0.36.1-4build1) ...
Processing triggers for man-db (2.10.2-1) ...
Processing triggers for libc-bin (2.35-0ubuntu3.1) ...
Step 3: Check the status of the Apache web server by using the below command
root@linuxhelp:~# systemctl status apache2
● apache2.service - The Apache HTTP Server
     Loaded: loaded (/lib/systemd/system/apache2.service; enabled; vendor preset: enabled)
     Active: active (running) since Wed 2023-05-24 07:25:51 IST; 9s ago
       Docs: https://httpd.apache.org/docs/2.4/
   Main PID: 5676 (apache2)
      Tasks: 55 (limit: 4573)
     Memory: 4.9M
        CPU: 71ms
     CGroup: /system.slice/apache2.service
             ├─5676 /usr/sbin/apache2 -k start
             ├─5678 /usr/sbin/apache2 -k start
             └─5679 /usr/sbin/apache2 -k start

May 24 07:25:51 linuxhelp systemd[1]: Starting The Apache HTTP Server...
May 24 07:25:51 linuxhelp apachectl[5675]: AH00558: apache2: Could not reliably determine the server's fully qualified domain name, using 192.168.6.113. Set the 'ServerName' directive globally to>
May 24 07:25:51 linuxhelp systemd[1]: Started The Apache HTTP Server.
Step 4: Install php and dependencies by using the below command
root@linuxhelp:~# apt-get install php8.1 php8.1-cli php8.1-common php8.1-imap php8.1-redis php8.1-snmp php8.1-xml php8.1-zip php8.1-mbstring php8.1-curl php8.1-gd php8.1-mysql
Reading package lists... Done
Building dependency tree... Done
Reading state information... Done
The following packages were automatically installed and are no longer required:
  libflashrom1 libftdi1-2 libllvm13
Use 'apt autoremove' to remove them.
The following additional packages will be installed:
  libapache2-mod-php8.1 libc-client2007e libonig5 libzip4 mlock php-common php8.1-igbinary php8.1-opcache php8.1-readline snmp
Suggested packages:
  php-pear uw-mailutils redis-server
The following NEW packages will be installed:
  libapache2-mod-php8.1 libc-client2007e libonig5 libzip4 mlock php-common php8.1 php8.1-cli php8.1-common php8.1-curl php8.1-gd php8.1-igbinary php8.1-imap php8.1-mbstring php8.1-mysql
  php8.1-opcache php8.1-readline php8.1-redis php8.1-snmp php8.1-xml php8.1-zip snmp
0 upgraded, 22 newly installed, 0 to remove and 22 not upgraded.
Need to get 7,399 kB of archives.
After this operation, 28.2 MB of additional disk space will be used.
Do you want to continue? [Y/n] y
Get:1 http://in.archive.ubuntu.com/ubuntu jammy/main amd64 php-common all 2:92ubuntu1 [12.4 kB]
Get:2 http://in.archive.ubuntu.com/ubuntu jammy-updates/main amd64 php8.1-common amd64 8.1.2-1ubuntu2.11 [1,126 kB]
apache2_switch_mpm Switch to prefork
apache2_invoke: Enable module php8.1
Setting up php8.1 (8.1.2-1ubuntu2.11) ...
Setting up php8.1-redis (5.3.5+4.3.0-5.1) ...
Processing triggers for man-db (2.10.2-1) ...
Processing triggers for libc-bin (2.35-0ubuntu3.1) ...
Processing triggers for php8.1-cli (8.1.2-1ubuntu2.11) ...
Processing triggers for libapache2-mod-php8.1 (8.1.2-1ubuntu2.11) ...
Step 5: Install MariaDB server by using the below command
root@linuxhelp:~# apt install mariadb-server
Reading package lists... Done
Building dependency tree... Done
Reading state information... Done
The following packages were automatically installed and are no longer required:
  libflashrom1 libftdi1-2 libllvm13


Use 'apt autoremove' to remove them.
The following additional packages will be installed:
  galera-4 gawk libcgi-fast-perl libcgi-pm-perl libconfig-inifiles-perl libdaxctl1 libdbd-mysql-perl libdbi-perl libfcgi-bin libfcgi-perl libfcgi0ldbl libhtml-template-perl libmariadb3
  libmysqlclient21 libndctl6 libpmem1 libsigsegv2 libsnappy1v5 libterm-readkey-perl liburing2 mariadb-client-10.6 mariadb-client-core-10.6 mariadb-common mariadb-server-10.6
  mariadb-server-core-10.6 mysql-common socat
Suggested packages:
  gawk-doc libmldbm-perl libnet-daemon-perl libsql-statement-perl libipc-sharedcache-perl mailx mariadb-test
The following NEW packages will be installed:
  galera-4 gawk libcgi-fast-perl libcgi-pm-perl libconfig-inifiles-perl libdaxctl1 libdbd-mysql-perl libdbi-perl libfcgi-bin libfcgi-perl libfcgi0ldbl libhtml-template-perl libmariadb3
  libmysqlclient21 libndctl6 libpmem1 libsigsegv2 libsnappy1v5 libterm-readkey-perl liburing2 mariadb-client-10.6 mariadb-client-core-10.6 mariadb-common mariadb-server mariadb-server-10.6
  mariadb-server-core-10.6 mysql-common socat
0 upgraded, 28 newly installed, 0 to remove and 22 not upgraded.
Need to get 18.7 MB of archives.
After this operation, 165 MB of additional disk space will be used.
Do you want to continue? [Y/n] y
Get:1 http://in.archive.ubuntu.com/ubuntu jammy/main amd64 libsigsegv2 amd64 2.13-1ubuntu3 [14.6 kB]
Get:2 http://in.archive.ubuntu.com/ubuntu jammy/main amd64 gawk amd64 1:5.1.0-1build3 [447 kB]
Get:3 http://in.archive.ubuntu.com/ubuntu jammy/main amd64 mysql-common all 5.8+1.0.8 [7,212 B]
Step 6: Check the status of MariaDB by using the below command
root@linuxhelp:~# systemctl status mariadb
● mariadb.service - MariaDB 10.6.12 database server
     Loaded: loaded (/lib/systemd/system/mariadb.service; enabled; vendor preset: enabled)
     Active: active (running) since Thu 2023-06-22 10:31:01 IST; 12s ago


       Docs: man:mariadbd(8)
             https://mariadb.com/kb/en/library/systemd/
    Process: 17962 ExecStartPre=/usr/bin/install -m 755 -o mysql -g root -d /var/run/mysqld (code=exited, status=0/SUCCESS)
    Process: 17966 ExecStartPre=/bin/sh -c systemctl unset-environment _WSREP_START_POSITION (code=exited, status=0/SUCCESS)
    Process: 17975 ExecStartPre=/bin/sh -c [ ! -e /usr/bin/galera_recovery ] && VAR= ||   VAR=`cd /usr/bin/..; /usr/bin/galera_recovery`; [ $? -eq 0 ]   && systemctl set-environment _WSREP_START_>
    Process: 18031 ExecStartPost=/bin/sh -c systemctl unset-environment _WSREP_START_POSITION (code=exited, status=0/SUCCESS)
    Process: 18033 ExecStartPost=/etc/mysql/debian-start (code=exited, status=0/SUCCESS)
   Main PID: 18018 (mariadbd)
     Status: "Taking your SQL requests now..."
      Tasks: 14 (limit: 4573)
     Memory: 61.4M
        CPU: 711ms
     CGroup: /system.slice/mariadb.service
             └─18018 /usr/sbin/mariadbd

Jun 22 10:31:01 linuxhelp mariadbd[18018]: Version: '10.6.12-MariaDB-0ubuntu0.22.04.1'  socket: '/run/mysqld/mysqld.sock'  port: 3306  Ubuntu 22.04
Jun 22 10:31:01 linuxhelp systemd[1]: Started MariaDB 10.6.12 database server.
Jun 22 10:31:01 linuxhelp /etc/mysql/debian-start[18035]: Upgrading MySQL tables if necessary.
Jun 22 10:31:01 linuxhelp /etc/mysql/debian-start[18038]: Looking for 'mariadb' as: /usr/bin/mariadb
Jun 22 10:31:01 linuxhelp /etc/mysql/debian-start[18038]: Looking for 'mariadb-check' as: /usr/bin/mariadb-check
Jun 22 10:31:01 linuxhelp /etc/mysql/debian-start[18038]: This installation of MariaDB is already upgraded to 10.6.12-MariaDB.
Jun 22 10:31:01 linuxhelp /etc/mysql/debian-start[18038]: There is no need to run mysql_upgrade again for 10.6.12-MariaDB.
Jun 22 10:31:01 linuxhelp /etc/mysql/debian-start[18038]: You can use --force if you still want to run mysql_upgrade
Jun 22 10:31:01 linuxhelp /etc/mysql/debian-start[18046]: Checking for insecure root accounts.


Jun 22 10:31:01 linuxhelp /etc/mysql/debian-start[18052]: Triggering myisam-recover for all MyISAM tables and aria-recover for all Aria tables
Step 7: Check the MariaDB version by using the below command
root@linuxhelp:~# mysql -V
mysql  Ver 15.1 Distrib 10.6.12-MariaDB, for debian-linux-gnu (x86_64) using  EditLine wrapper
Step 8: Create a database and grant privileges to the user by using the below command
root@linuxhelp:~# mysql
Welcome to the MariaDB monitor.  Commands end with ; or \g.
Your MariaDB connection id is 31
Server version: 10.6.12-MariaDB-0ubuntu0.22.04.1 Ubuntu 22.04
Copyright (c) 2000, 2018, Oracle, MariaDB Corporation Ab and others.
Type 'help;' or '\h' for help. Type '\c' to clear the current input statement.
MariaDB [(none)]> CREATE DATABASE nextcloud;
Query OK, 1 row affected (0.001 sec)
MariaDB [(none)]> GRANT ALL PRIVILEGES ON nextcloud.* TO 'nextcloud'@'localhost' IDENTIFIED BY '123456';
Query OK, 0 rows affected (0.001 sec)
MariaDB [(none)]> FLUSH PRIVILEGES;
Query OK, 0 rows affected (0.001 sec)
MariaDB [(none)]> exit;
Bye
Step 9: Change into html directory by using the below command
root@linuxhelp:~# cd /var/www/html
Step 10: Download the nextcloud by using wget command
root@linuxhelp:/var/www/html# wget https://download.nextcloud.com/server/releases/nextcloud-24.0.1.zip
--2023-06-22 10:32:23--  https://download.nextcloud.com/server/releases/nextcloud-24.0.1.zip
Resolving download.nextcloud.com (download.nextcloud.com)... 95.217.64.181, 2a01:4f9:2a:3119::181
Connecting to download.nextcloud.com (download.nextcloud.com)|95.217.64.181|:443... connected.


HTTP request sent, awaiting response... 200 OK
Length: 150593304 (144M) [application/zip]
Saving to: ‘nextcloud-24.0.1.zip’
nextcloud-24.0.1.zip                             100%[==========================================================================================================>] 143.62M  5.19MB/s    in 32s

2023-06-22 10:32:56 (4.48 MB/s) - ‘nextcloud-24.0.1.zip’ saved [150593304/150593304]
**Step 11: Extract the file using unzip command **
root@linuxhelp:/var/www/html# unzip nextcloud-24.0.1.zip
Archive:  nextcloud-24.0.1.zip
   creating: nextcloud/
  inflating: nextcloud/index.php
   creating: nextcloud/ocs-provider/
  inflating: nextcloud/ocs-provider/index.php
   creating: nextcloud/ocs/
  inflating: nextcloud/ocs/v2.php
  inflating: nextcloud/ocs/providers.php
  inflating: nextcloud/ocs/v1.php
   creating: nextcloud/resources/
  inflating: nextcloud/resources/update-locales.php
  inflating: nextcloud/resources/app-info.xsd
   creating: nextcloud/resources/codesigning/
  inflating: nextcloud/resources/codesigning/root.crt
  inflating: nextcloud/resources/codesigning/core.crt
  inflating: nextcloud/resources/codesigning/root.crl
  inflating: nextcloud/resources/locales.json
  inflating: nextcloud/resources/app-info-shipped.xsd
   creating: nextcloud/resources/config/
  inflating: nextcloud/resources/config/mimetypealiases.dist.json
  inflating: nextcloud/resources/config/mimetypemapping.dist.json
  inflating: nextcloud/resources/config/ca-bundle.crt
   creating: nextcloud/lib/
   creating: nextcloud/lib/composer/
   creating: nextcloud/lib/composer/composer/
Step 12: Change the ownership of the file by using the below command
root@linuxhelp:/var/www/html# chown -R www-data:www-data /var/www/html/nextcloud
Step 13: Create apache virtual host file by using the below command
root@linuxhelp:/var/www/html# vim /etc/apache2/sites-available/nextcloud.conf
Paste the following lines in the file and save the file
<VirtualHost *:80>
ServerName yourdomain.com
DocumentRoot /var/www/html/nextcloud
<Directory /var/www/html/nextcloud/>
 Require all granted
 Options FollowSymlinks MultiViews
 AllowOverride All
 <IfModule mod_dav.c>
 Dav off
 </IfModule>
</Directory>
ErrorLog /var/log/apache2/yourdomain.com.error_log
CustomLog /var/log/apache2/yourdomain.com.access_log common
</VirtualHost>
Step 14: Enable the Apache2 configuration file by using the below command
root@linuxhelp:/var/www/html# a2ensite nextcloud.conf
Enabling site nextcloud.
To activate the new configuration, you need to run:
systemctl reload apache2
Step 15: Enable the Apache2 Module by using the below command
root@linuxhelp:/var/www/html# a2enmod rewrite
Enabling module rewrite.
To activate the new configuration, you need to run:
systemctl restart apache2
Step 16: Disable the Apache default welcome page by using the below command
root@linuxhelp:/var/www/html# a2dissite 000-default.conf
Site 000-default disabled.
To activate the new configuration, you need to run:
systemctl reload apache2
Step 17: Check the syntax of conf file by using the below command
root@linuxhelp:/var/www/html# apachectl -t
AH00558: apache2: Could not reliably determine the server's fully qualified domain name, using 192.168.6.113. Set the 'ServerName' directive globally to suppress this message
Syntax OK
Step 18: Restart the Apache web server by using the below command
root@linuxhelp:/var/www/html# systemctl restart apache2
Step 19: Open the browser and search with IP as shown in the below image

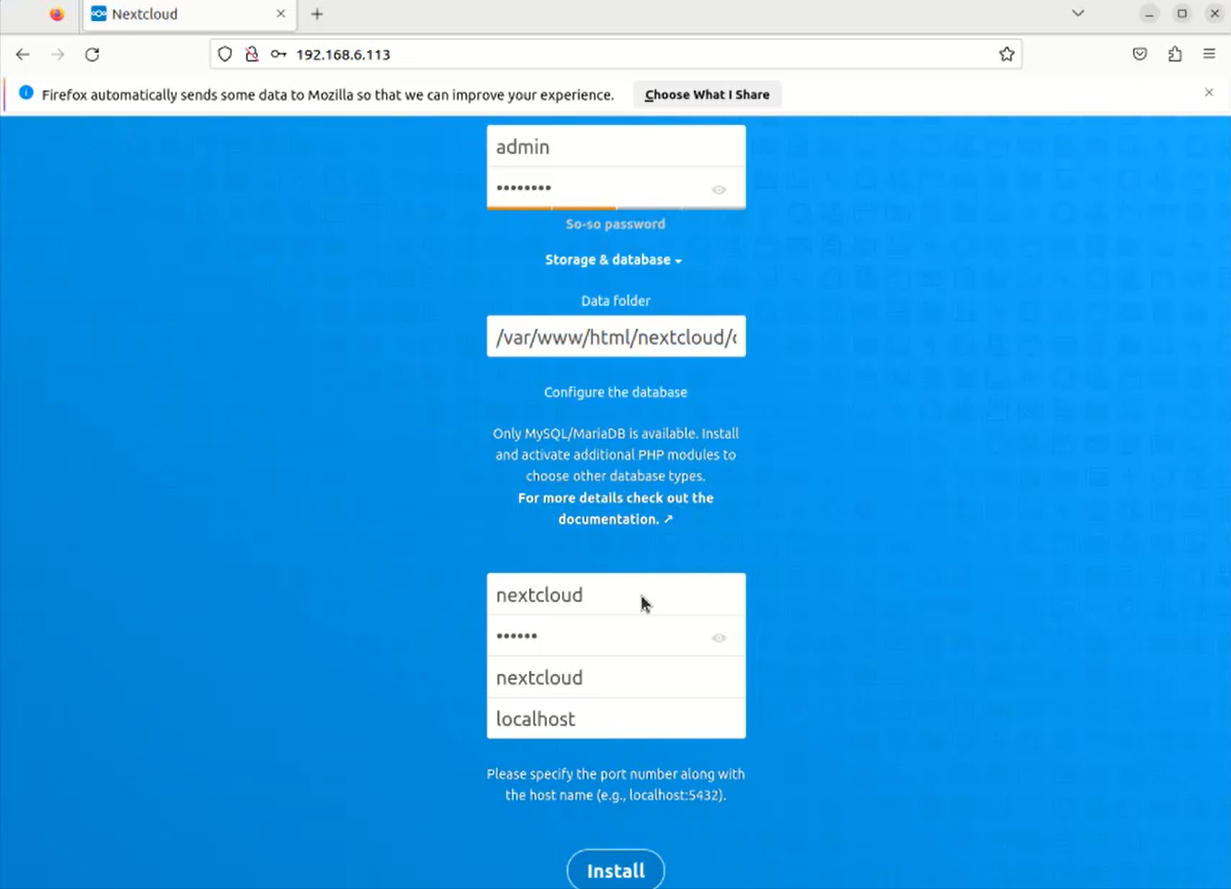
Step 20: Create the admin account and enter the database credentials in the below session as show in the below image
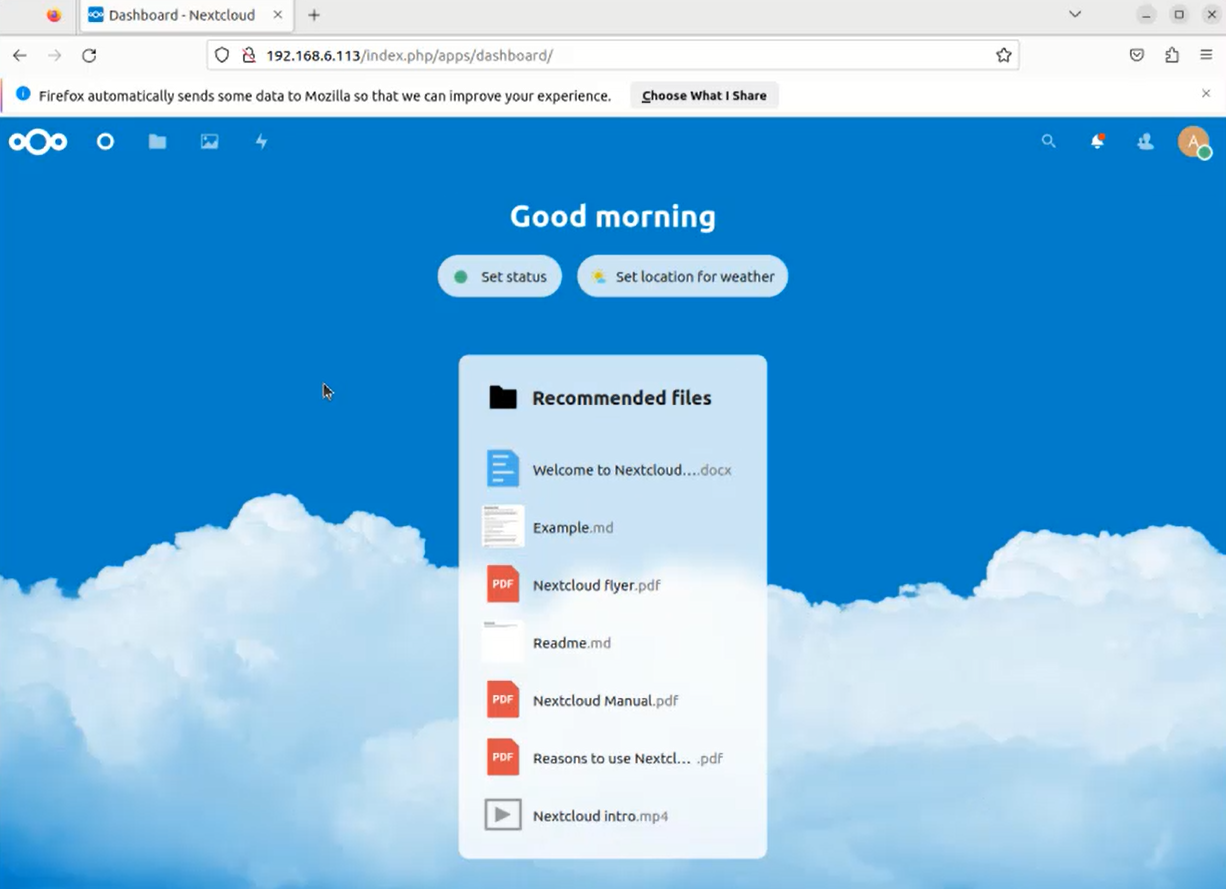
This is the dashboard of the Nextcloud
Conclusion:
By this how to install Nextcloud on Ubuntu 22 has come to an end.
Comments ( 0 )
No comments available