How to install Elasticsearch on Ubuntu 22.04
- 00:43 lsb_release -a
- 01:05 curl -fsSL https://artifacts.elastic.co/GPG-KEY-elasticsearch | sudo gpg --dearmor -o /usr/share/keyrings/elastic.gpg
- 01:20 echo "deb [signed-by=/usr/share/keyrings/elastic.gpg] https://artifacts.elastic.co/packages/7.x/apt stable main" | sudo tee -a /etc/apt/sources.list.d/elastic-7.x.list
- 01:36 apt update
- 02:12 apt install elasticsearch
- 03:35 systemctl daemon-reload
- 03:52 systemctl enable elasticsearch
- 04:07 systemctl start elasticsearch
- 04:28 systemctl status elasticsearch
- 04:46 vim /etc/elasticsearch/elasticsearch.yml
- 05:36 systemctl restart elasticsearch
- 05:51 systemctl status elasticsearch
To install Elastic Search on Ubuntu 22.04
Introduction:
Elastic Search is a platform for distributed search and analysis of data in real time. It is a popular choice due to its usability, powerful features, and scalability. It is a modern search and analytics engine which is based on Apache Lucene. Its built with Java, Elasticsearch is a NoSQL database.
Procedure
Step 1: Check the OS version by using the below command
root@linuxhelp:~# lsb_release -a
No LSB modules are available.
Distributor ID:    Ubuntu
Description:    Ubuntu 22.04.3 LTS
Release:    22.04
Codename:    jammy
Step 2: Use curl command for transferring data with URLs, to import the Elasticsearch public GPG key into APT.
root@linuxhelp:~# curl -fsSL https://artifacts.elastic.co/GPG-KEY-elasticsearch | sudo gpg --dearmor -o /usr/share/keyrings/elastic.gpg
Step 3: Add the Elastic source list to the sources.list.d directory, where apt will search for new sources.
root@linuxhelp:~# echo "deb [signed-by=/usr/share/keyrings/elastic.gpg] https://artifacts.elastic.co/packages/7.x/apt stable main" | sudo tee -a /etc/apt/sources.list.d/elastic-7.x.list
deb [signed-by=/usr/share/keyrings/elastic.gpg] https://artifacts.elastic.co/packages/7.x/apt stable main
Step 4: Update package lists by using the following command
root@linuxhelp:~# apt update
Get:1 https://artifacts.elastic.co/packages/7.x/apt stable InRelease [13.6 kB]
Hit:2 http://in.archive.ubuntu.com/ubuntu jammy InRelease
Get:3 http://security.ubuntu.com/ubuntu jammy-security InRelease [110 kB]
Get:4 http://in.archive.ubuntu.com/ubuntu jammy-updates InRelease [119 kB]
Get:5 https://artifacts.elastic.co/packages/7.x/apt stable/main amd64 Packages [118 kB]
Get:6 https://artifacts.elastic.co/packages/7.x/apt stable/main i386 Packages [85.1 kB]
Get:7 http://in.archive.ubuntu.com/ubuntu jammy-backports InRelease [109 kB]
Get:8 http://in.archive.ubuntu.com/ubuntu jammy-updates/main amd64 Packages [1,103 kB]
Get:9 http://security.ubuntu.com/ubuntu jammy-security/main amd64 Packages [896 kB]
Get:10 http://in.archive.ubuntu.com/ubuntu jammy-updates/main i386 Packages [515 kB]
Get:11 http://in.archive.ubuntu.com/ubuntu jammy-updates/main Translation-en [239 kB]
Get:12 http://in.archive.ubuntu.com/ubuntu jammy-updates/main amd64 DEP-11 Metadata [101 kB]
Get:13 http://in.archive.ubuntu.com/ubuntu jammy-updates/main amd64 c-n-f Metadata [16.0 kB]
Get:14 http://in.archive.ubuntu.com/ubuntu jammy-updates/restricted amd64 Packages [1,036 kB]
Fetched 11.2 MB in 12s (916 kB/s)
Reading package lists... Done
Building dependency tree... Done
Reading state information... Done
91 packages can be upgraded. Run 'apt list --upgradable' to see them.
Step 5: Install the Elasticsearch by using the following command
root@linuxhelp:~# apt install elasticsearch
Reading package lists... Done
Building dependency tree... Done
Reading state information... Done
The following packages were automatically installed and are no longer required:
  libflashrom1 libftdi1-2 libllvm13
Use 'apt autoremove' to remove them.
The following NEW packages will be installed:
  elasticsearch
0 upgraded, 1 newly installed, 0 to remove and 91 not upgraded.
Need to get 323 MB of archives.
After this operation, 540 MB of additional disk space will be used.
Get:1 https://artifacts.elastic.co/packages/7.x/apt stable/main amd64 elasticsearch amd64 7.17.14 [323 MB]
Fetched 323 MB in 41s (7,951 kB/s)
Selecting previously unselected package elasticsearch.
(Reading database ... 202143 files and directories currently installed.)
Preparing to unpack .../elasticsearch_7.17.14_amd64.deb ...
Creating elasticsearch group... OK
Creating elasticsearch user... OK
Unpacking elasticsearch (7.17.14) ...
Setting up elasticsearch (7.17.14) ...
### NOT starting on installation, please execute the following statements to configure elasticsearch service to start a
utomatically using systemd
 sudo systemctl daemon-reload
 sudo systemctl enable elasticsearch.service
### You can start elasticsearch service by executing
 sudo systemctl start elasticsearch.service
Created elasticsearch keystore in /etc/elasticsearch/elasticsearch.keystore
Step 6: After the installation reload the daemon services
root@linuxhelp:~# systemctl daemon-reload
Step 7: Now enable the service by using the following command
root@linuxhelp:~# systemctl enable elasticsearch
Synchronizing state of elasticsearch.service with SysV service script with /lib/systemd/systemd-sysv-install.
Executing: /lib/systemd/systemd-sysv-install enable elasticsearch
Created symlink /etc/systemd/system/multi-user.target.wants/elasticsearch.service → /lib/systemd/system/elasticsearch.service.
Step 8: Start the service by using the following command
root@linuxhelp:~# systemctl start elasticsearch
Step 9: Check the status of the service by using the following command
root@linuxhelp:~# systemctl status  elasticsearch
● elasticsearch.service - Elasticsearch
     Loaded: loaded (/lib/systemd/system/elasticsearch.service; enabled; vendor preset: enabled)
     Active: active (running) since Sat 2023-10-21 08:12:19 IST; 37s ago
       Docs: https://www.elastic.co
   Main PID: 6817 (java)
      Tasks: 77 (limit: 4556)
     Memory: 2.1G
        CPU: 1min 48.427s
     CGroup: /system.slice/elasticsearch.service
             ├─6817 /usr/share/elasticsearch/jdk/bin/java -Xshare:auto -Des.networkaddress.cache.ttl=60 -Des.networkad>
             └─6999 /usr/share/elasticsearch/modules/x-pack-ml/platform/linux-x86_64/bin/controller

Oct 21 08:11:37 linuxhelp systemd[1]: Starting Elasticsearch...
Oct 21 08:11:45 linuxhelp systemd-entrypoint[6817]: Oct 21, 2023 8:11:45 AM sun.util.locale.provider.LocaleProviderAda>
Oct 21 08:11:45 linuxhelp systemd-entrypoint[6817]: WARNING: COMPAT locale provider will be removed in a future release
Oct 21 08:12:19 linuxhelp systemd[1]: Started Elasticsearch.
Step 10: Configure the elasticsearch.yml file by using the following command
root@linuxhelp:~# vim /etc/elasticsearch/elasticsearch.yml
Step 11: After the changes restart the elasticsearch service by using the following command
root@linuxhelp:~# systemctl restart elasticsearch
Step 12: Check the status of the Elasticsearch service by using the following command
root@linuxhelp:~# systemctl status  elasticsearch
● elasticsearch.service - Elasticsearch
     Loaded: loaded (/lib/systemd/system/elasticsearch.service; enabled; vendor preset: enabled)
     Active: active (running) since Sat 2023-10-21 08:14:38 IST; 12s ago
       Docs: https://www.elastic.co
   Main PID: 7134 (java)
      Tasks: 60 (limit: 4556)
     Memory: 2.2G
        CPU: 1min 20.875s
     CGroup: /system.slice/elasticsearch.service
             ├─7134 /usr/share/elasticsearch/jdk/bin/java -Xshare:auto -Des.networkaddress.cache.ttl=60 -Des.networkad>
             └─7321 /usr/share/elasticsearch/modules/x-pack-ml/platform/linux-x86_64/bin/controller

Oct 21 08:14:04 linuxhelp systemd[1]: Starting Elasticsearch...
Oct 21 08:14:11 linuxhelp systemd-entrypoint[7134]: Oct 21, 2023 8:14:11 AM sun.util.locale.provider.LocaleProviderAda>
Oct 21 08:14:11 linuxhelp systemd-entrypoint[7134]: WARNING: COMPAT locale provider will be removed in a future release
Oct 21 08:14:38 linuxhelp systemd[1]: Started Elasticsearch.
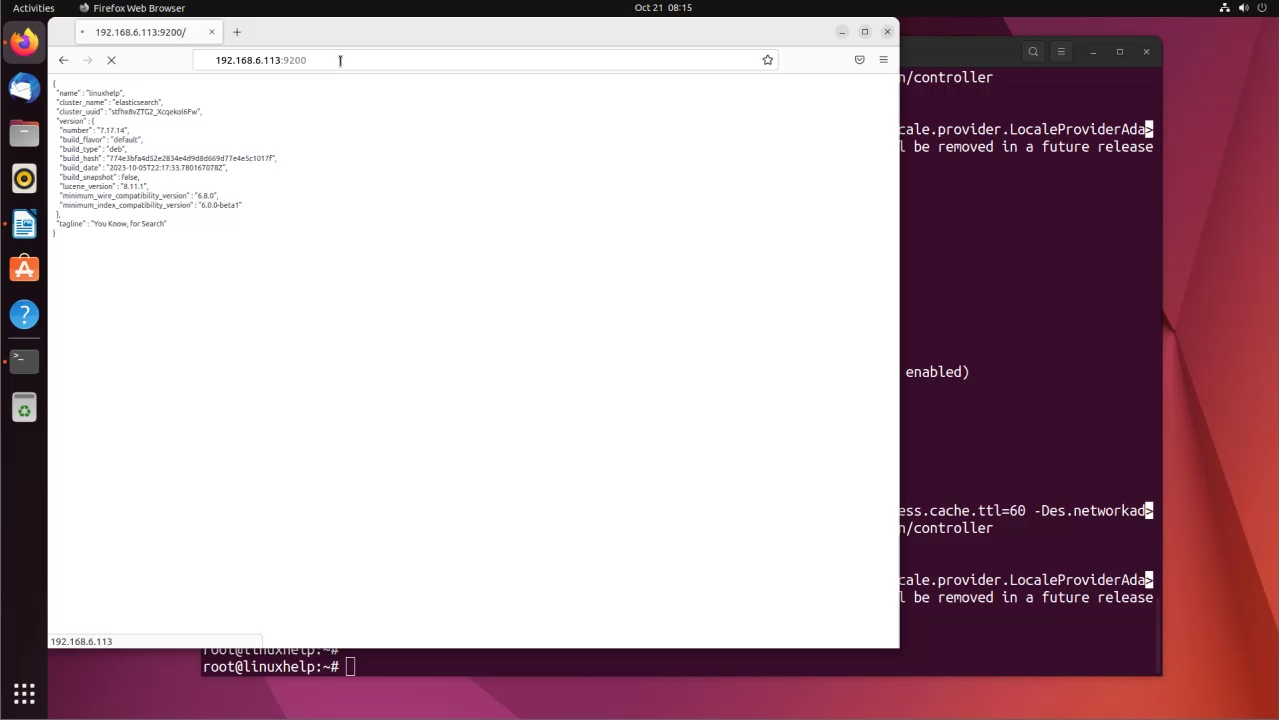
Now go to the browser and search with your ip along with the port number you will see the following page
Conclusion:
We have reached the end of this article. In this guide, we have walked you through the steps required to install Elasticsearch on Ubuntu 22.04. Your feedback is much welcome.
Comments ( 0 )
No comments available