How to configure RAID1 on CentOS 7
To configure RAID1 on CentOS 7
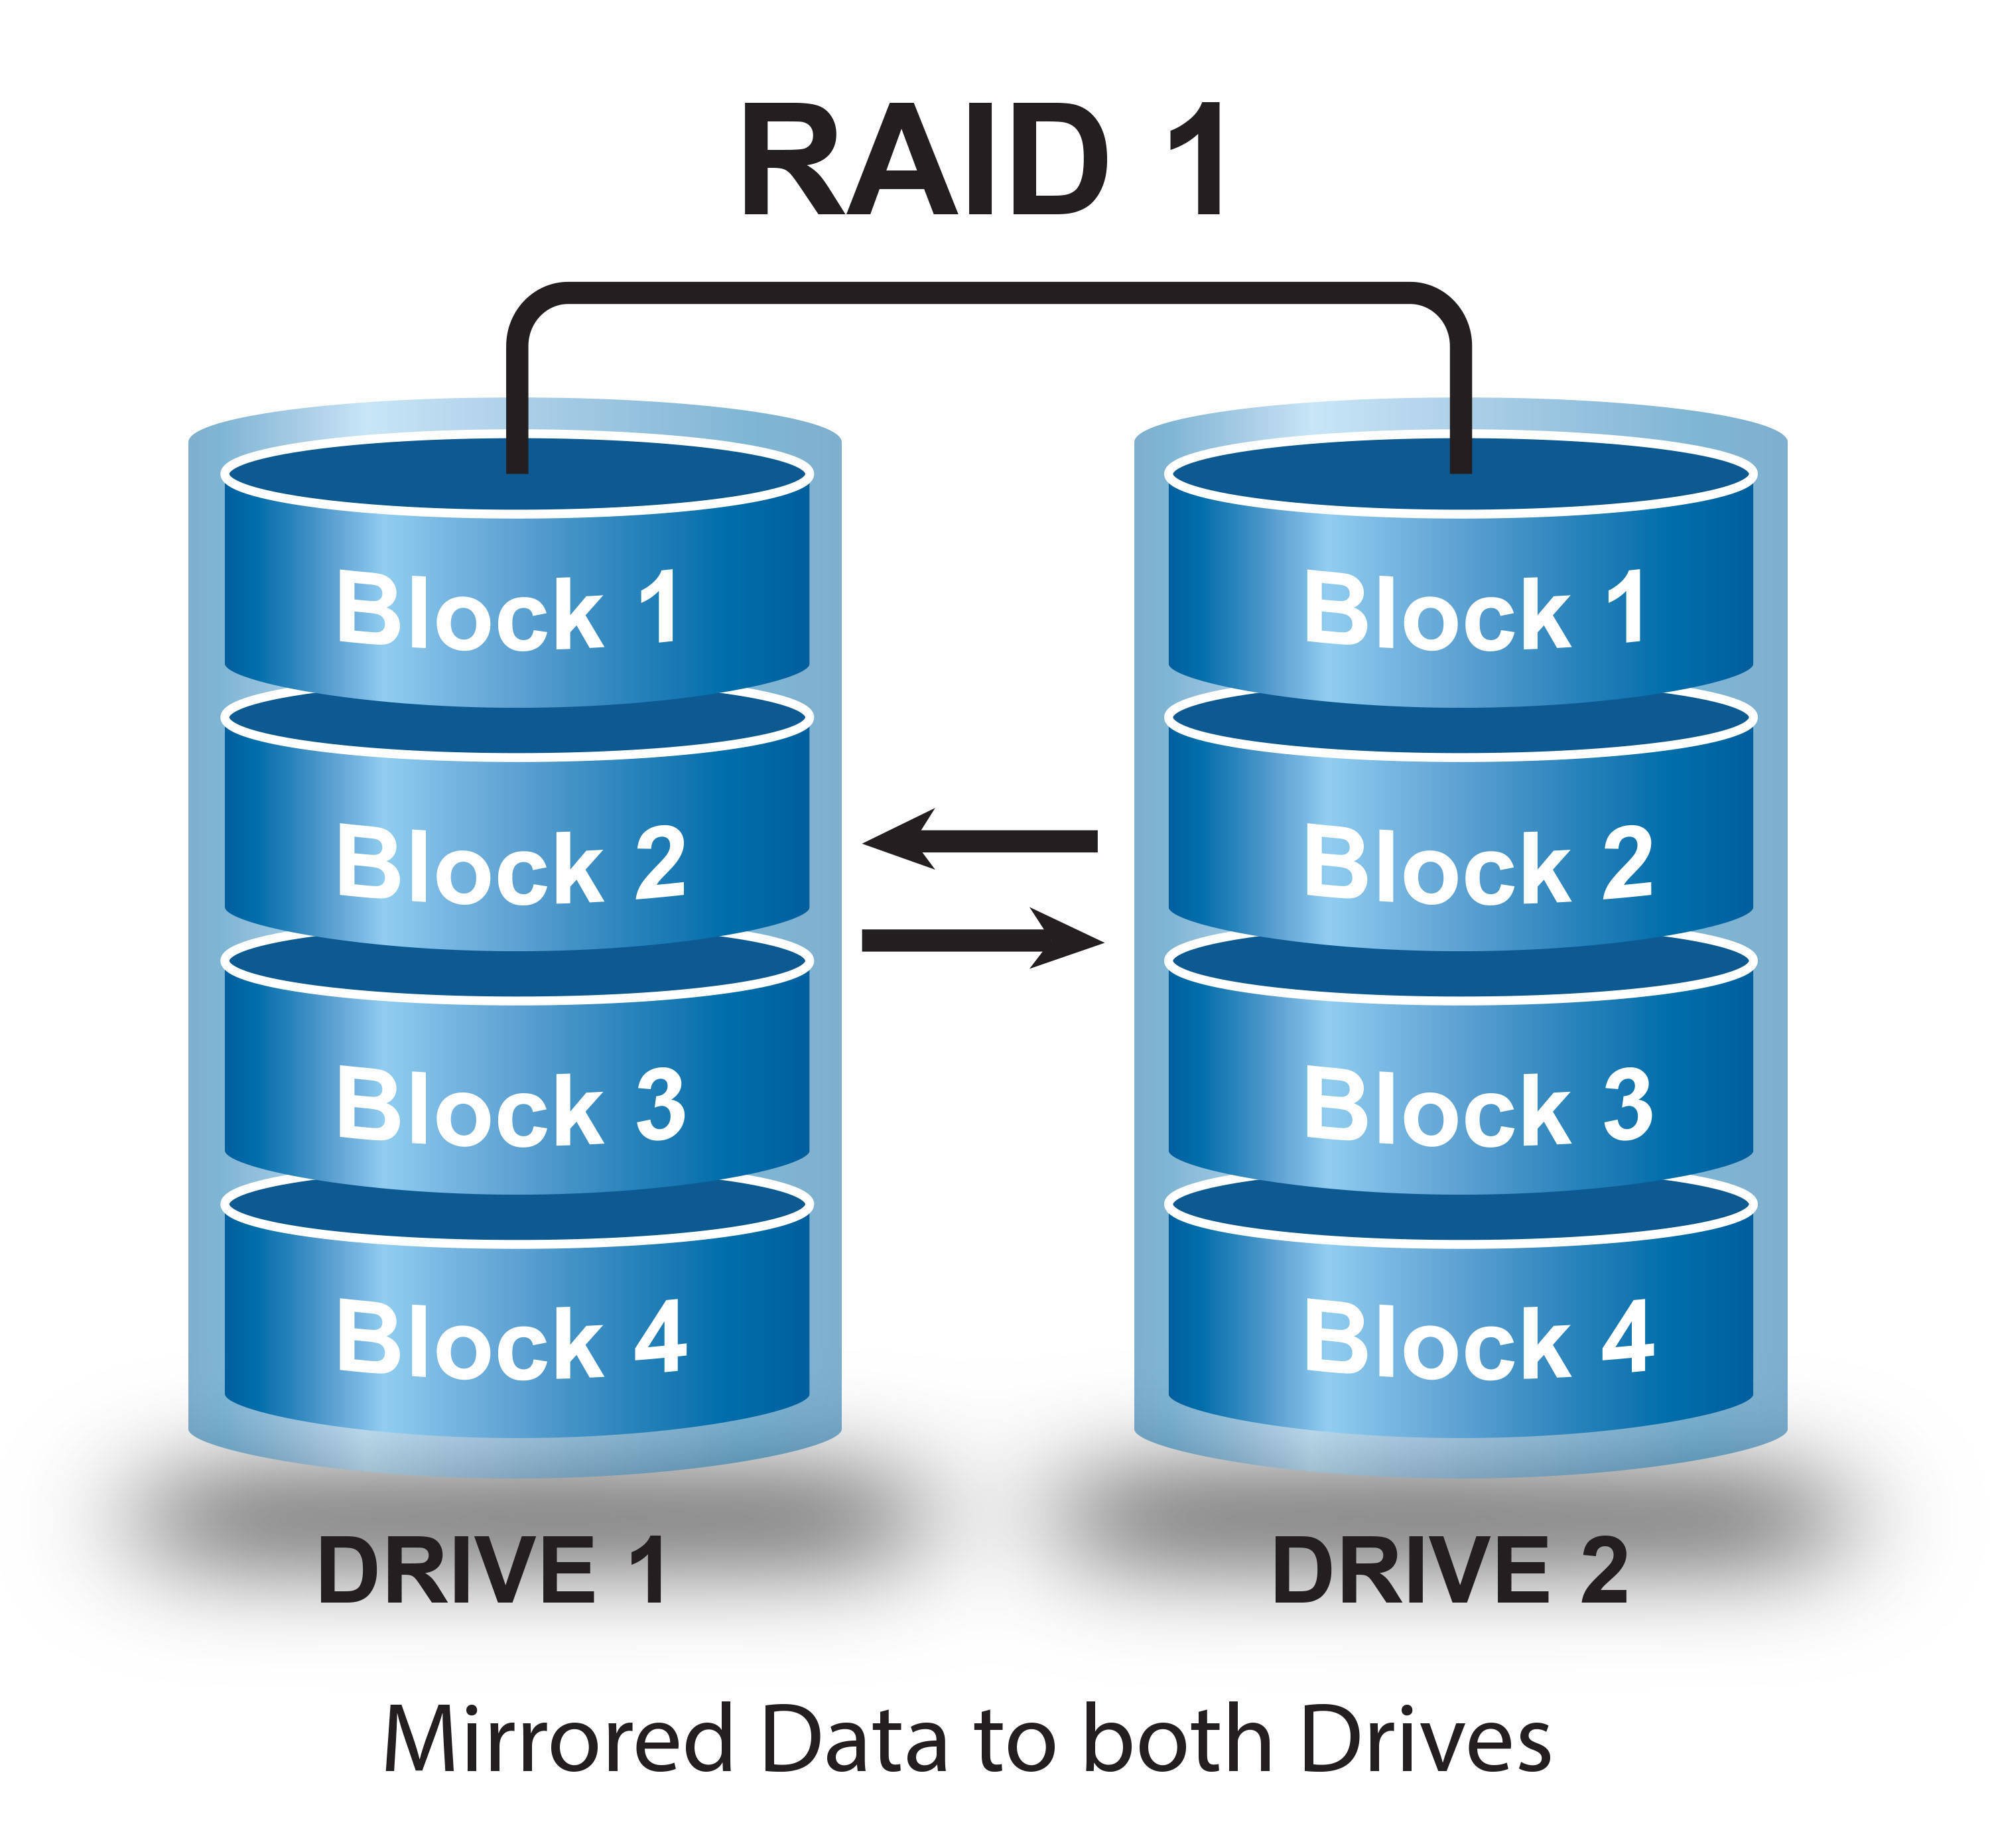
RAID (Redundant Array of Independent Disks) is a data storage virtualization technology that combines multiple physical disk drive components into a single logical unit for the purposes of data redundancy, performance improvement, or both. RAID 1, in particular, consists of an exact copy (or mirror) of a set of data on two or more disks a classic RAID 1 mirrored pair contains two disks. This configuration offers no parity, striping, or spanning of disk space across multiple disks, since the data is mirrored on all disks belonging to the array, and the array can only be as big as the smallest member disk. This layout is useful when read performance or reliability is more important than write performance or the resulting data storage capacity. This tutorial covers the configuration procedure of RAID 1 on CentOS 7.
Performance
- No data loss in Mirroring if one disk fails, because we have the same content in both disks.
- Reading will be good than writing data to drive
Disadvantage
- 50% of storage space will be lost. Means if we have two disk with 500GB size total, it will be 1TB but in Mirroring it will only show us 500GB.
Pre-Requisite
Minimum 2 Hard disks (Mandatory) to configure RAID1
Configuring RAID
Before you begin with the process, you need to check the devices available for the configuration of RAID. Run the following command for the same purpose, which displays the available devices as output.
[root@server2 Desktop]# lsblk
NAME   MAJ:MIN RM  SIZE RO TYPE MOUNTPOINT
sda      8:0    0   30G  0 disk
??sda1   8:1    0  500M  0 part /boot
??sda2   8:2    0 14.7G  0 part /
??sda3   8:3    0  2.5G  0 part [SWAP]
sdb      8:16   0   10G  0 disk
sdc      8:32   0   10G  0 disk
sr0     11:0    1  3.9G  0 rom
And then, you need to do partition for the available disks in the following manner.
[root@server2 ~]# fdisk /dev/sdb Command (m for help): n Select (default p): p Partition number (1-4, default 1): 1 First sector (2048-20971519, default 2048): Using default value 2048 Last sector, +sectors or +size{K,M,G} (2048-20971519, default 20971519): +5G Partition 1 of type Linux and of size 5 GiB is set Command (m for help): t Hex code (type L to list codes): fd Command (m for help): pCommand (m for help): w
Repeat the same steps to create partition for another block.
Install mdadm package which is very essential for this configuration. Run the following command for the same purpose.
[root@server2 ~]# yum install mdadm -y
Loaded plugins: fastestmirror, langpacks
Loading mirror speeds from cached hostfile
 * base: centos.myfahim.com
 * extras: centos.myfahim.com
* updates: centos.myfahim.com
.
.
.

  Verifying  : mdadm-4.0-5.el7.x86_64                                                   1/2
  Verifying  : mdadm-3.2.6-31.el7.x86_64                                              2/2

Updated:
  mdadm.x86_64 0:4.0-5.el7

Complete!
And then, check whether if the block details are configured already by making use of the following command.
[root@server2 Desktop]# mdadm -E /dev/sd[b-c]1
mdadm: No md superblock detected on /dev/sdb1.
mdadm: No md superblock detected on /dev/sdc1.
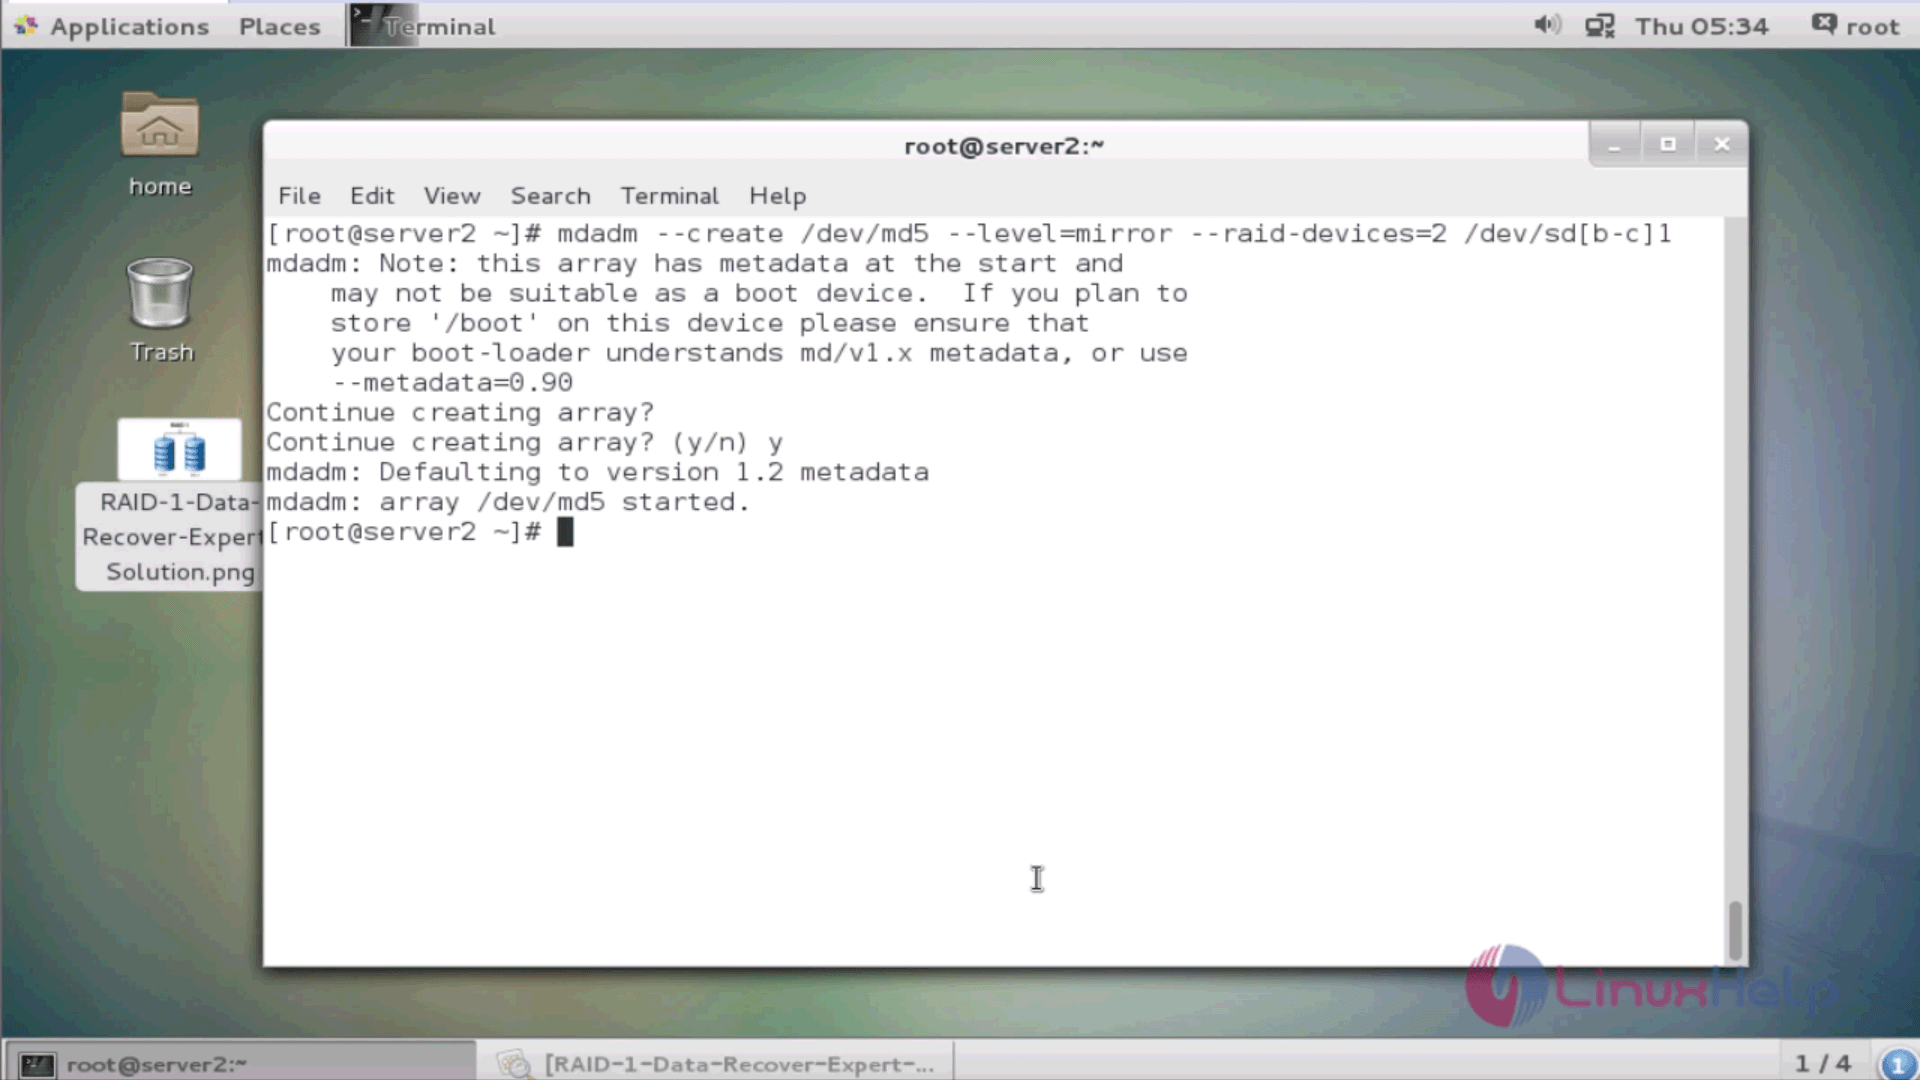
Later, you need to create md device. For that, you need to run the following command which creates the md device. You should specify the mirror level, number of devices available, and finally mention those devices name in that command.
[root@server2 Desktop]# mdadm --create /dev/md5 --level=mirror --raid-devices=2 /dev/sd[b-c]1
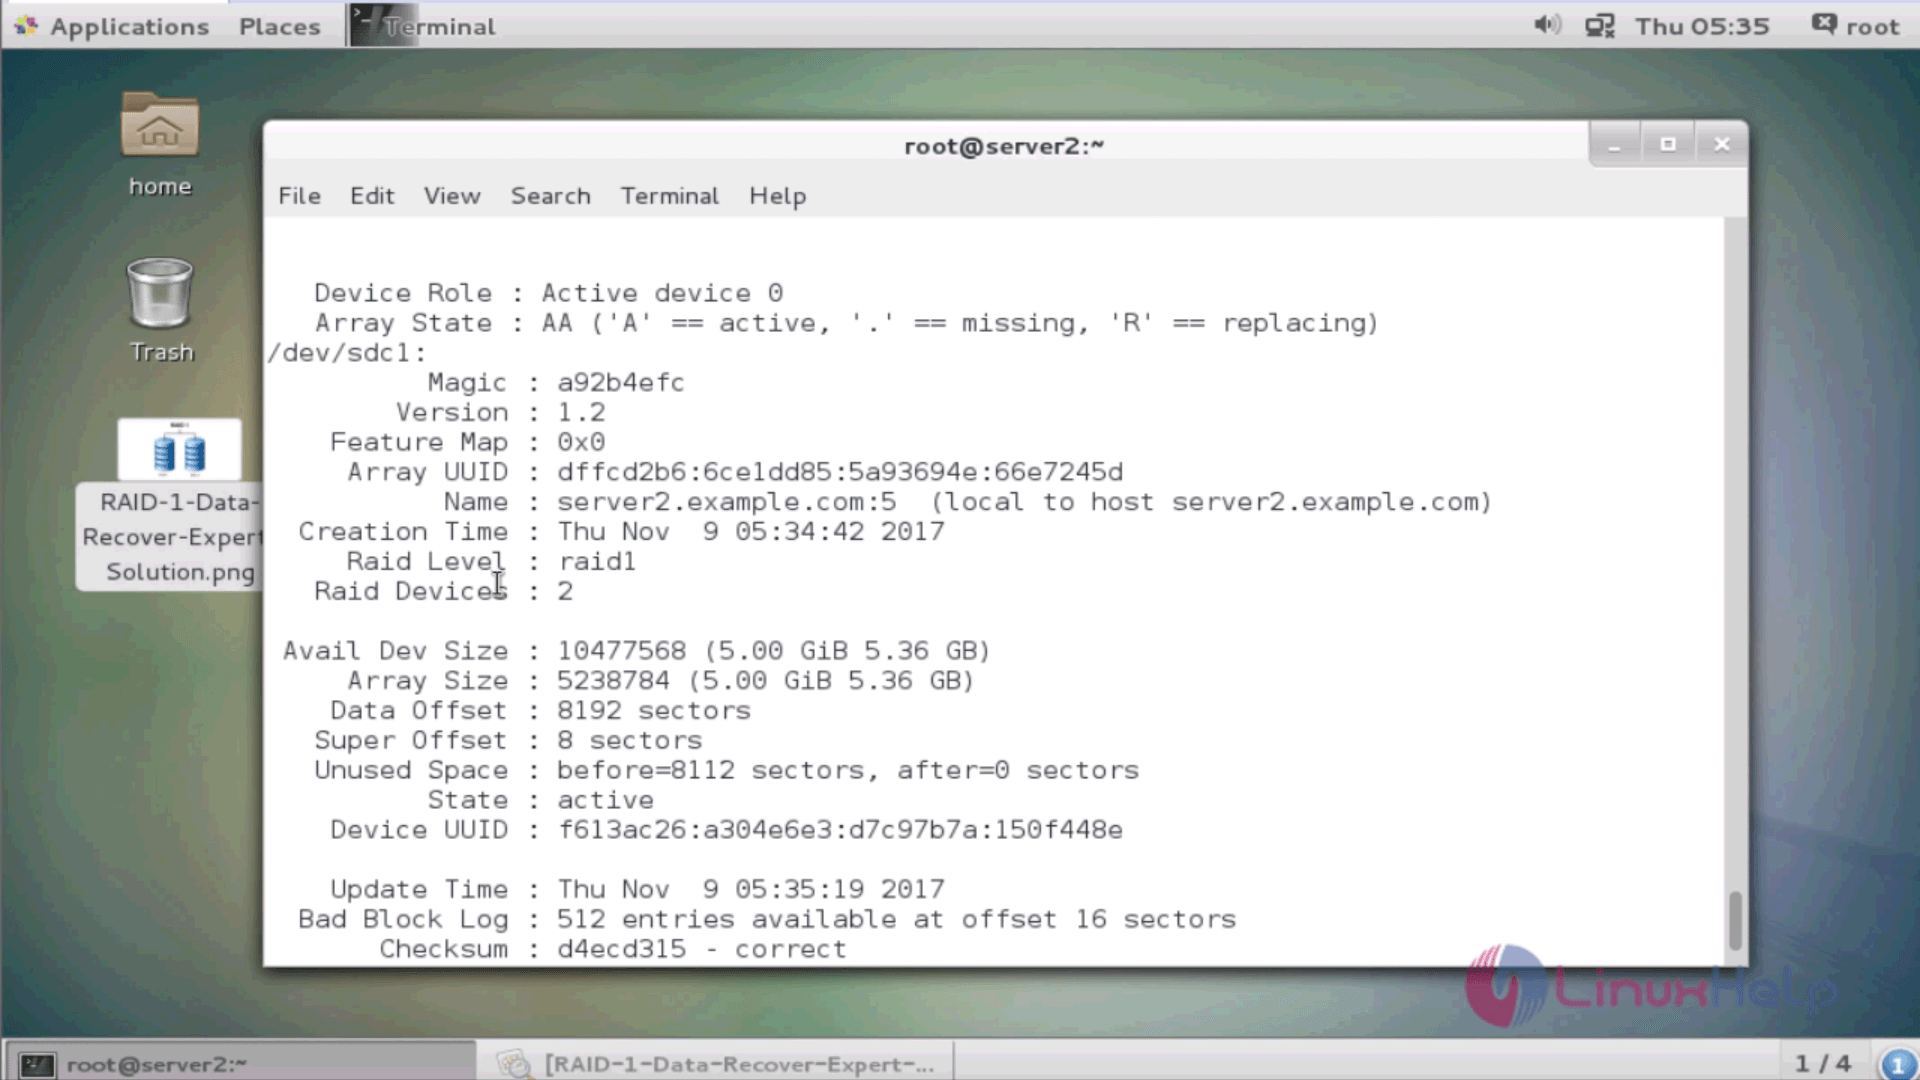
After that, you need to verify if the RAID devices' level is same as your configuration.
[root@server2 Desktop]# mdadm -E /dev/sd[b-c]1

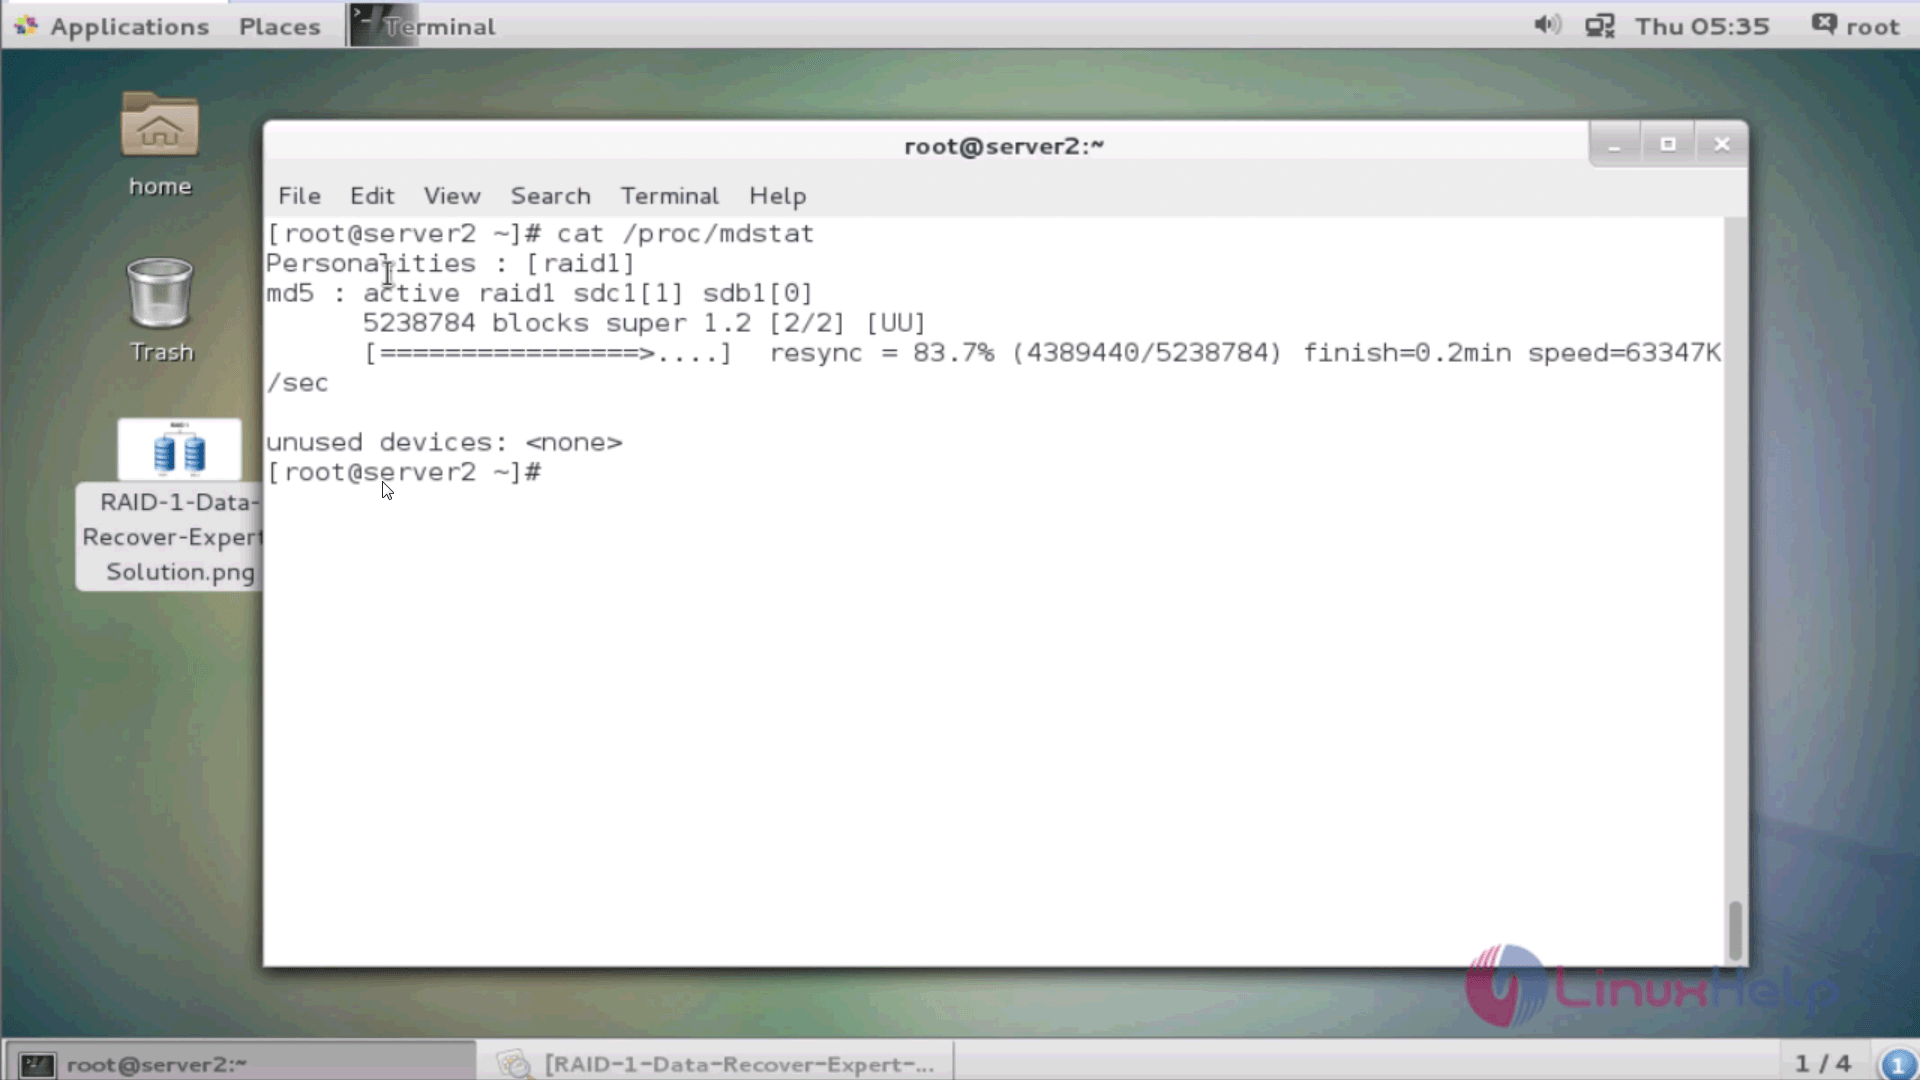
You can also check the status of the configuration in another manner. For that, you need to open the mdstat with the help of the following command.
[root@server2 Desktop]# cat /proc/mdstat
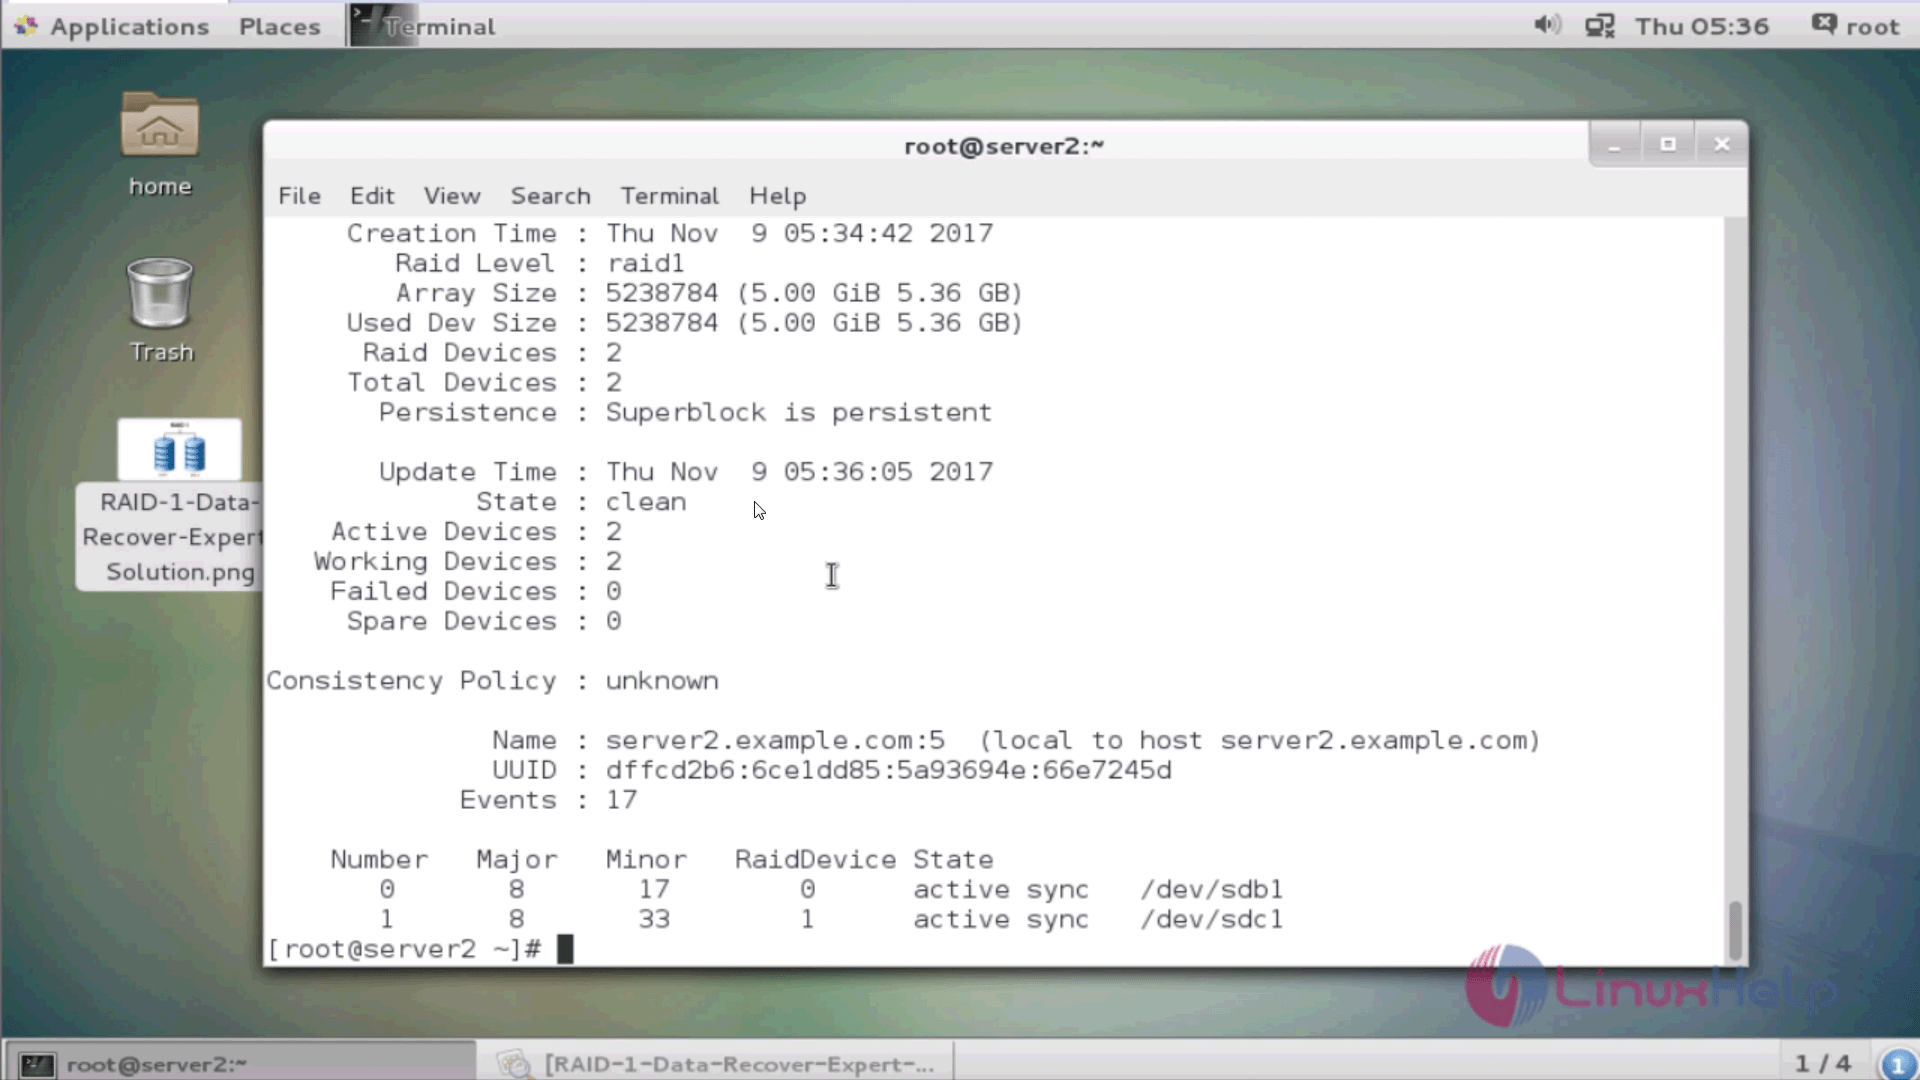
Once it is done, you should also check the status of the md device. The md device contains the details about the number of devices which are active, working, failed and spare. Also, the order of the devices along with other details.
[root@server2 Desktop]# mdadm --detail /dev/md5
And then, you need to create a mount point directory named raid1, which shall be done by using mkdir command.
[root@server2 Desktop]# mkdir /mnt/raid1
Next, you should permanently mount the RAID using UUID of that device. So run the following command which generates its UUID.
[root@server2 raid1]# blkid /dev/md5
/dev/md5: UUID=" 24c0af2e-630b-48ef-a546-fe805bdc6031"  TYPE=" ext4"
And, use that UUID along with the mount point to permanently mount that RAID device.
[root@server2 raid1]# vim /etc/fstab
UUID=24c0af2e-630b-48ef-a546-fe805bdc6031    /mnt/raid1    ext4    defaults 0 0
Execute mount command and check the status of mounted RAID device.
[root@server2 raid1]# mount -a
[root@server2 raid1]# df -h
Filesystem      Size  Used Avail Use% Mounted on
/dev/sda2        15G  4.5G   11G  31% /
devtmpfs        741M     0  741M   0% /dev
tmpfs              749M  140K  749M   1% /dev/shm
tmpfs              749M  8.9M  741M   2% /run
tmpfs              749M     0  749M   0% /sys/fs/cgroup
/dev/md5        4.8G   20M  4.6G   1% /mnt/raid1
Finally save the RAID configuration by using the following command.
[root@server2 raid1]# mdadm --detail --scan --verbose > > /etc/mdadm.conf
With this, the configuration of RAID1 comes to an end.
Comments ( 0 )
No comments available